
Abstract
In response to the urgent need for rapid, climate-adaptive housing driven by the climate crisis and global migration, this research explores the architectural potential of combinatorial spatial assemblages. These systems, built through the aggregation of discrete components, offer emergent spatial qualities but are often driven by random or heuristic rules, making them difficult to control or align with design objectives. This research aims to investigate how the growth of spatial combinatorial assemblages can be guided to adapt to a fixed set of adjustable spatial criteria.
By introducing reinforcement learning (RL) as a generative method to control the growth of assemblages, two objectives can be achieved: (1) a rule-based assessment of non-subjective architectural conditions essential for structural and environmental coherence, as well as for overall architectural validity, and (2) responsiveness to a fixed set of spatial evaluation criteria whose values can be adjusted by the architect on a continuous scale and are introduced as target objectives during the training process. Unlike typical voxel-based methods, this research proposes a catalogue of living units with varying sizes and geometries. Implemented through a custom pipeline combining Python (Stable Baselines 3) with Rhino and Grasshopper. This methodology is applied to a city block in Barcelona, where mixed-use developments, municipal regulations and environmental conditions are guiding the evolution of a viable residential project within the city.

Climate change has become one of the primary drivers of forced displacement around the world, giving rise to the phenomenon known as climate migration.
Here are some examples of statistics in the last year, forcing people to move to other cities and countries.
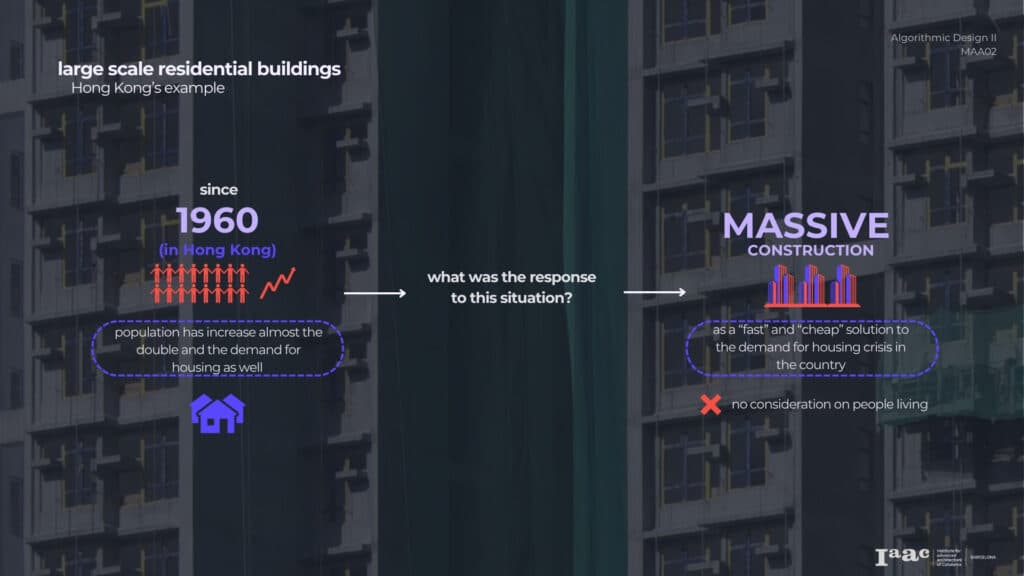
In 1960, the uncontrollable increase of population in Hong Kong created a high demand on house living, giving as a fast and cheap solution, the massive construction of housing projects around the city with no consideration into human aspects, only time, money and not even aesthetics.
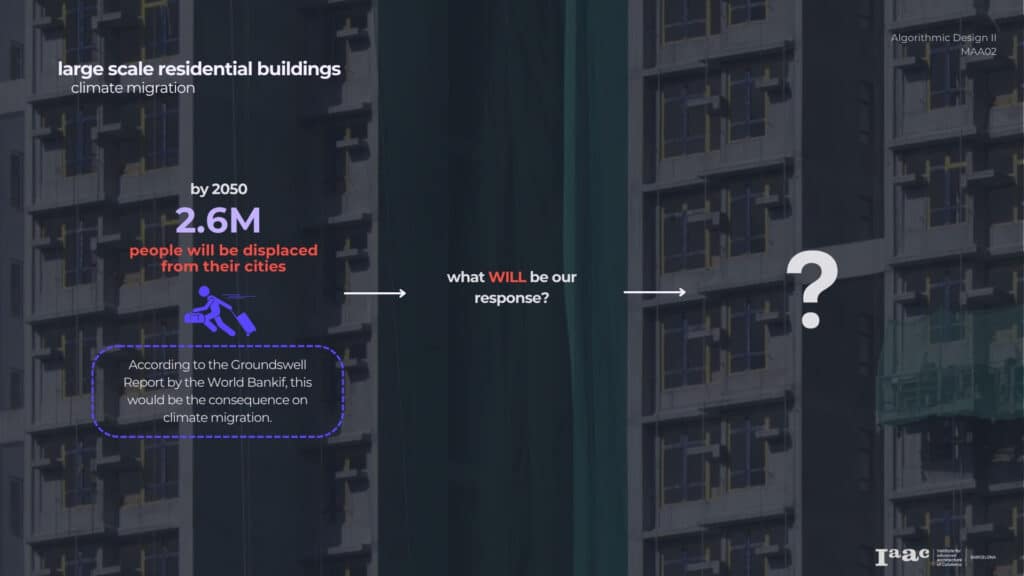
Now on, a report from de World Bankif, said that by 2050, more than 2.6M of people, will be displaced from their cities due to climate change issues which it means, a high demand of housing to new and safety areas. The question is, what will be our response?
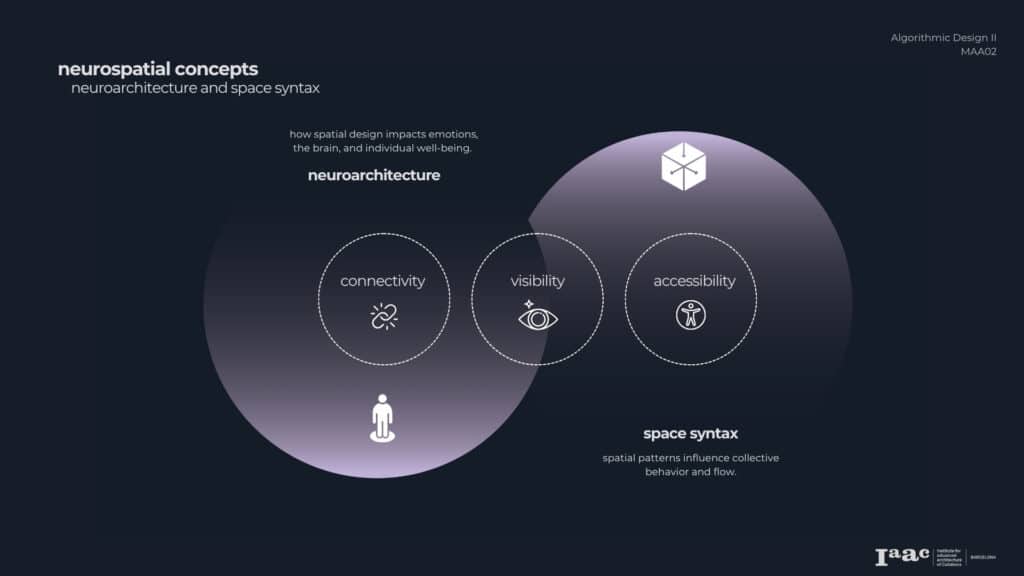
Here we see a comparative framework between Neuroarchitecture and Space Syntax
Neuroarchitecture, focuses on how spatial design impacts emotions and the brain.
On the right, we have Space Syntax, which analyzes spatial patterns to predict collective behavior and movement. Two fields that evaluate spaces through different lenses but share common concepts as connectivity, visibility and accessibility
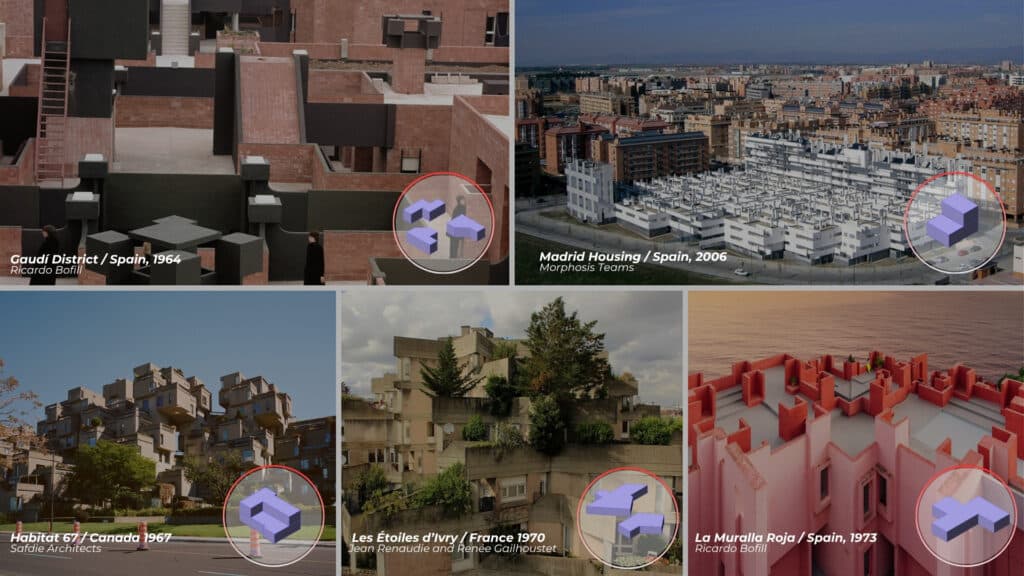
Since the 1970s, spatial assemblages emerged as architectural responses to urban density and the need for efficient, collective living — as seen in projects like Ricardo Bofill’s Gaudí District and La Muralla Roja in Spain, Habitat 67 in Canada, or Les Étual d’Ivry in France. This approach continues today in projects like Madrid Housing (2006), showing how assemblages remain relevant in addressing collective living needs.
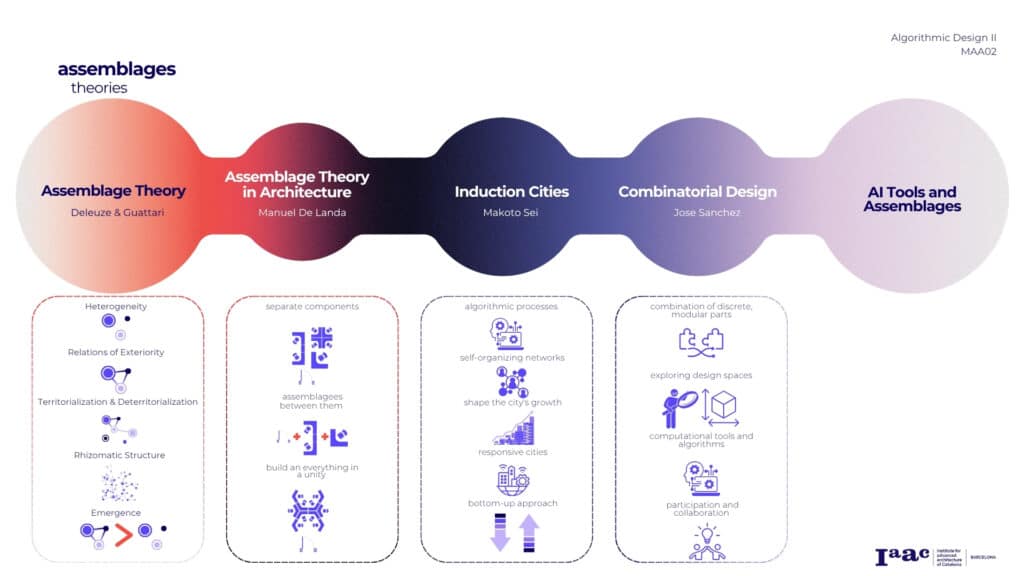
Let’s look at the ideas behind assemblages — how different thinkers have helped us see them not just as ways to build space, but as part of how we live and connect with the world.The Assemblage theory was invented by French philosopher Deleuze and psychoanalyst Guattari in the 80’s.
And It emphasizes diversity in components (heterogeneity), their ability to interact without losing identity and their dynamic nature to stabilize or change over time. The ideas of Deleuze & Guattari inspired Manuel DeLanda to introduce the into architectural workflows and so on with Makoto Sei and José Sánchez to further elaborate in the future.
This next section introduces the collaborative work of Alessio Erioli and Andrea Graziano, highlighting the development of Assembler plugin and a series of research projects that explore learning-based generative flows for creating architectural assemblages through reinforcement learning and adaptive design processes.
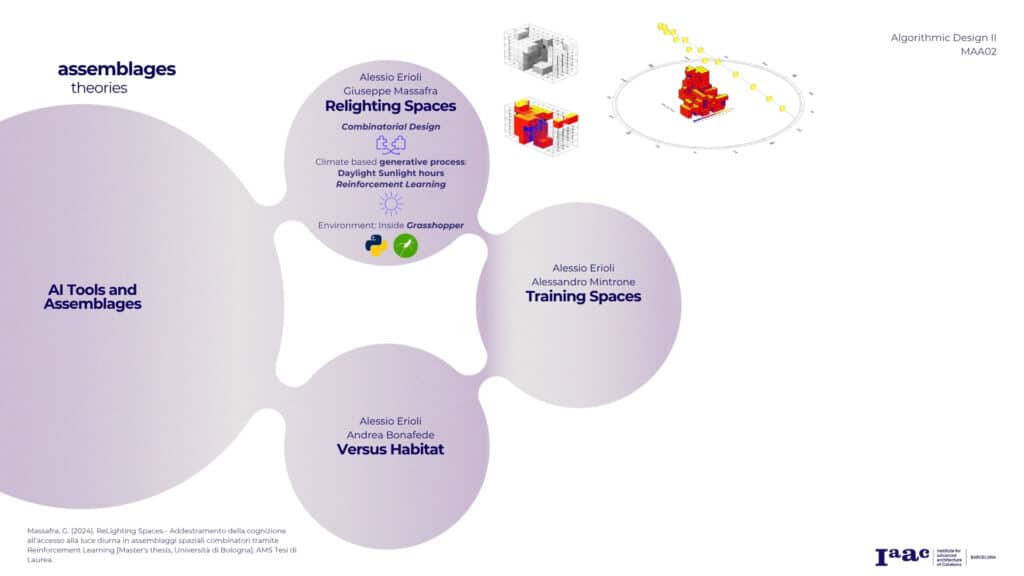
First of it, in Massafra’s
with ‘ReLighting Spaces’ uses reinforcement learning to design adaptive spatial assemblages that optimize daylight access.
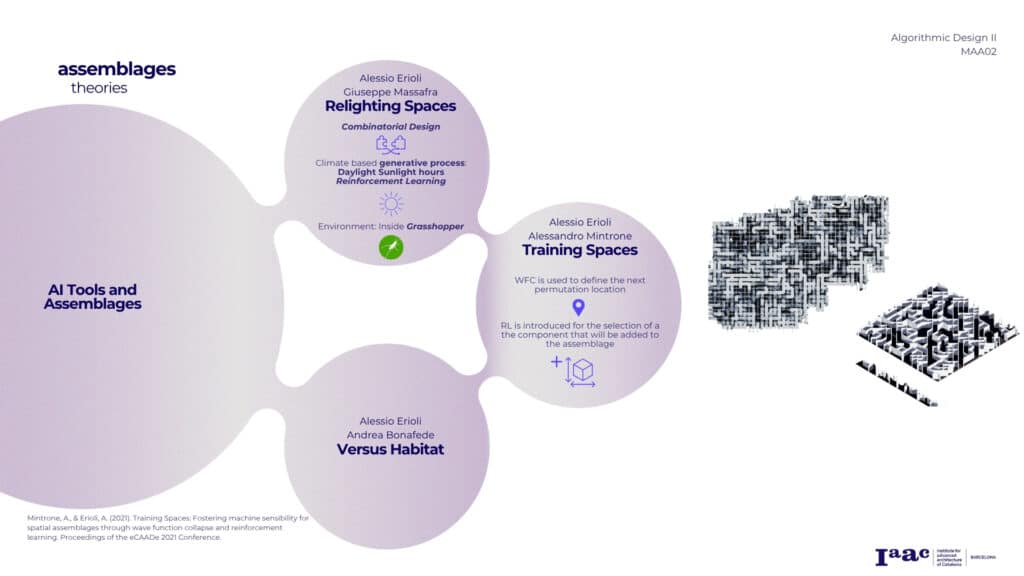
Mintrone’s ‘Training Spaces’ combines reinforcement learning and Wave Function Collapse to control the growth of assemblages.
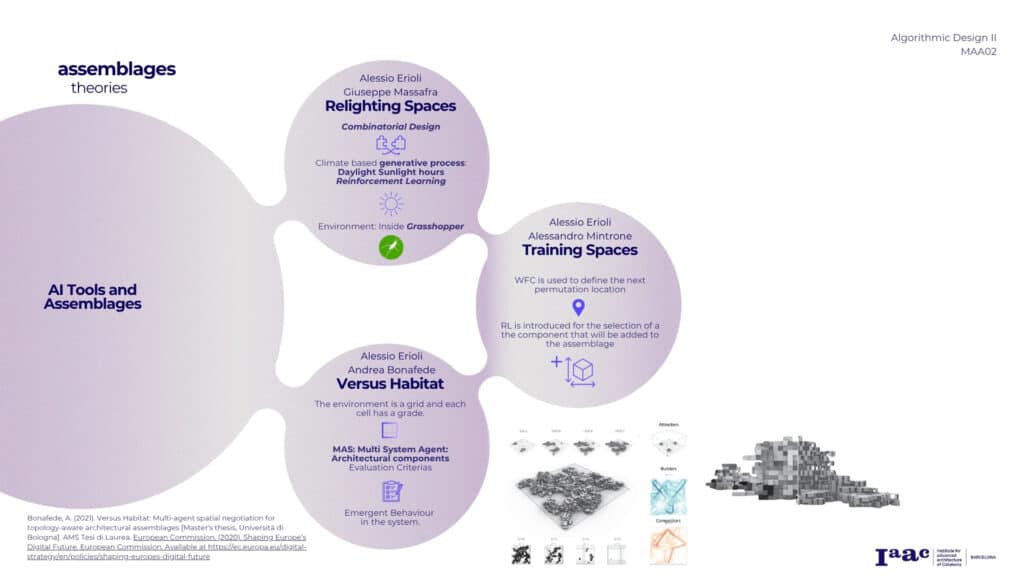
Versus Habitat” by Bonafede explores multi-agent systems for generating large-scale architectural assemblages.
And for the last part of our State of the Art – few relevant works that integrate Machine learning tools in Architecture Combinatorial Problems.
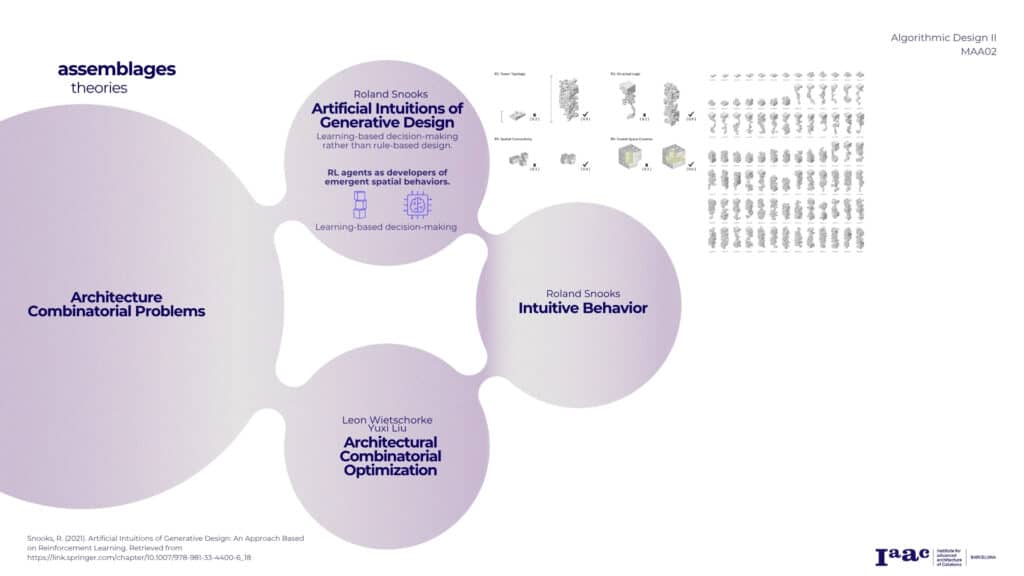
In Artificial Intuitions of Generative Design, Roland Snooks introduces a generative workflow where reinforcement learning guides a random walk algorithm to develop voxel-based architectural forms
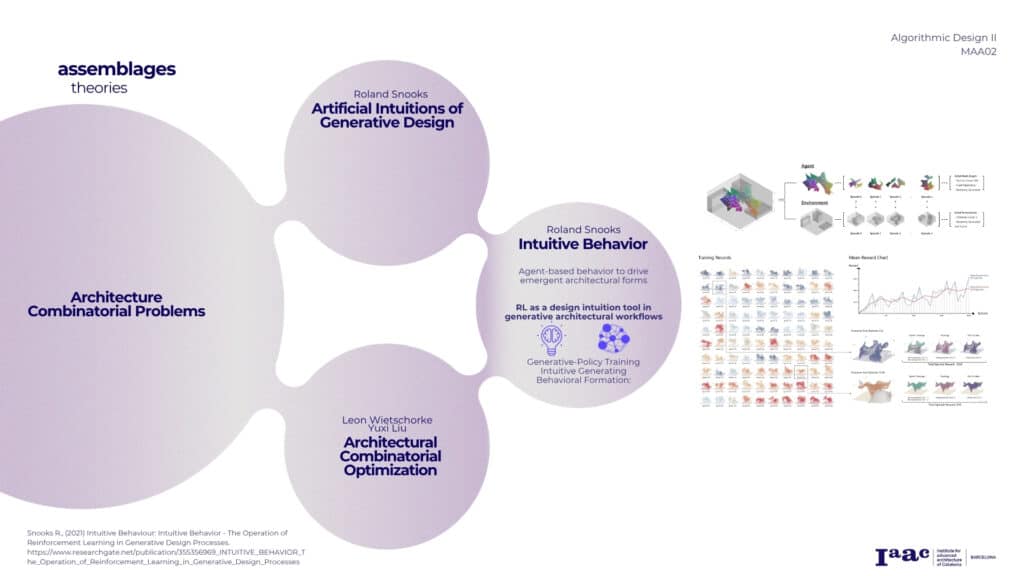
In the second paper, Intuitive Behavior, he presents a combines reinforcement learning with behavioral formation, to design a mesh based pavilion
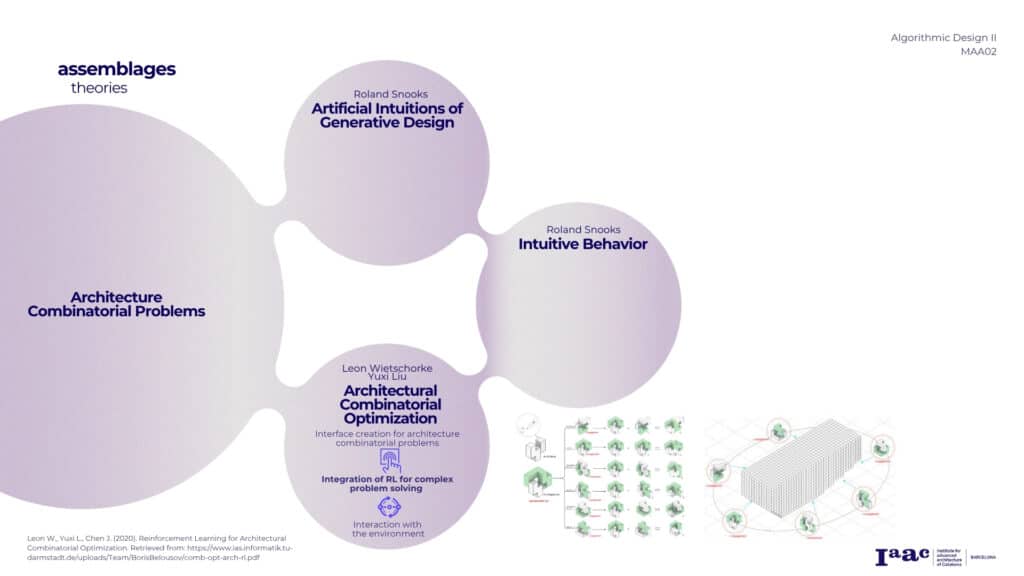
last, In Reinforcement Learning for Architectural Combinatorial Optimization, Veechorkee presents a Grasshopper-based interface that links architectural design workflows with reinforcement learning algorithms.
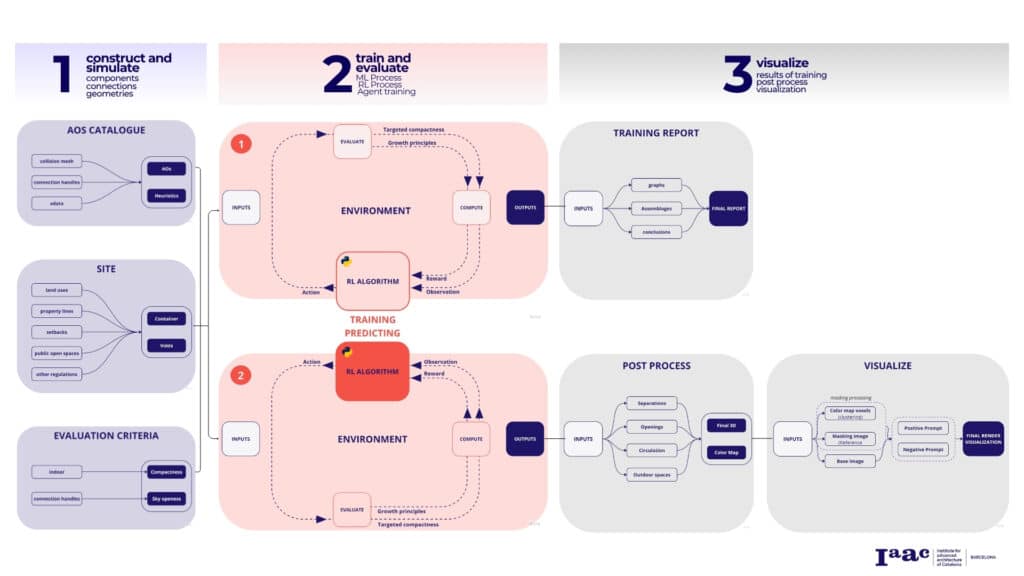
During this research, we divided our process into 3 main chapters.
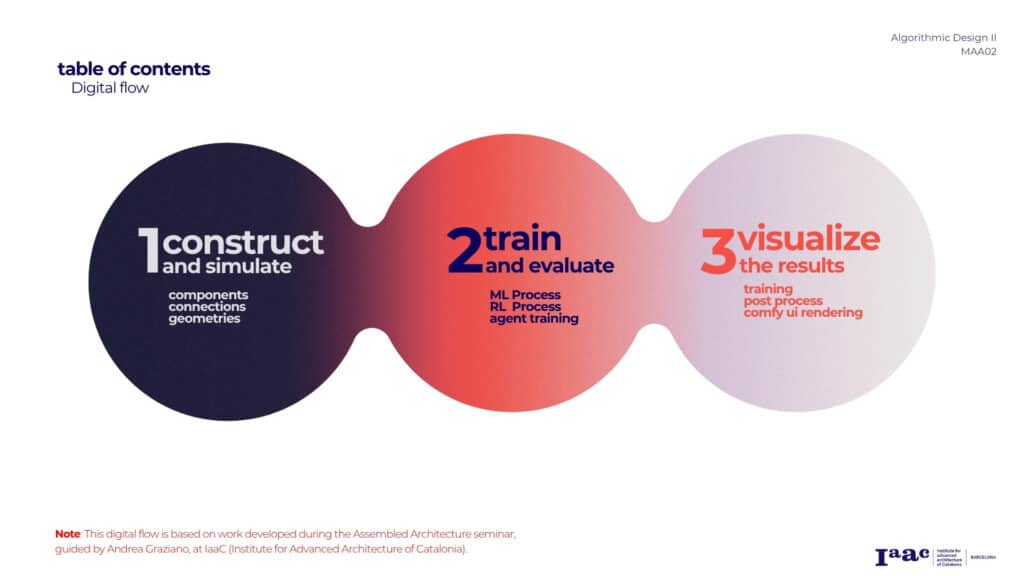
In the first chapter, construct and simulate, we focused in the design of our components, their connection rules and their spatial geometries.
In the second chapter, we will further elaborate on conducted experiments of Training Processes to reach specific evaluation Criteria targets
In the third one, we will be able to start with a brief introduction of the final user output, implementing a post processing of the assemblages and a final rendering visualization.
Let’s start with the design of our components.
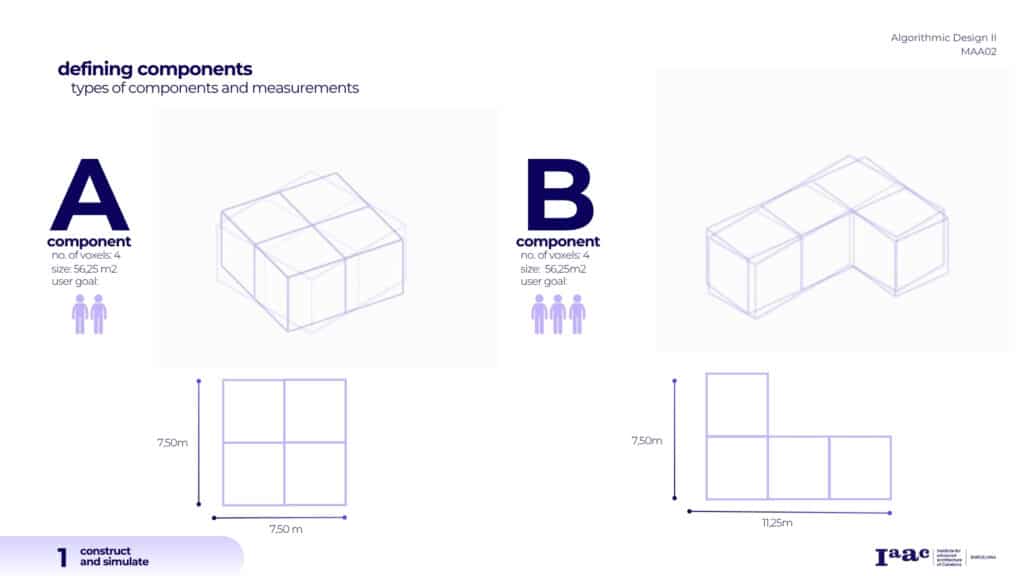
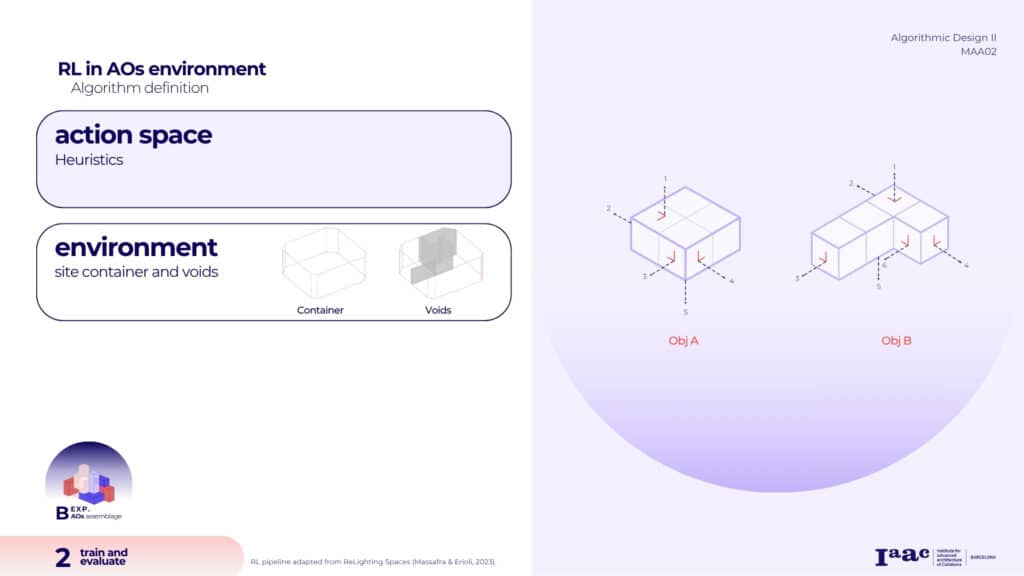
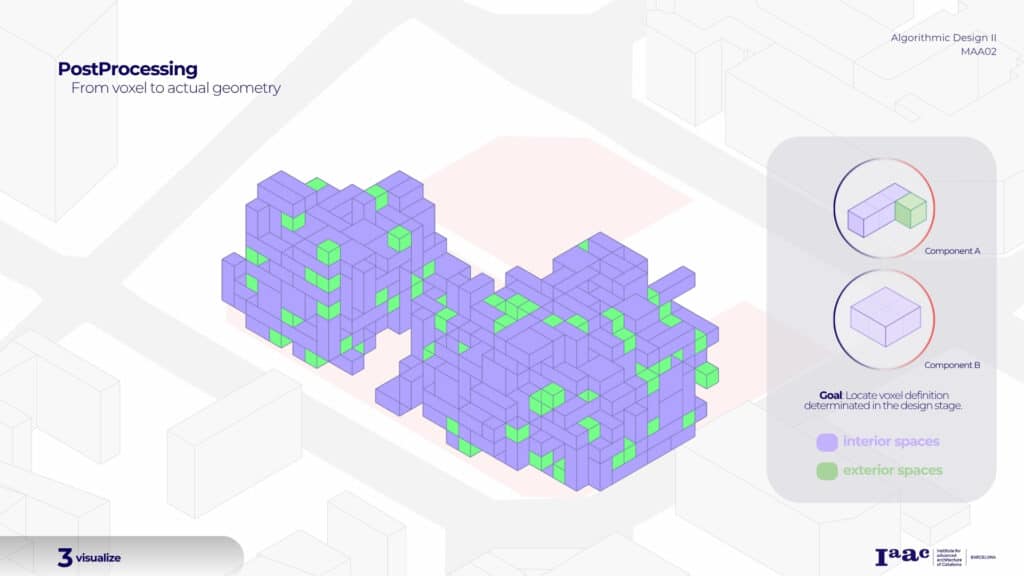
For the development of our components, we decided to start from voxels of 3.75m by 3.75m that will allow to lead us to 2 different types of components, both components with 4 voxels but different arrangement.
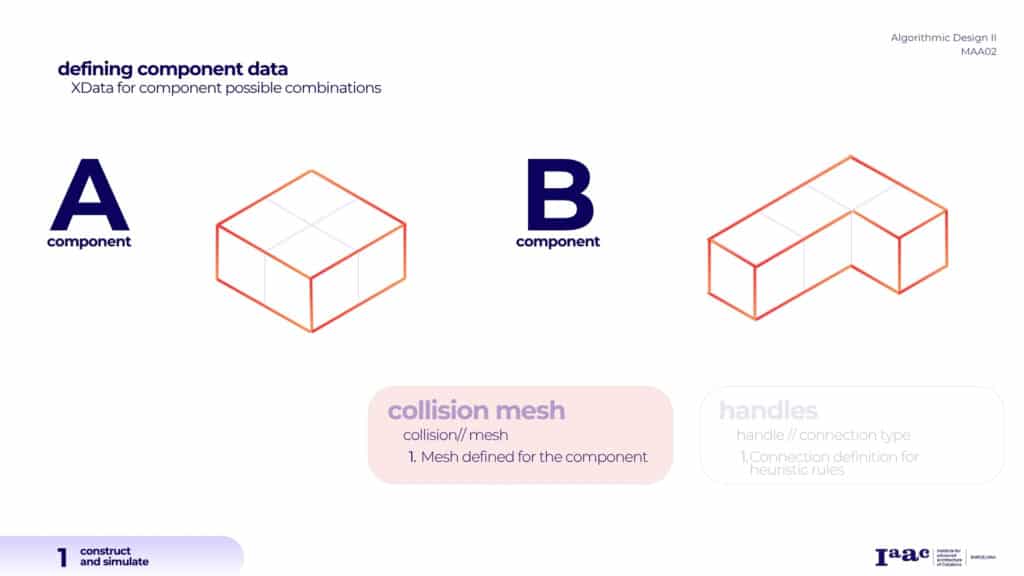
Each Assembly Object is configured by:
a collision mesh which define the space it encapsulate
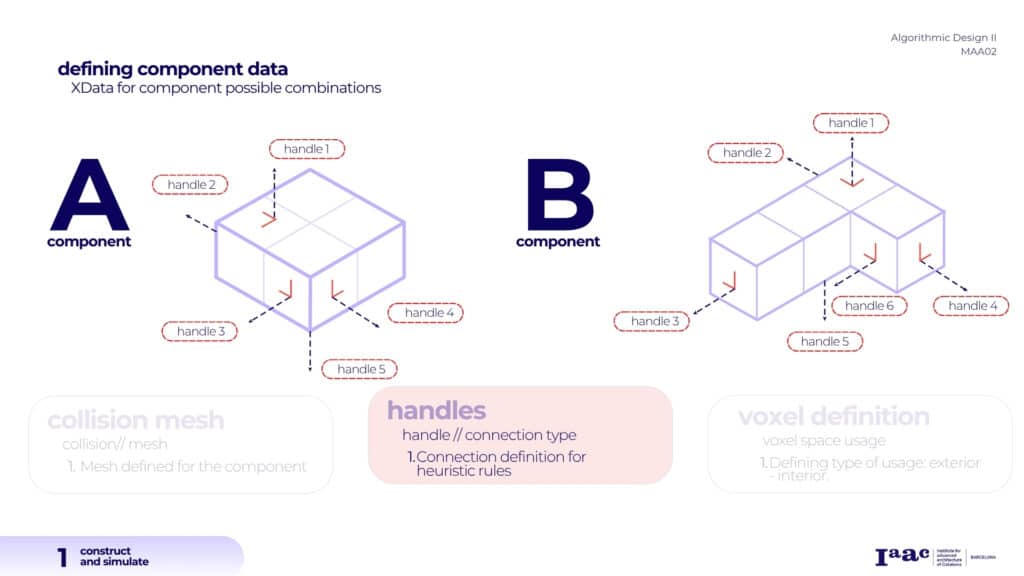
Likewise, the defined handles will allow us to create various combinations of components, which is a crucial part of the assembly process.
Component A has a definition of 5 handles and Component B a definition of 6 handles.
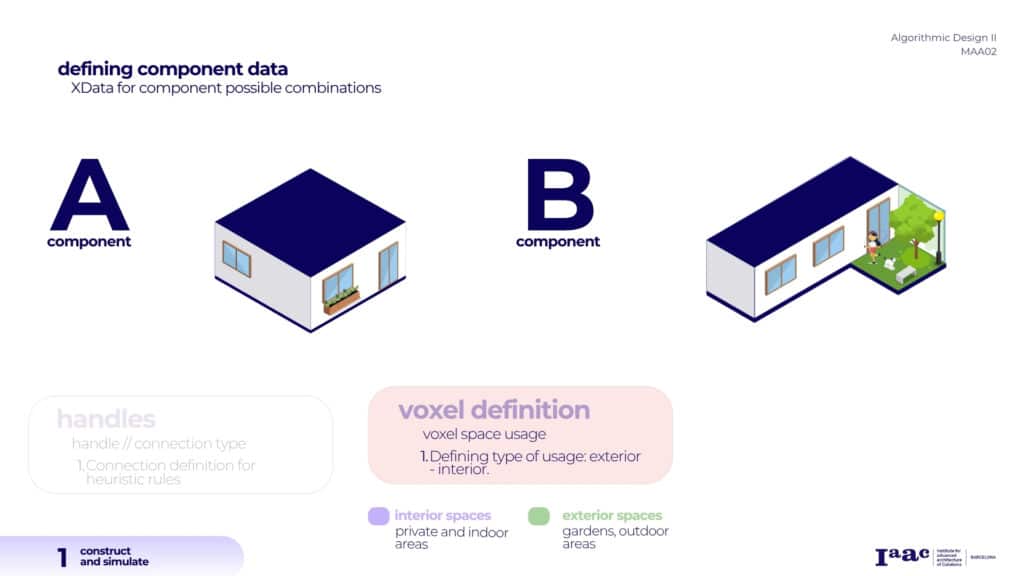
we include a voxel definition depending on the type of usage: either exteior or interior.
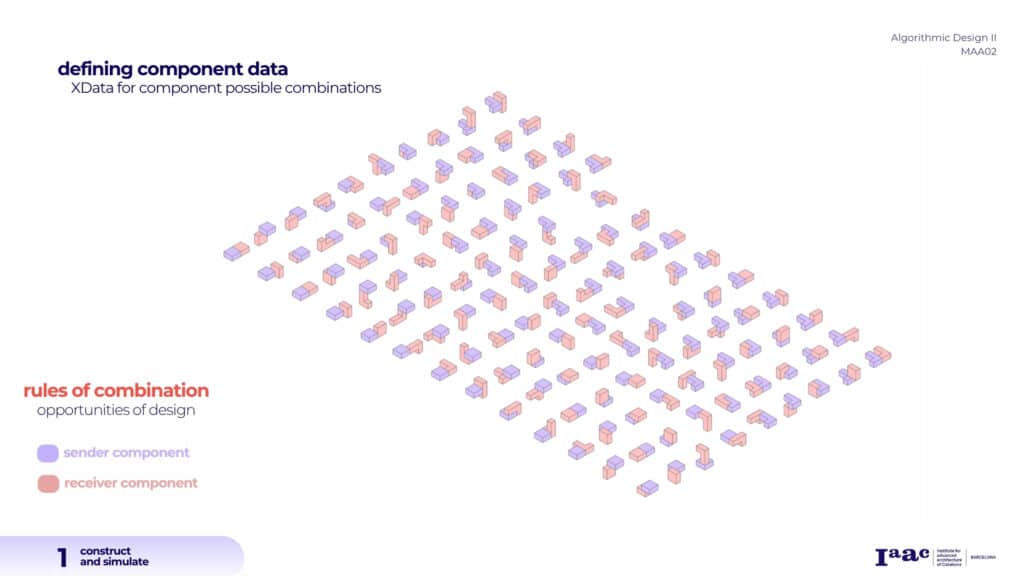
Based on the design component logic, we can then generate a wide range of design outcomes defined as heuristic set. In fact, this gives us unique configurations that expand the design possibilities of the system.
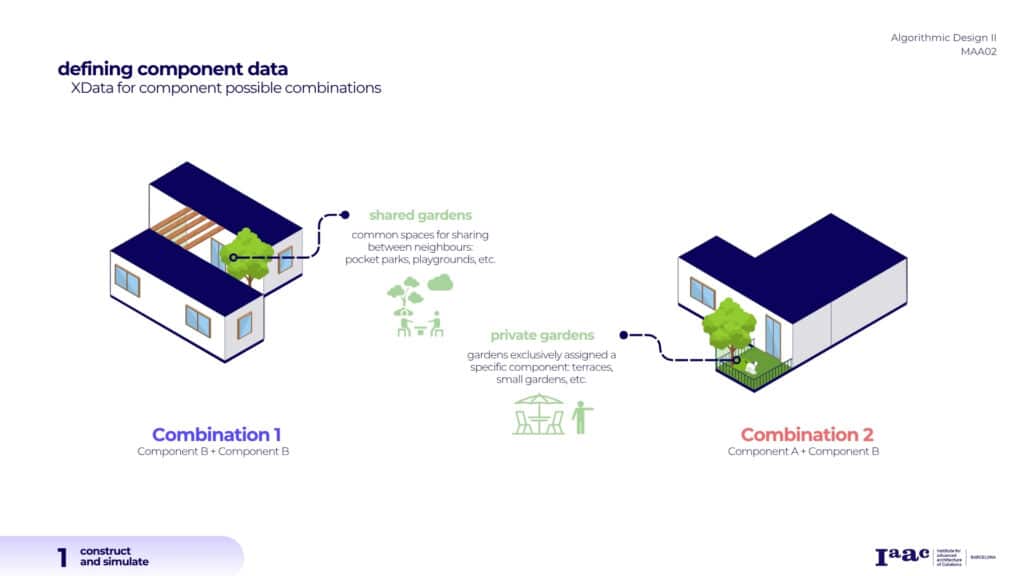
So, after defining voxels as interior or exterior, we can start assigning meaning to those exterior spaces. For example, depending on how components are combined, we can create either shared gardens or more private outdoor areas, like small terraces or personal gardens.
These spatial definitions allow us to design with both collectivity and privacy in mind.
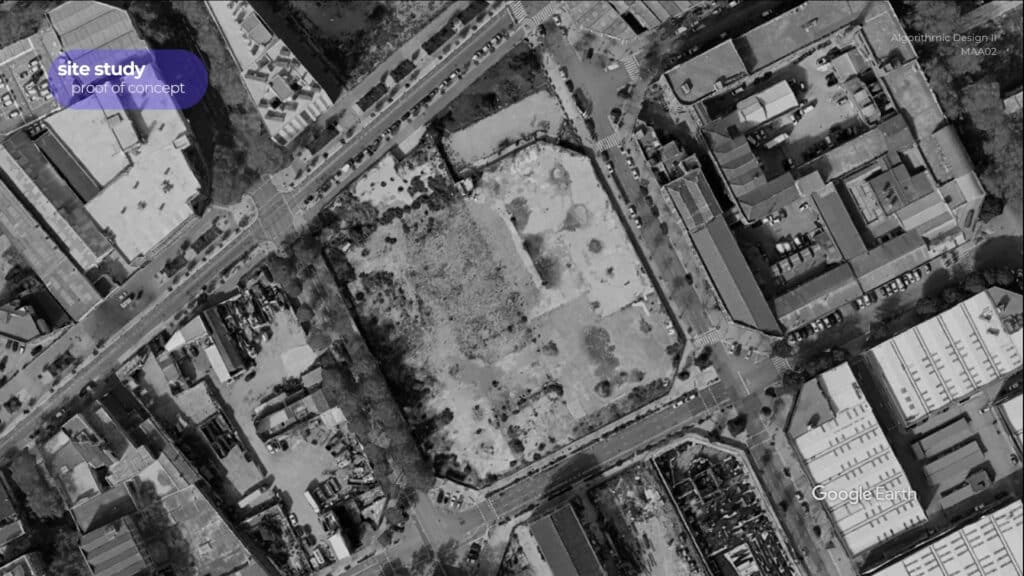
the next step was to test these ideas in a real urban context. In order to develop our proof of concept, the site selection is located in Barcelona, Spain — specifically at Carrer de Sant Pere 4, in the Sant Martí district.
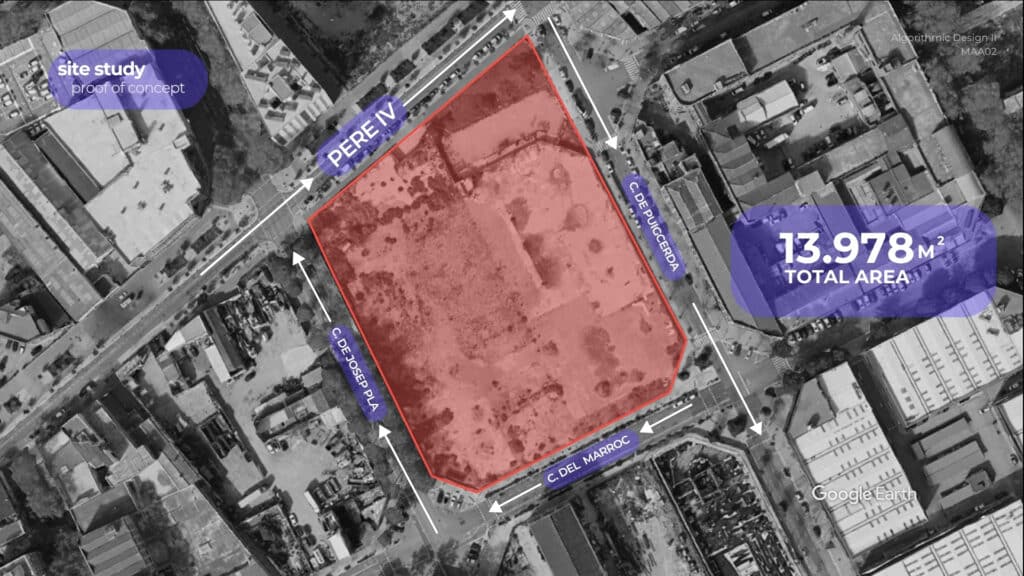
As we can see, our site selection is a full city block with and area 13.978 square meters.
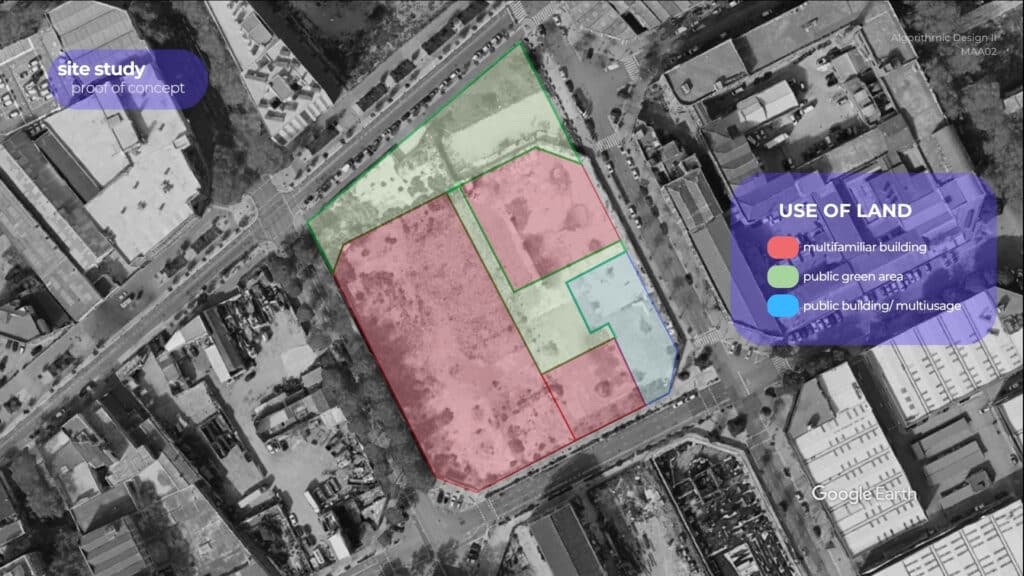
the use of land allowed by the town hall in this site, it’s dived in 3 areas: multifamiliar building, public green area and a public building that will be determinated by the townhall in the future for their own conveniences.
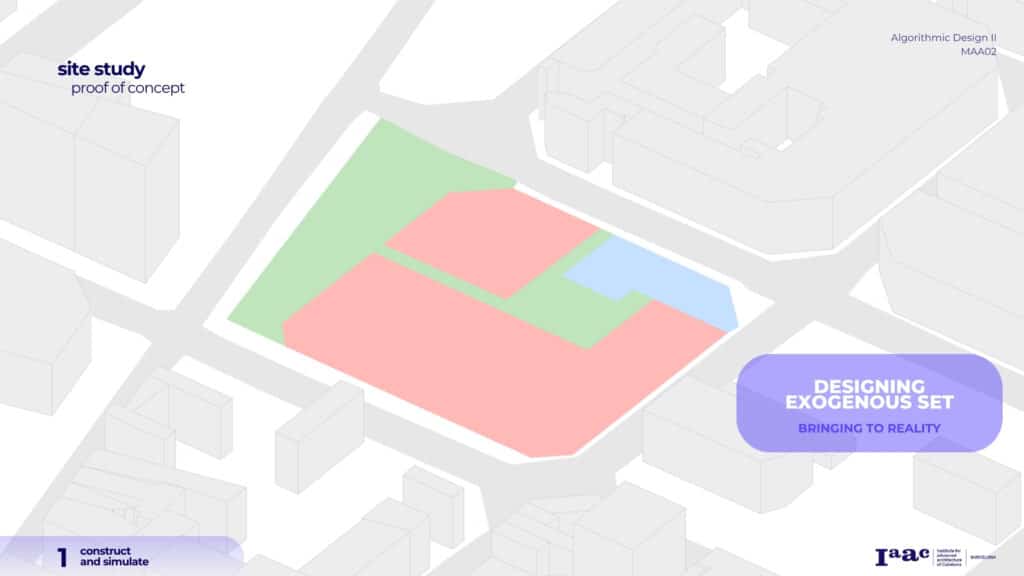
After selecting, we brought our site to rhino with our determinate restrictions of land usage, bringing to the reality the development of assemblies and the components previously presented.
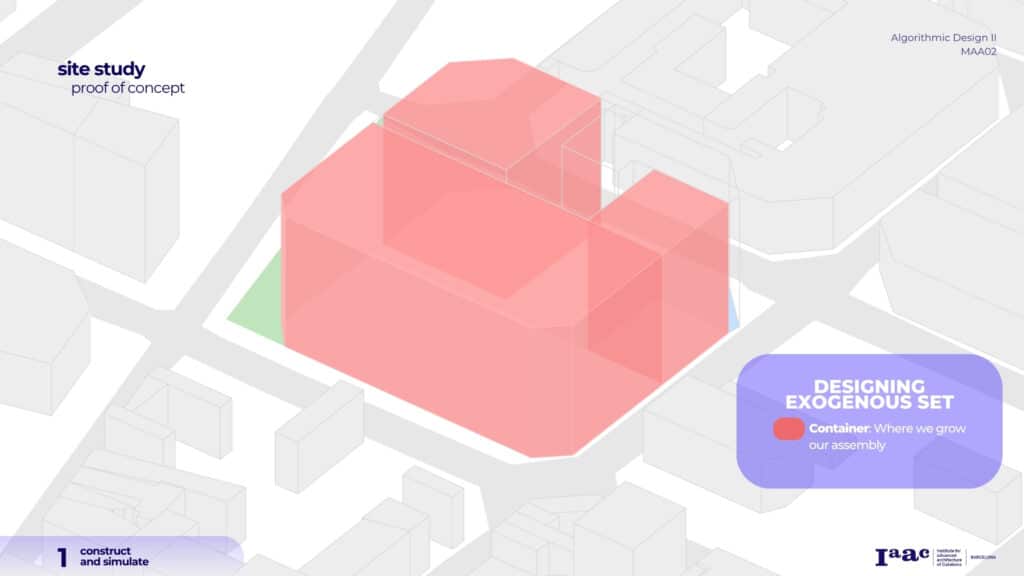
we determinate a container where we will be able to growth our assembly,
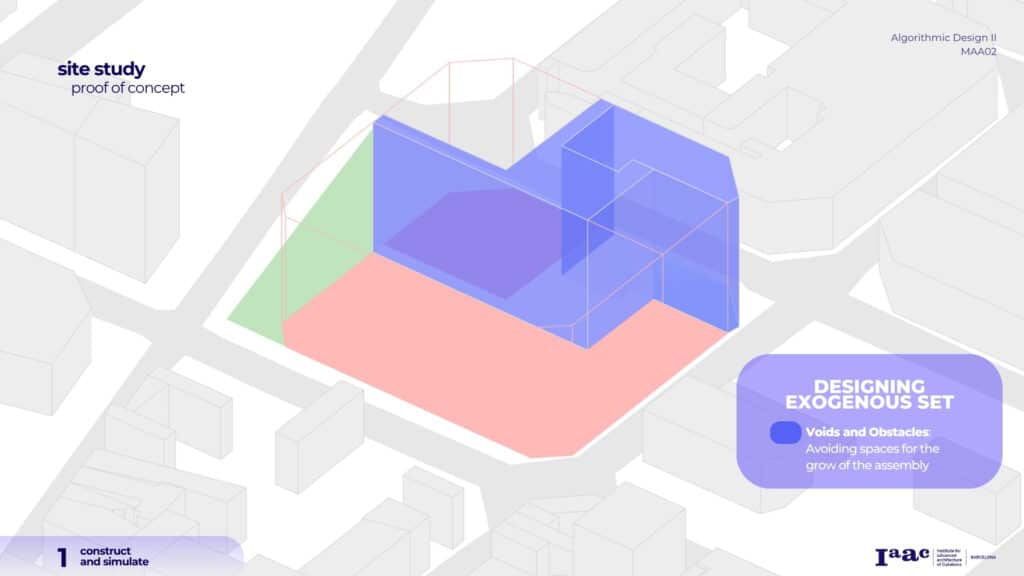
respecting the restrictions from the use of land, we determinate this areas as voids in order to not build any component inside this space.
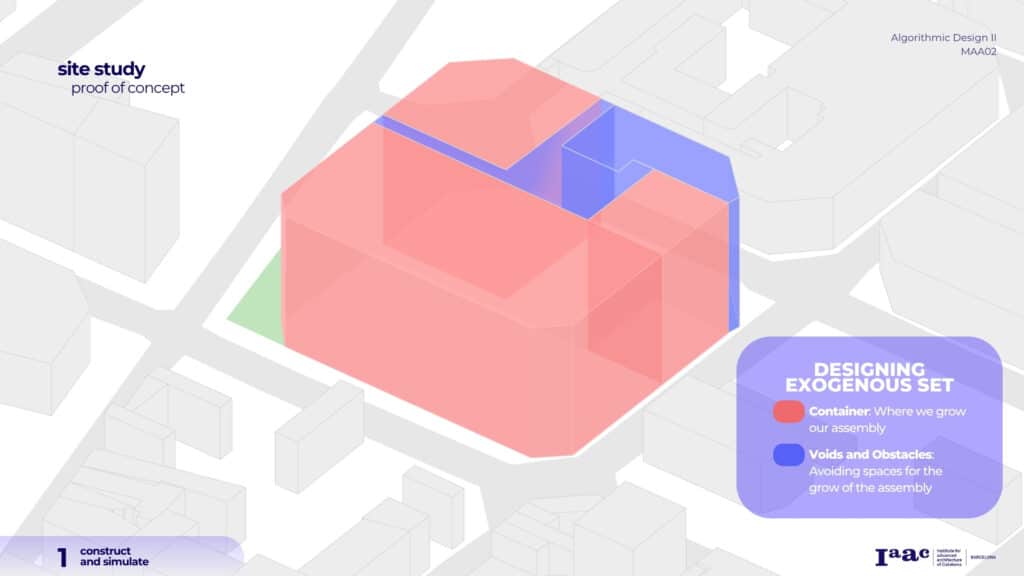
having as a result, an assembly that will follow this restrictions.
here is an example of the growth of our assembly with our component presented. And, i have my assembly, but now, how can i know it’s quality?
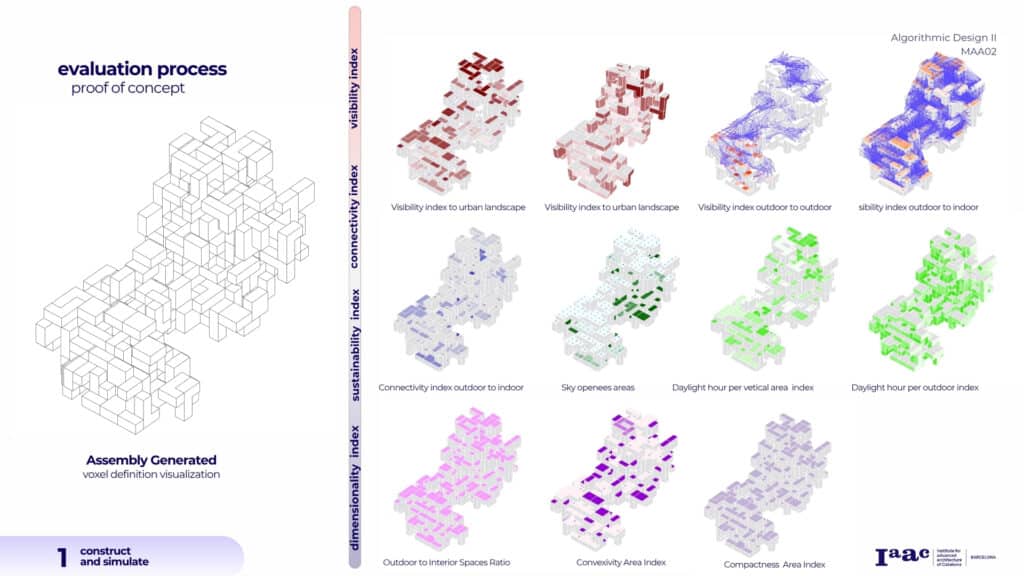
Commonly, designers evaluate the resulting assemblages using different criteria to understand their overall performance and spatial quality. In this case, we’ve organized the evaluation into four key aspects: dimensionality, sustainability, connectivity, and visibility
Now, I’ll walk you through a few examples for each of these aspects, starting with visibility.
The first evaluation aspect is the indoor visibility to the urban landscape. We looked at how much of the surrounding city can be seen from each component using a visibility index. But we also considered evaluations for the visual connections between indoor and outdoor spaces, between outdoor areas themselves, and how all of this relates to the urban landscape.
As part of the sustainability group, we also looked at sky openness — meaning how much of the sky is visible from different outdoor spaces within the assemblage. This helps us understand whether those areas feel open and comfortable, or more enclosed. Alongside this, we also evaluated daylight hours per vertical area and per outdoor space, as part of the same group of environmental performance indicators
Now moving into the connectivity aspect — here we focused on how well outdoor spaces are connected to interior ones, measuring the relationship between each open area and the components they serve.
Under the dimensionality aspect, we evaluated compactness — which is actually an indicator applied to the entire assemblage. Compactness doesn’t mean having more components or a bigger structure, but rather how efficient the relationship is between its area and volume. As a reference, in nature, the most compact shape is the sphere.
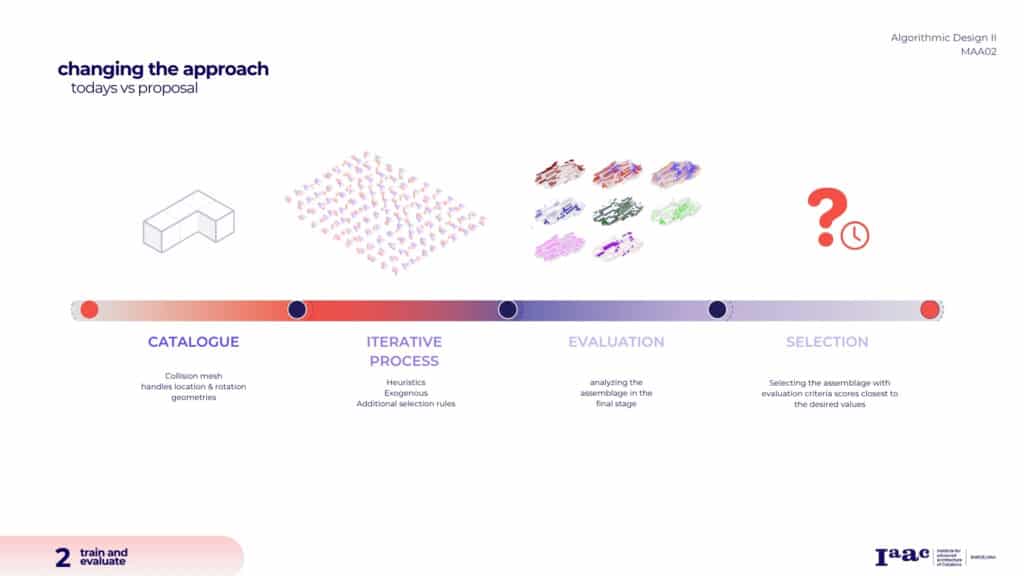
so for now, we have a linear process, where we define the catalogue of the components, determine our heuristic set, and go through evaluation of the generated assemblages. However, the selection stage can be a long process, especially in post-generative evaluation, where a large number of assemblages must be generated before finding one that aligns closely with the desired values.
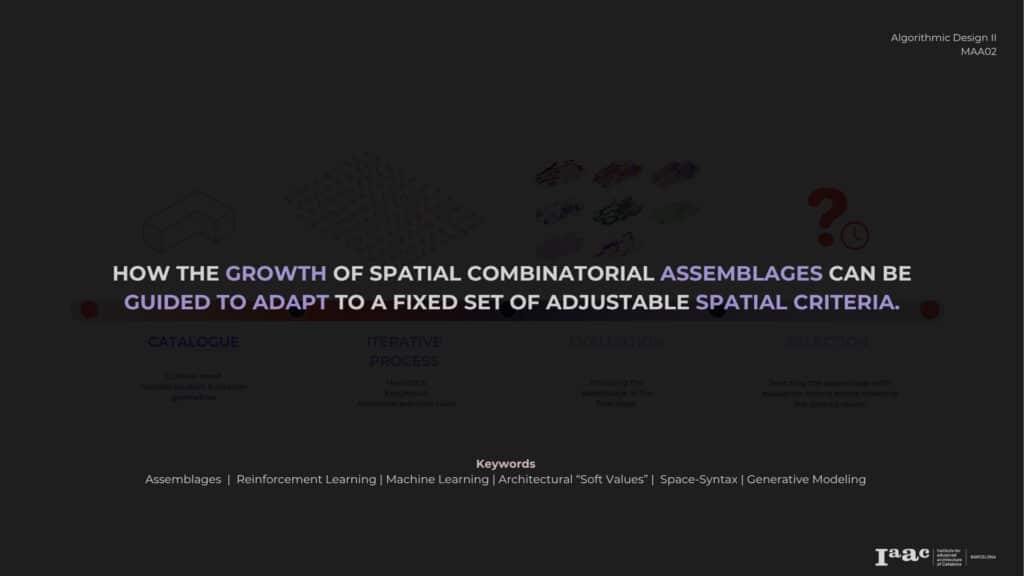
This led us, to our research question: how the growth of spatial combinatorial assemblages can be guided to adapt to a fixed set of adjustable spatial criteria?
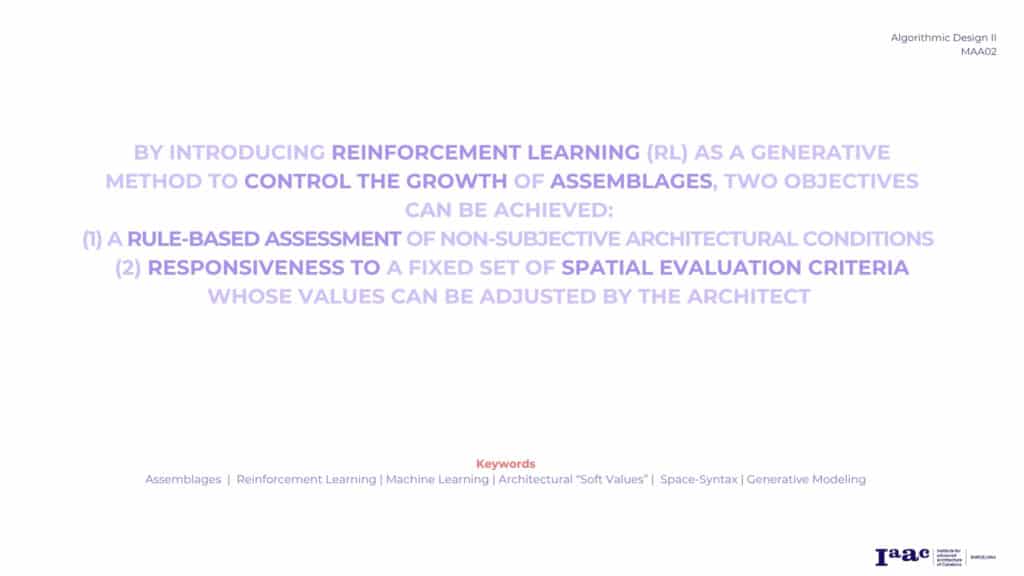
our hypothesis is that by introducing reinforcement learning (RL) as a generative method to control the growth of assemblages, we can achieve two objectives:
First, a rule-based assessment of non-subjective architectural conditions which are essential for structural and environmental coherence, as well as for overall architectural validity,
and second, responsiveness to a fixed set of spatial evaluation criteria (which we just presented) whose values can be adjusted by the architect on a continuous scale and are introduced as target objectives during the training process.
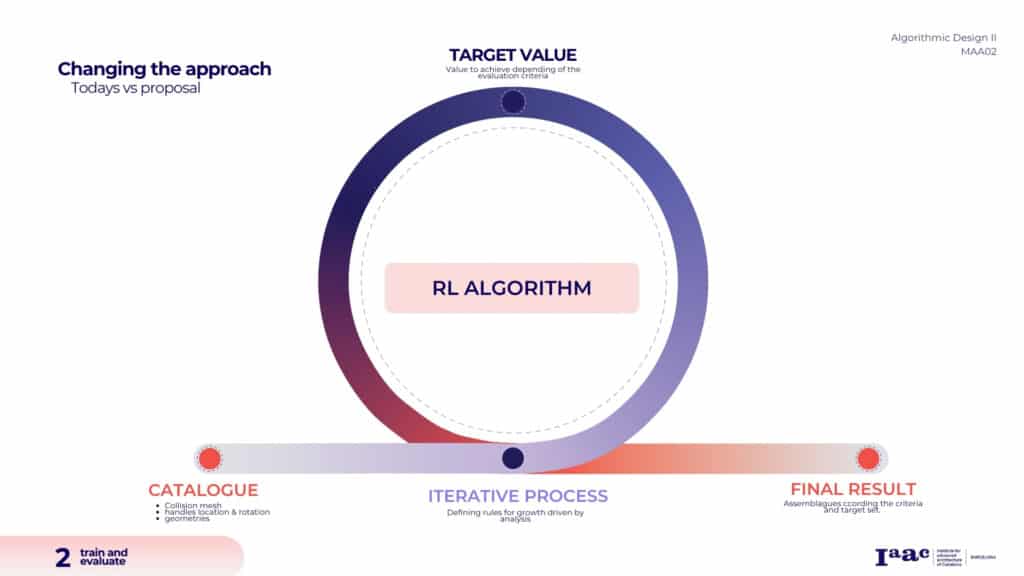
In the next chapter we will present the shift from a linear design logic to a feedback loop where the RL algorithm is embedded directly within the growth process of the assemblage.
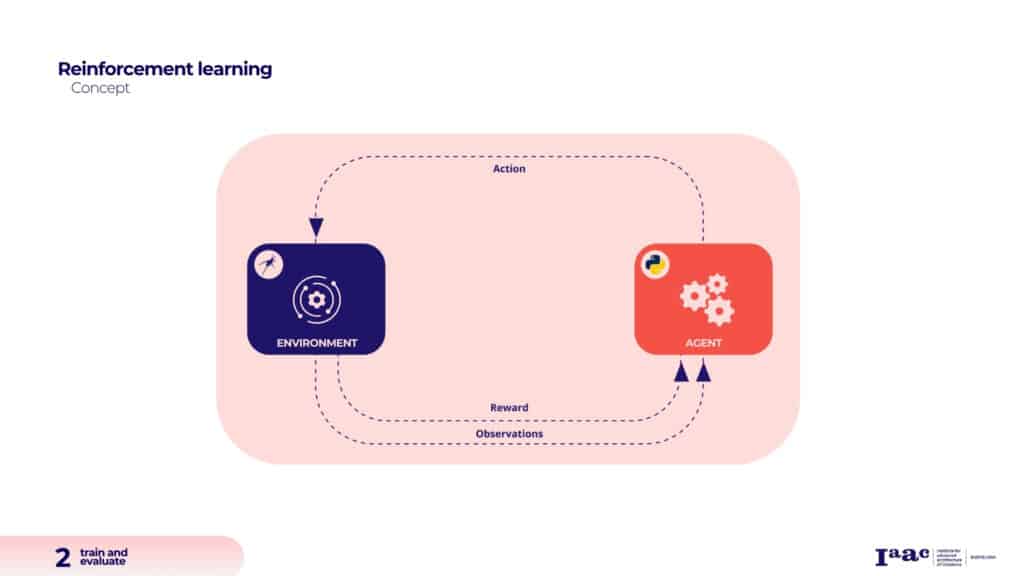
Differently from other kinds of Deep Learning algorithms, RL is not based on a pre-existing
dataset. Instead, a feedback loop is created where the algorithm learns
its behavior from the experience accumulated by
an agent interacting with an environment, trying to
maximize a series of rewards.
In our case, the environment — meaning the assemblage logic and spatial evaluation — is implemented entirely in Grasshopper.
The RL algorithm, however, runs in Python.
The two platforms communicate through a live socket connection.

For our proof of concept we focused on training for a single criterion which is compactness.
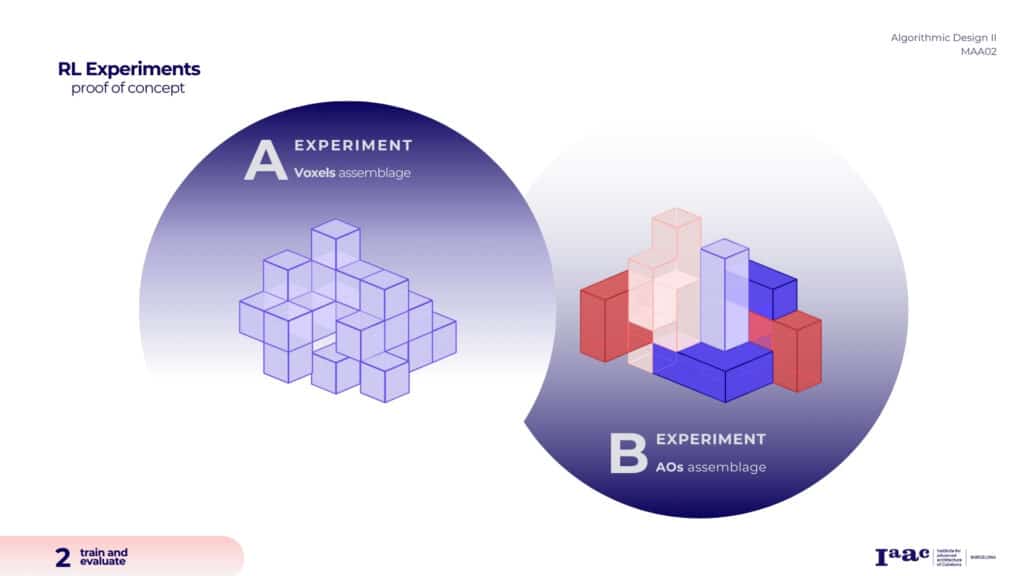
We conducted two main experiments:
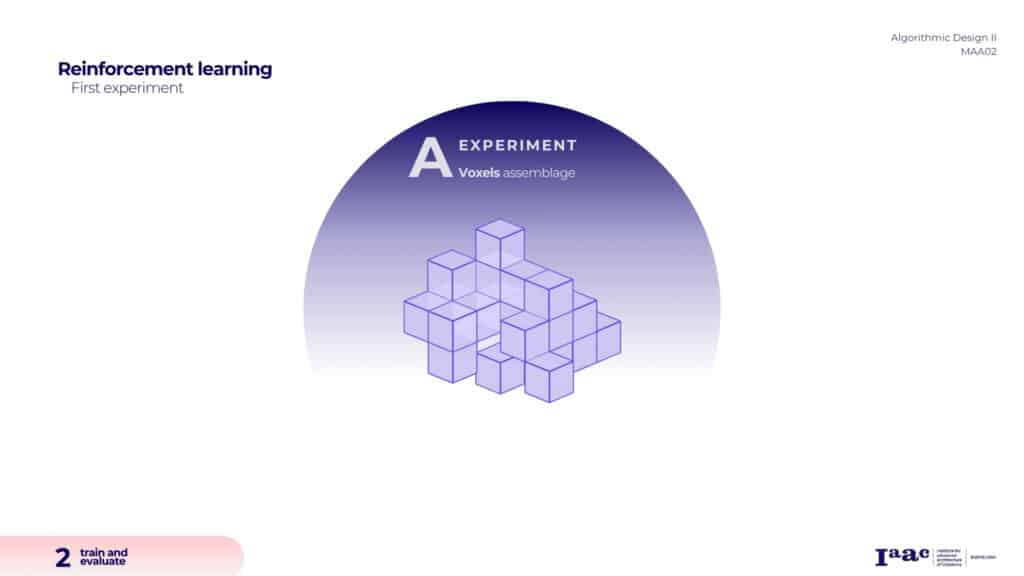
the first focused on assembling voxel-based structures,
and the second, on assembling predefined assembly objects.
I’ll now go over the flow and features of each experiment, along with their pros and cons.
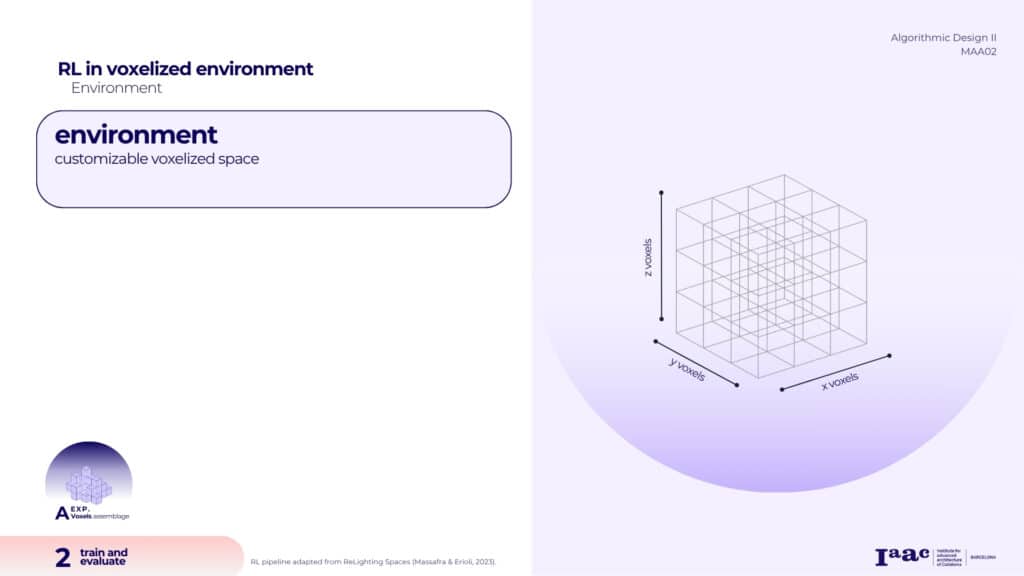
In the voxel-based experiment the environment is defined as a 3 dimensional grid of cells within which the assemblage can grow.
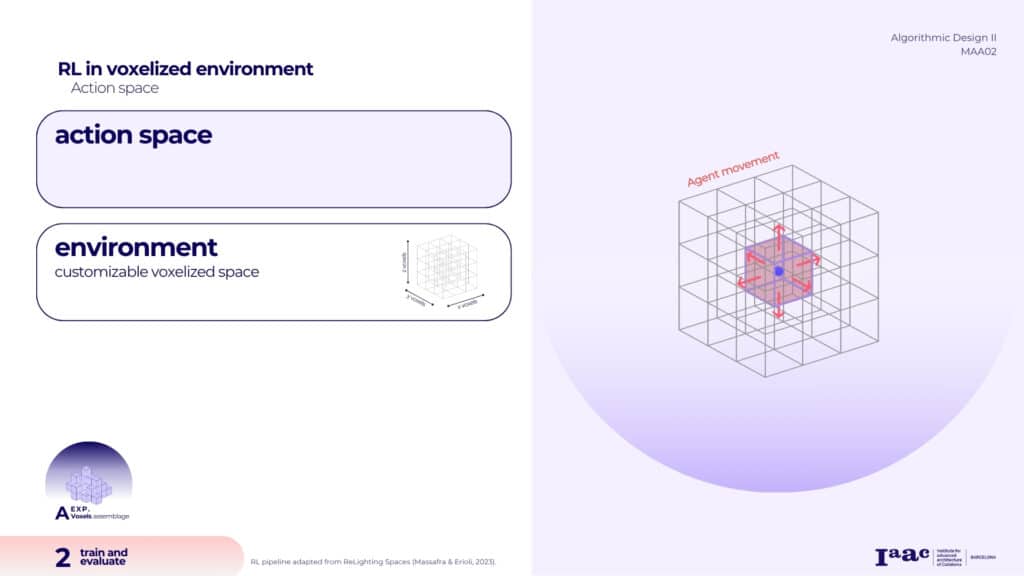
The agent’s action space—meaning how it interacts with the environment—consists of moving to one of the six adjacent cells or occupying its current cell by placing a box
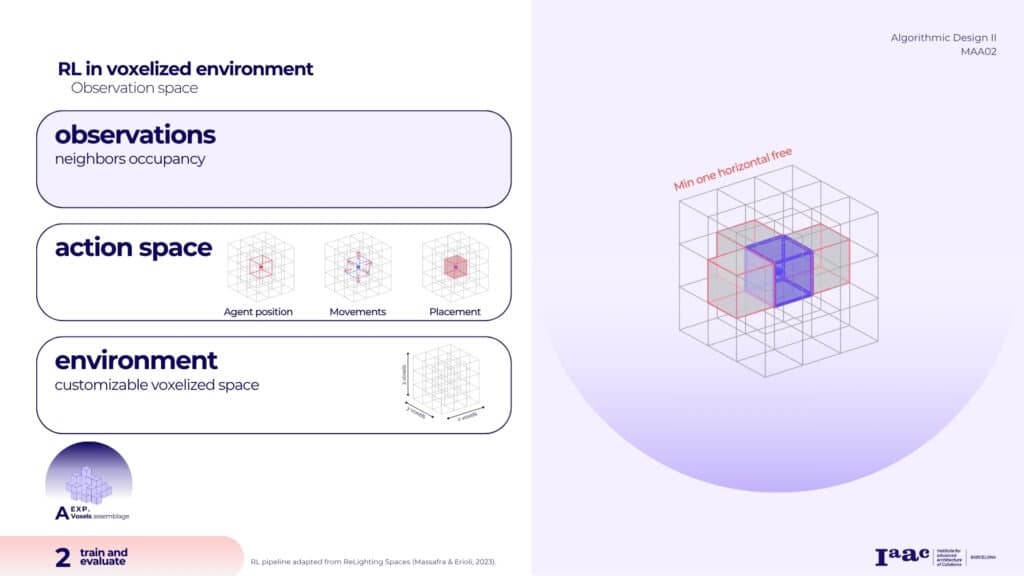
The observation space—meaning the information the agent receives from the environment and sends back to the algorithm—consists of three different types of observations:
Neighbor cell occupancy – ensures that cubes are placed adjacent to one another.
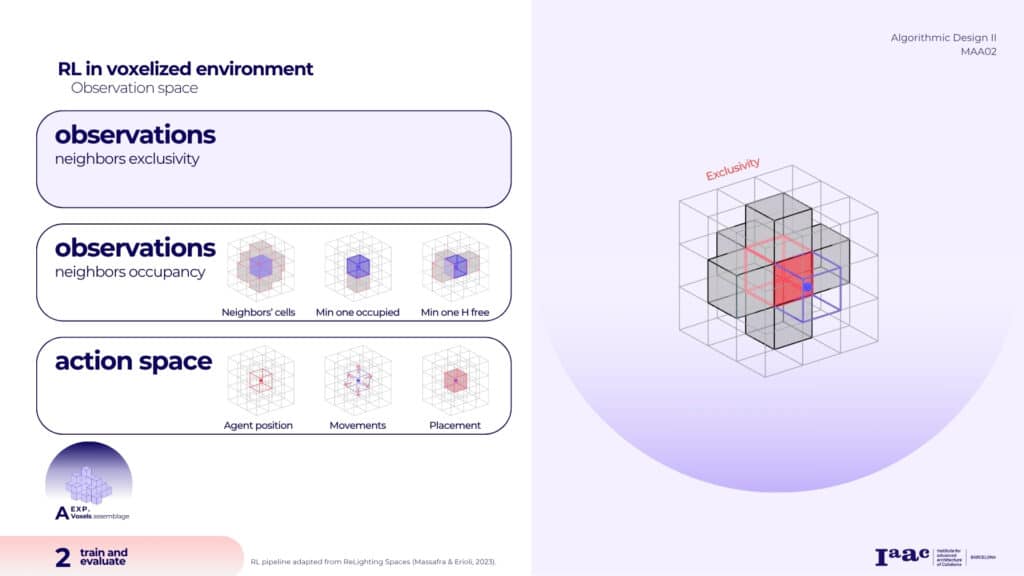
Neighbors exclusivity – helps avoid placing elements too tightly together, leaving space for ventilation.
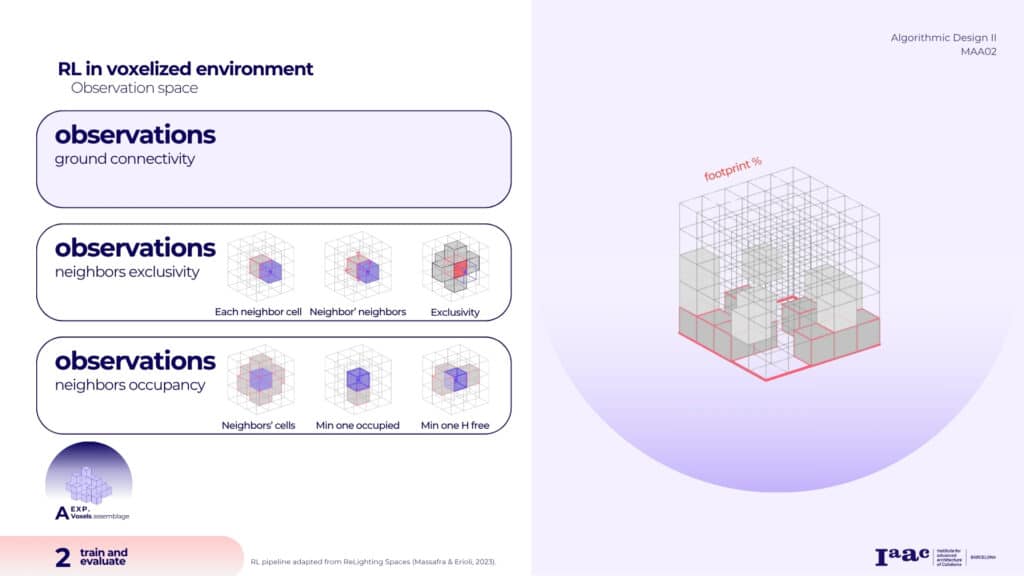
And ground connectivity – to ensure that the assemblage is placed on the ground.
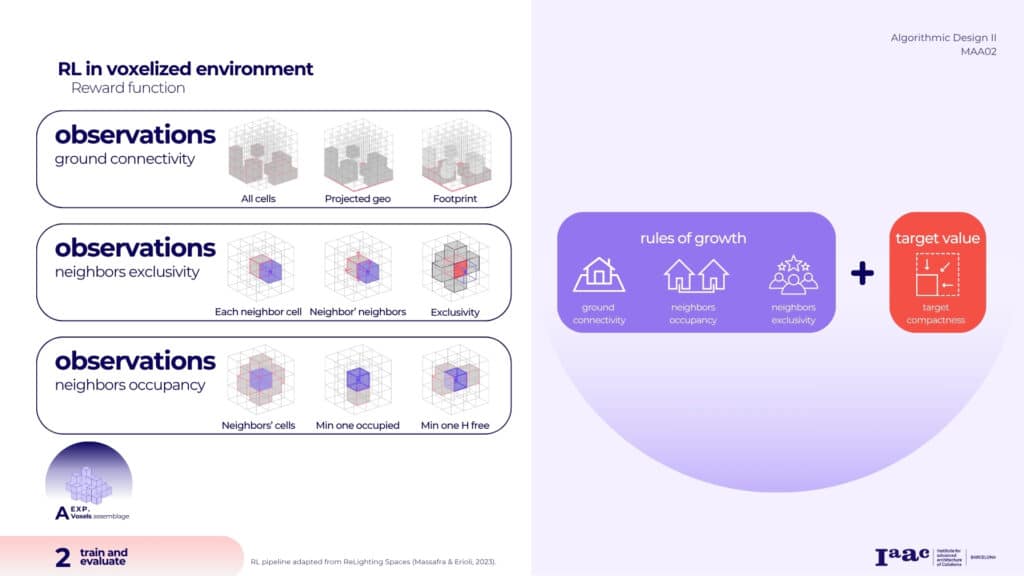
The reward function combines all the rules of growth and how close the assemblage gets to the target compactness value.
This is our training dashboard, you can see on the left all the data relevant for the advancement of the training. The target and real time compactness, the different observations, the reward at each iteration and the number of placed blocks. On the right, you can see the growth of the assemblage in its defined container.
After training, the model was tested and around 30 assemblages were generated. The success rate for reaching the target compactness—within a 10% deviation—was 78%. As seen in the examples shown here, the model learned reasonably well to connect the assemblages to the ground and to leave empty cells for ventilation. To summarize this experiment, working within a voxel-based environment simplifies the task of training and defining the action and observation space. The challenge increases once we move away from this structured system.
Since our goal was to work with livable units as the basic components, we moved beyond the voxel-based setup into the next experiment, which focused on assembling assembly objects. Our first step here was to define what makes an assemblage a valid architectural outcome and to set our rules guiding its growth.
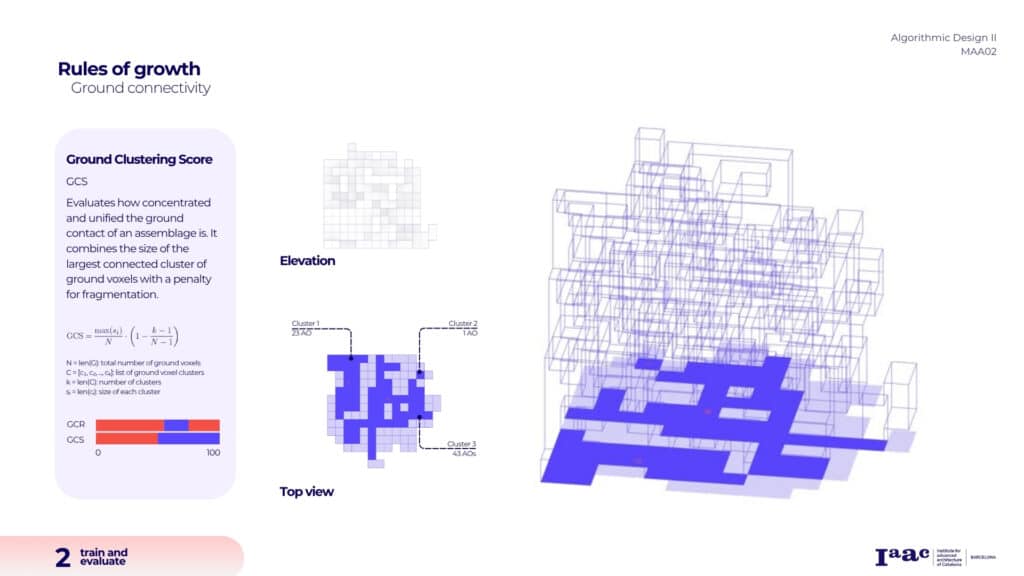
The first rule is ground connectivity, it checks the % the assemblage connects to the ground. We do want it to be mostly connected, but not completely, so that light and air can come through and there’s space for inner gardens. In addition, we also evaluate the way it connects to the ground and how concentrated and unified the ground contact is.
The aim is to have big clusters that allow good connectivity within the building.
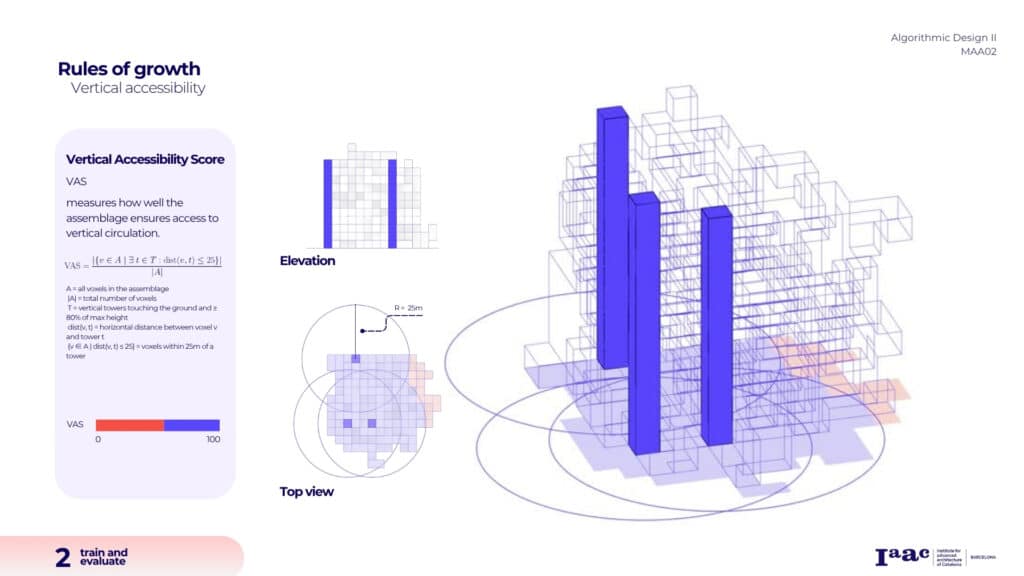
Our second rule is vertical accessibility which measures how well the assemblage ensures access to vertical circulation within a radius of 25m as usually set in fire regulations. The pink areas in the simulation are the ones uncovered.
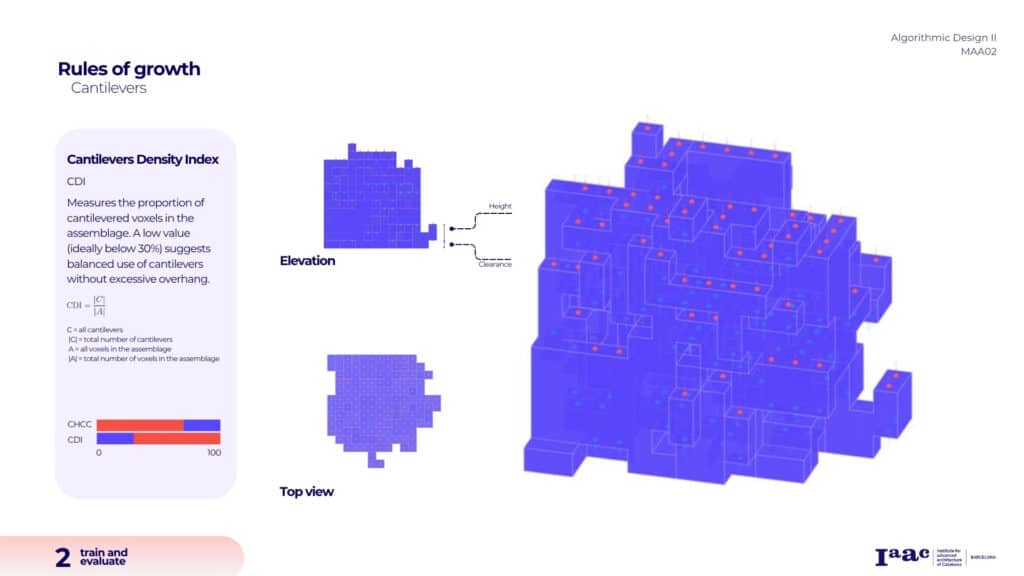
The third one is related to the evaluation of cantilevers and bridges. We check the height of each cantilever and the space underneath to make sure they have a solid presence and leave enough open area below. We assess their density to make sure they take up only a small part of the overall structure.
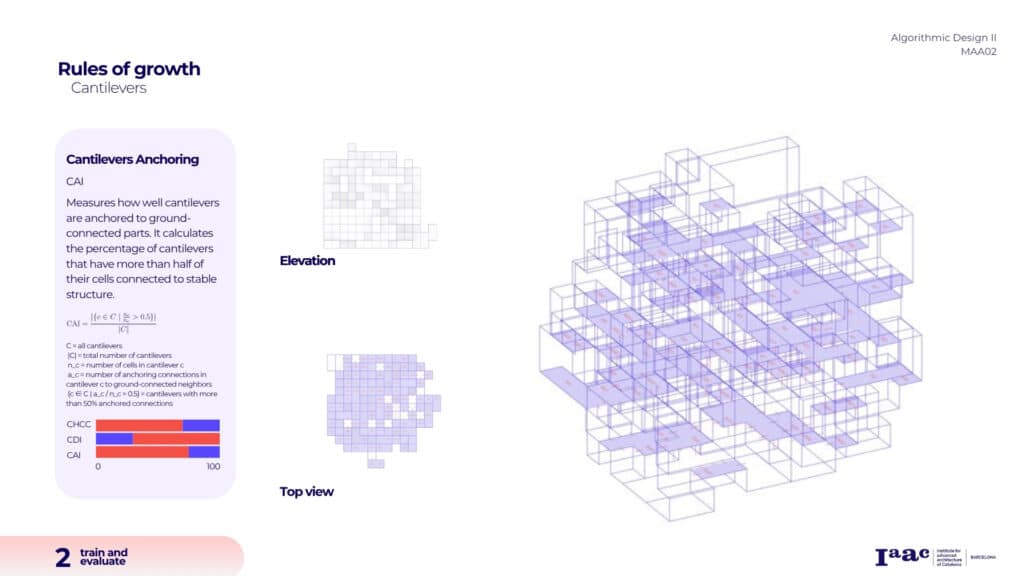
And most importantly, we check how well they’re anchored to the ground to make sure they’re structurally feasible. We set a threshold of 50% connection to the ground which means that for a 2 voxels cantilever at list one connection is needed.
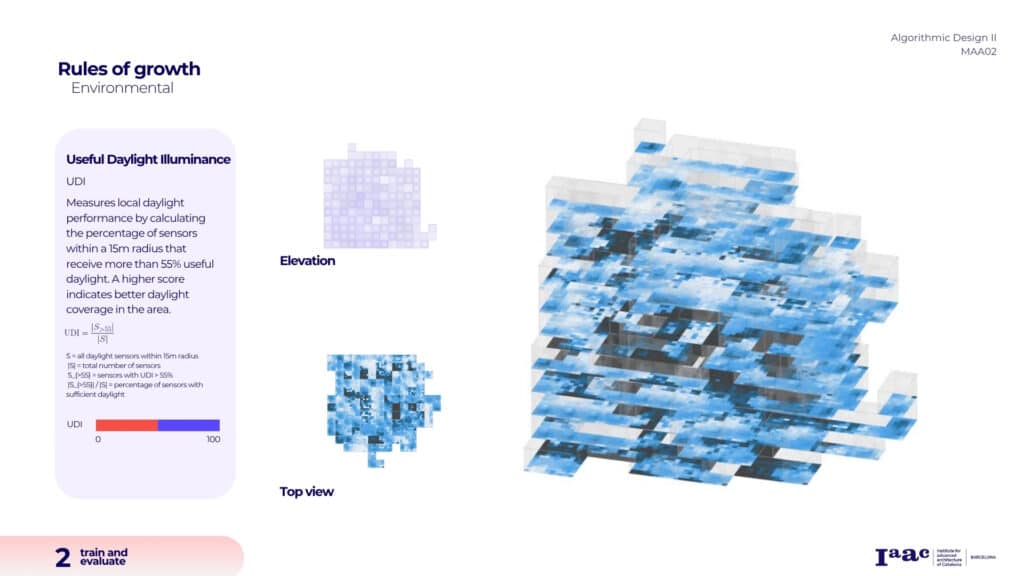
The last rule is Useful Daylight Illuminance (or UDI)— it helps us evaluate how comfortable the space is in terms of natural light. Good UDI is when at least 50% of the spaces have values superior to 55%.
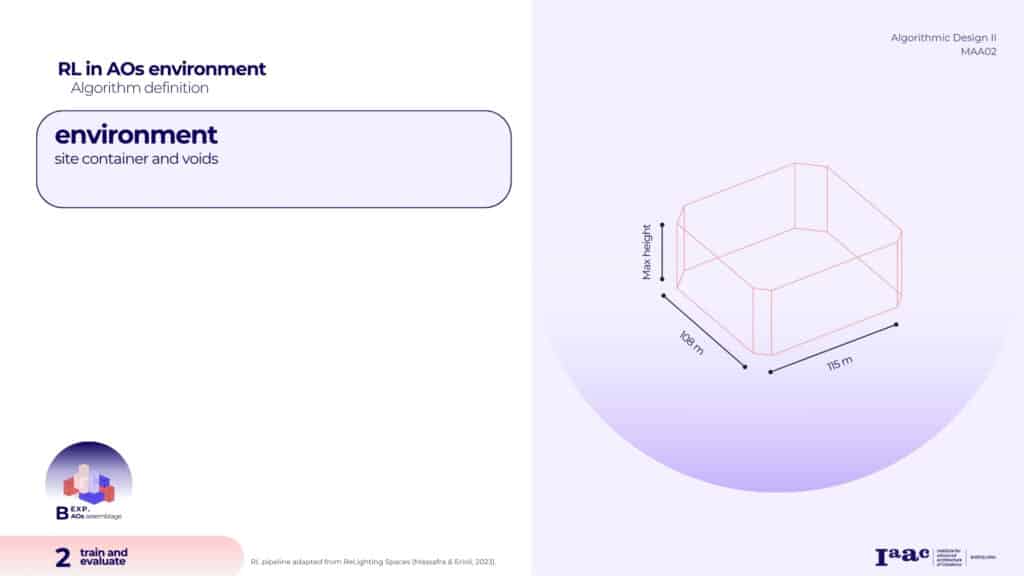
After setting the rules of growth we proceed to define the RL algorythm. We used our site analyses to set the environment: its boundaries.
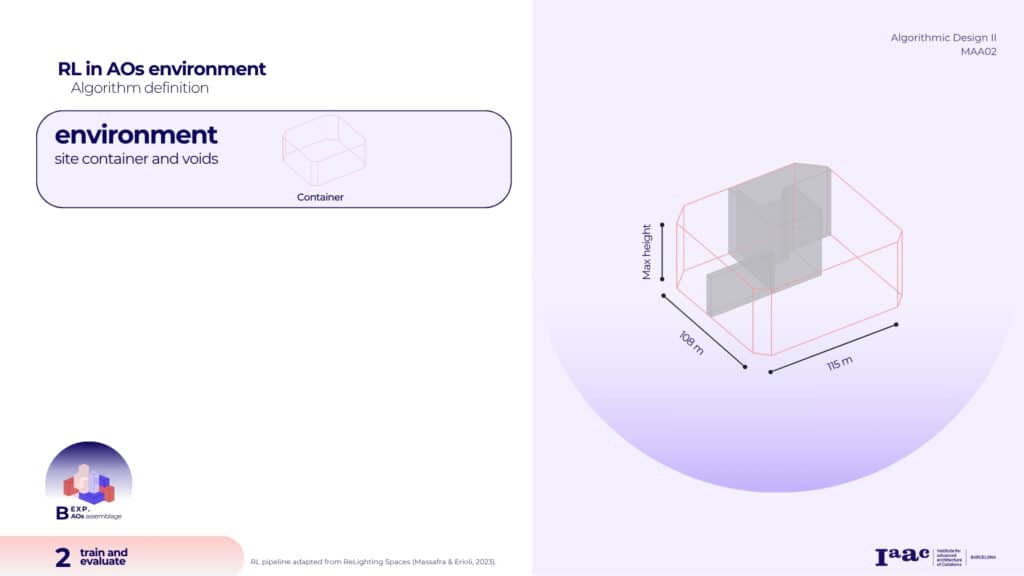
and its obstacles
The action space includes all the possible ways our catalogue objects can connect.
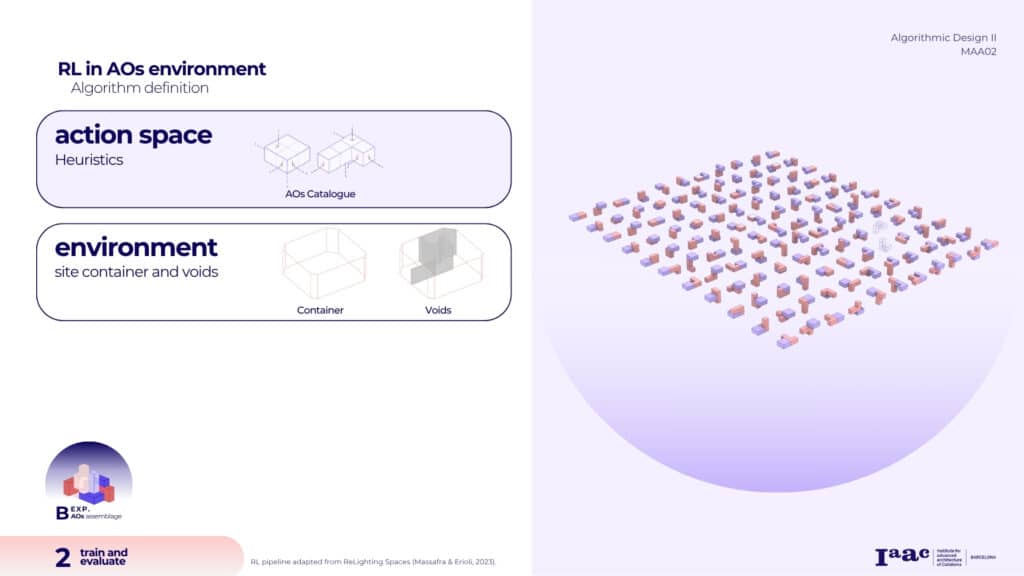
Which is basically the heuristic set, in each action, one object and handle belong to something already in the assemblage, and the other defines the new piece that will be added.
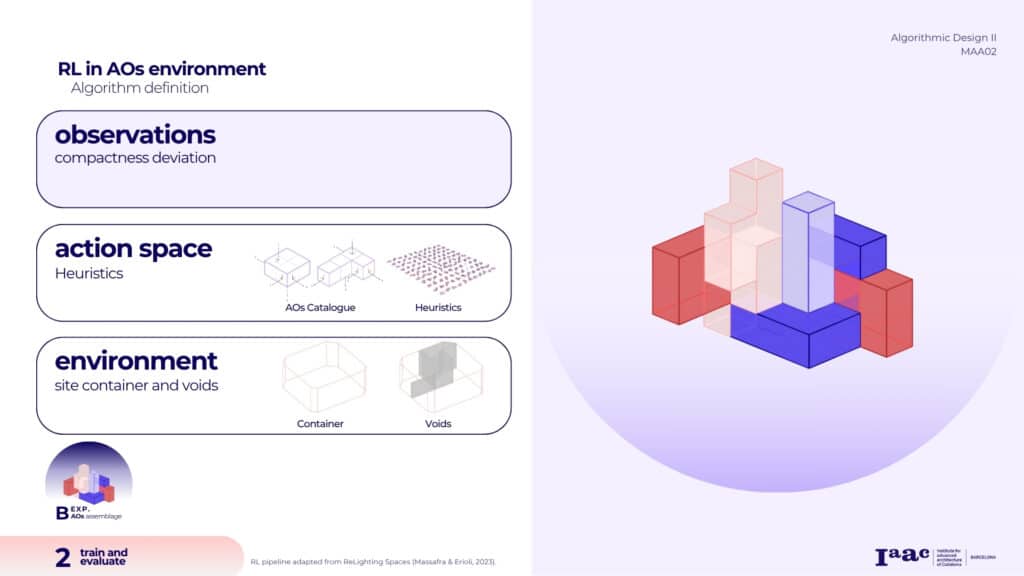
In the observation space we include the deviation between the measured compactness.
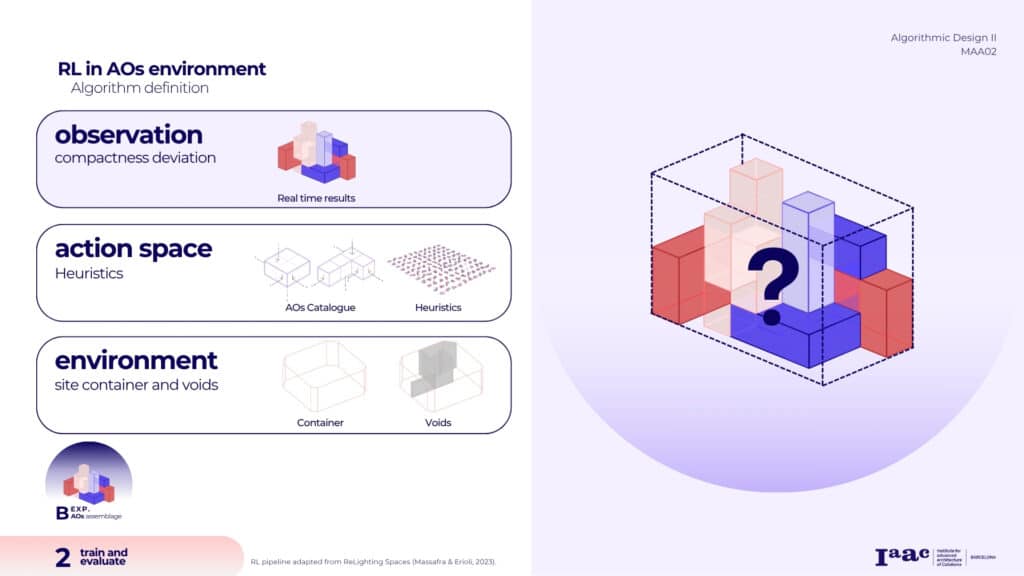
and the target one.
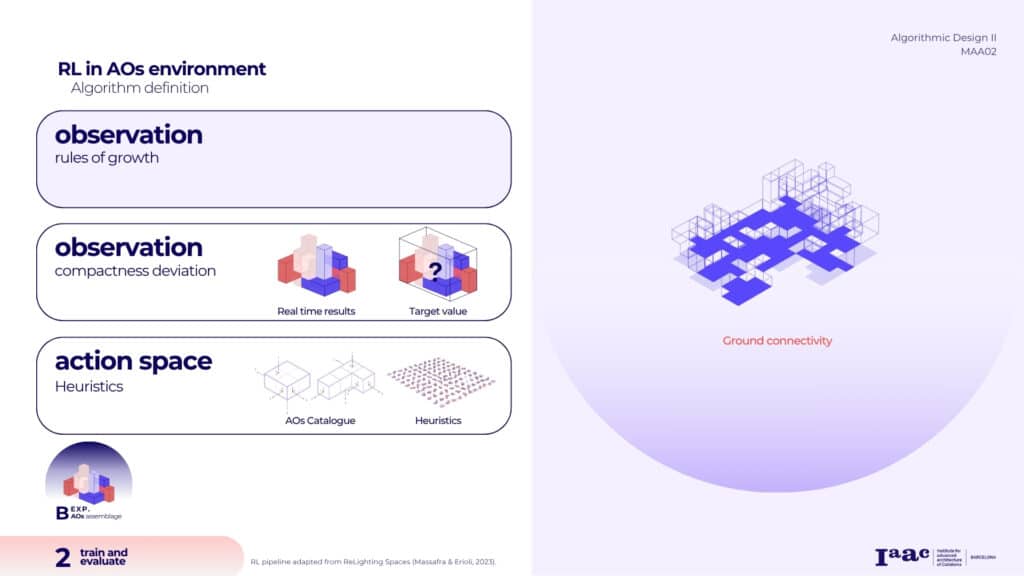
As well as the assessments of the rules of growth as, ground connectivity.
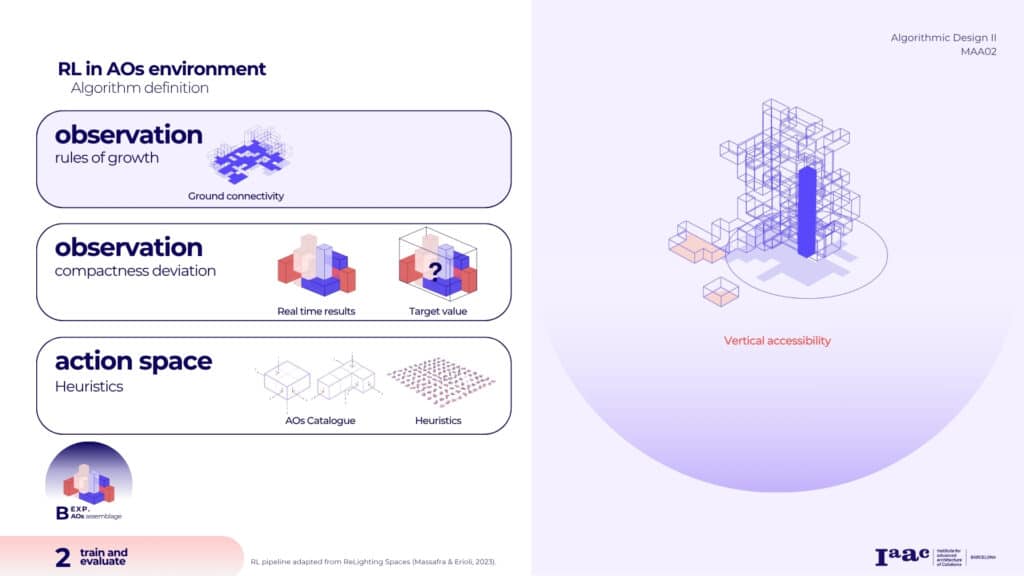
vertical accessibility.
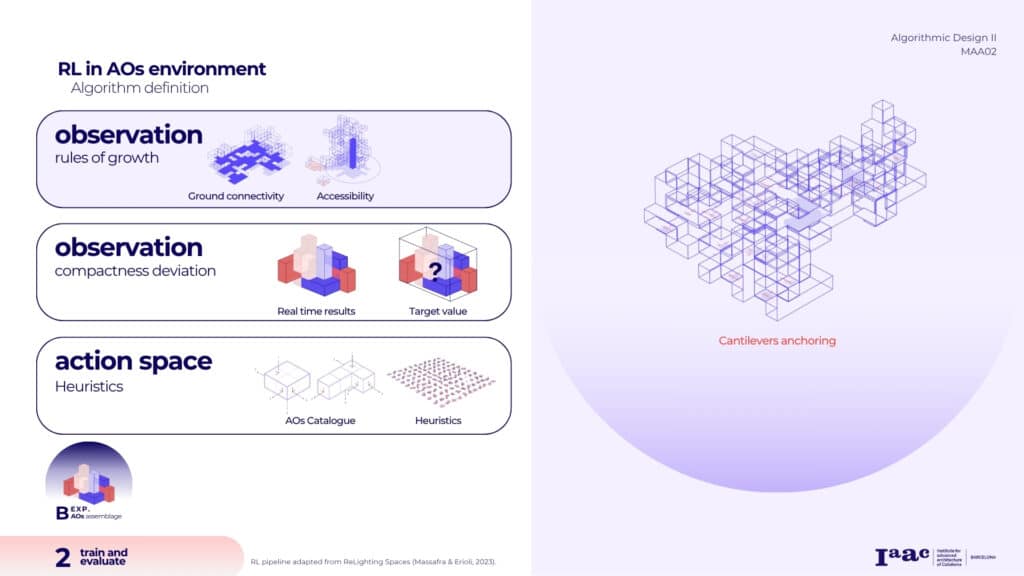
And catilevers assessment.
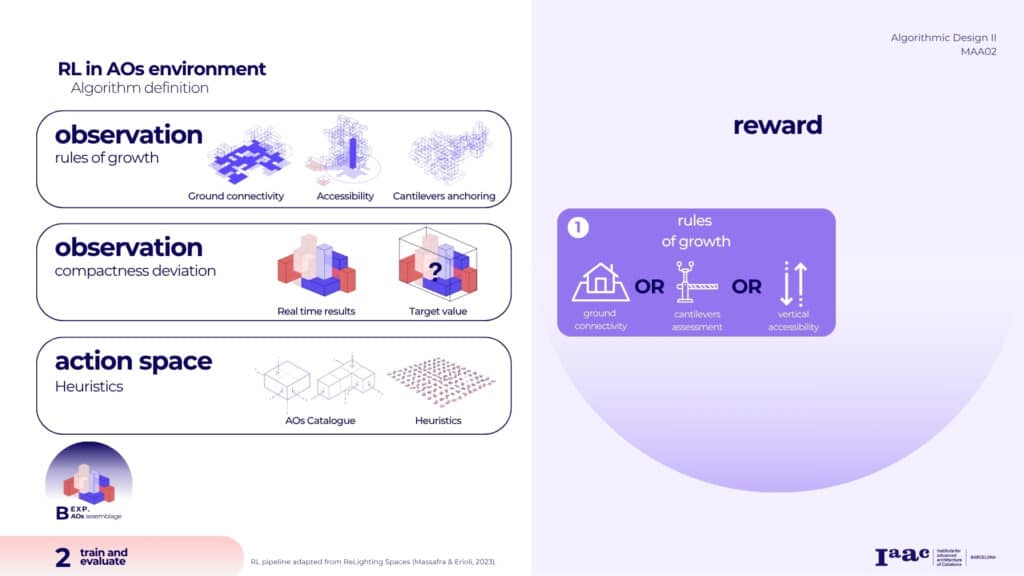
The reward function is one of the most complex parts of reinforcement learning. Balancing all the different goals with the right weights is challenging, so we decided to train the model separately for each rule of growth.
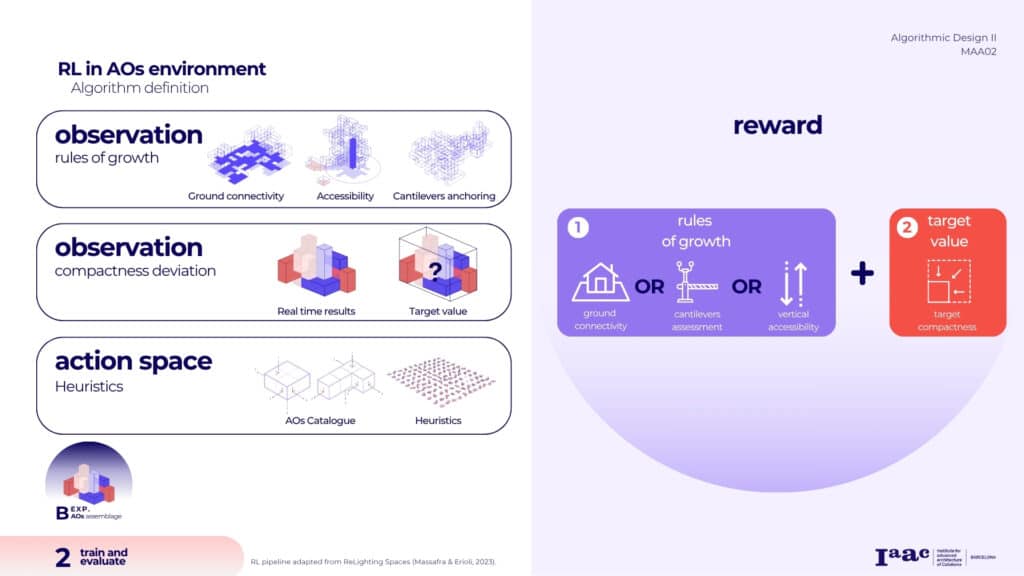
Along with the target value of compactness.
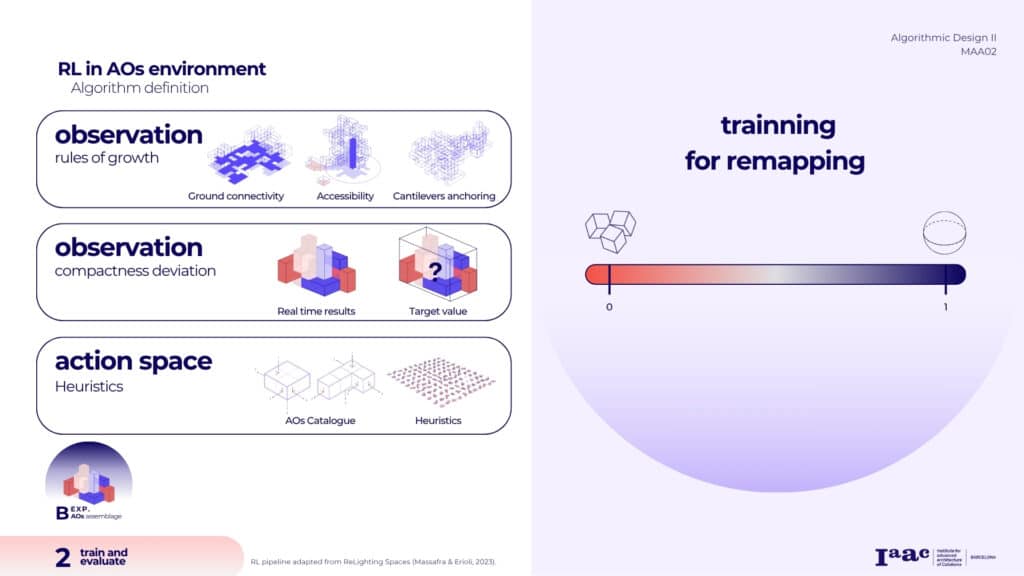
For compactness, we realized we needed to remap its range to fit the specific properties of our catalogue. So our first training phase focused just on that — one model was trained to maximize compactness, and another to minimize it.
This is the first training process in action. At the bottom, during each iteration, the selected combination appears. This is the action chosen by the algorithm.
The red componenet is the new one to be places and the purple one is the one already in the assemblage it will connect to. The next slides show a few examples of tests of models that were trained with different rules of growth. All the models were trained with target compactness of 0.7 and 100 components in each episode. In each test, we used a different target compactness (0.5) and 200 components to check the scalability of the system.
The first test is for ground connectivity. you can see in the main window the clusters of cells generated on the ground.
The tested assemblages show good ground clustering, although reaching the ground connectivity target was a bit tougher (77%). Overall, from 74 assemblages generated in this test,84% succeeded in their ground connectivity and 100% in keeping compactness within 10% of the target.
The second test was done for vertical accessibility. When no vertical element that reaches 80% of the structure is not found a 0 value is transmitted to the algorithm.
The performance and success rates of this model are similar to the previous one.
most of the assemblages generated in this test are either tall with small footprint or more spreaded and low.

The third one for cantilevers integrity.
The algorithm did well in creating well-anchored cantilevers and keeping their overall density low, but it struggled to maintain the minimum clearance height underneath them. The examples I just showed give only a brief look at the process, mostly focusing on the final results.
Throughout the work, there were many failed trainings, constant adjustments to parameters and reward weights, and times when we had to go back and redesign parts of the catalogue and its handles to get a wider range of compactness.

so once we get the generated assemblages, the question is — how do we actually work with them? This next part is about the post-processing stage.
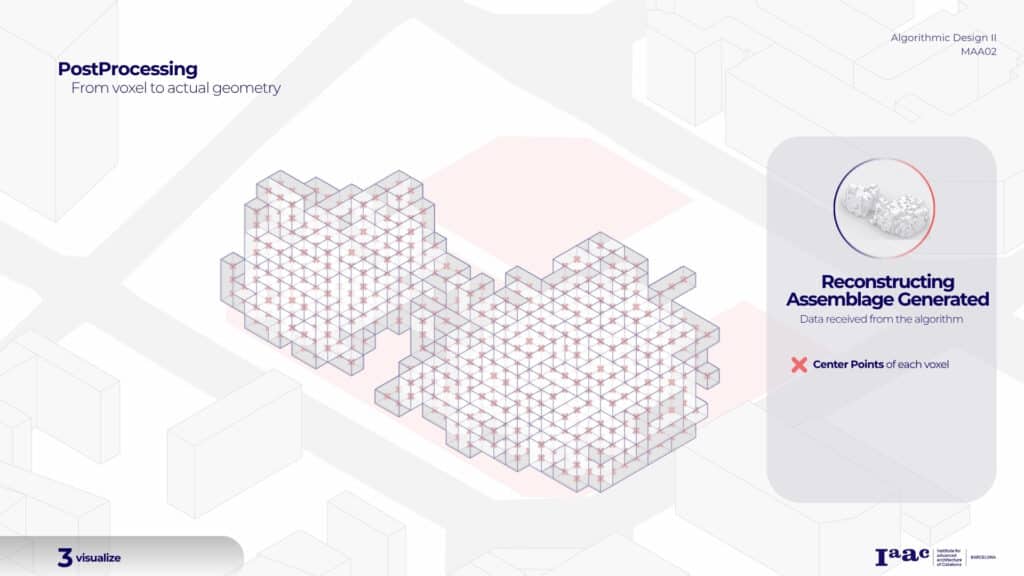
The data received from the algorithm consist of cells center points.
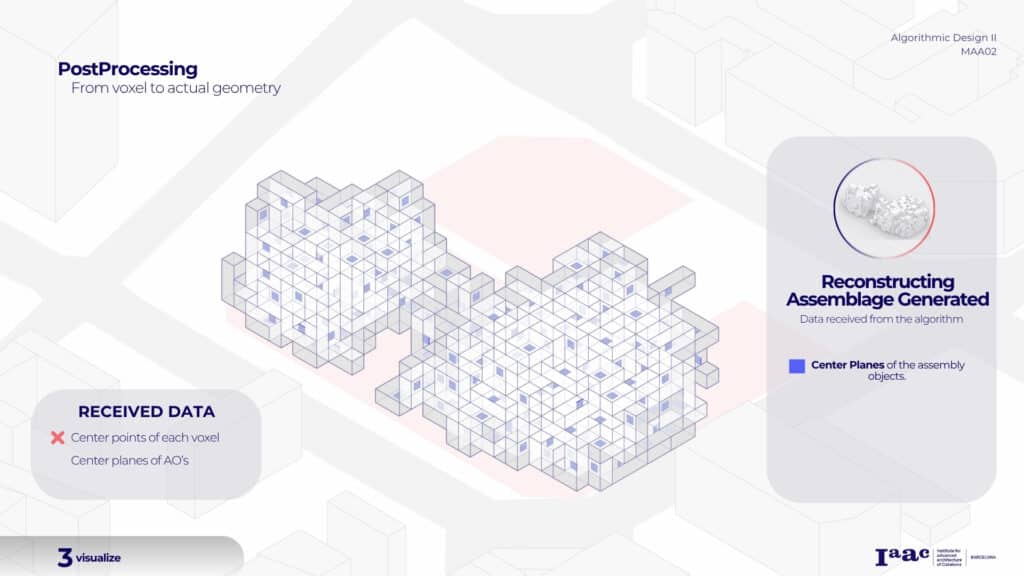
The center planes of each assembly object.

The available handles planes. Meaning the ones that are not connected to other assembly object. With this data we start to design:
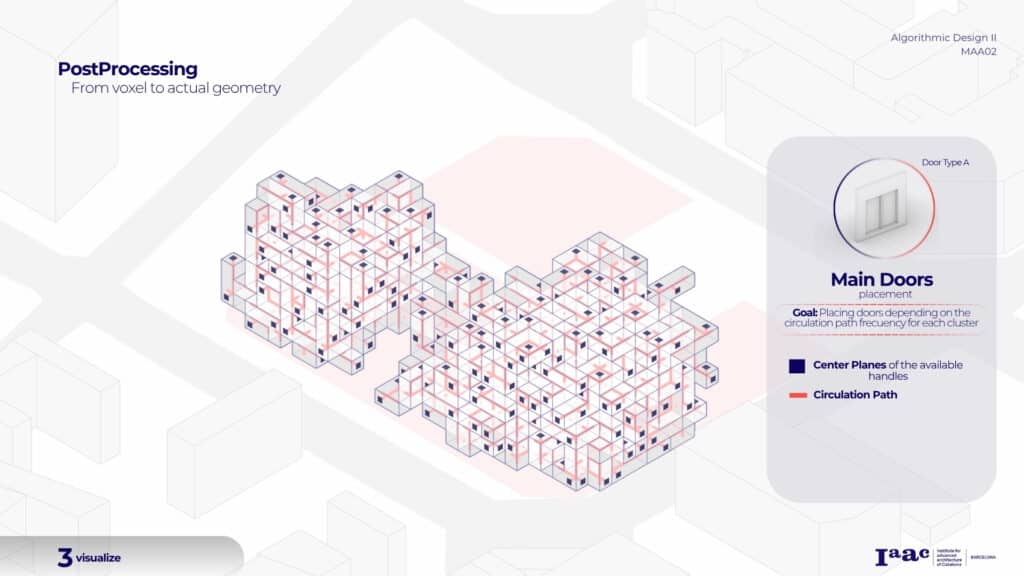
The first elements we decided to define were the main entrance doors. We used the circulation path — meaning the connecting lines between all the handles in each assembly object — together with the free handle planes across the whole assemblage.
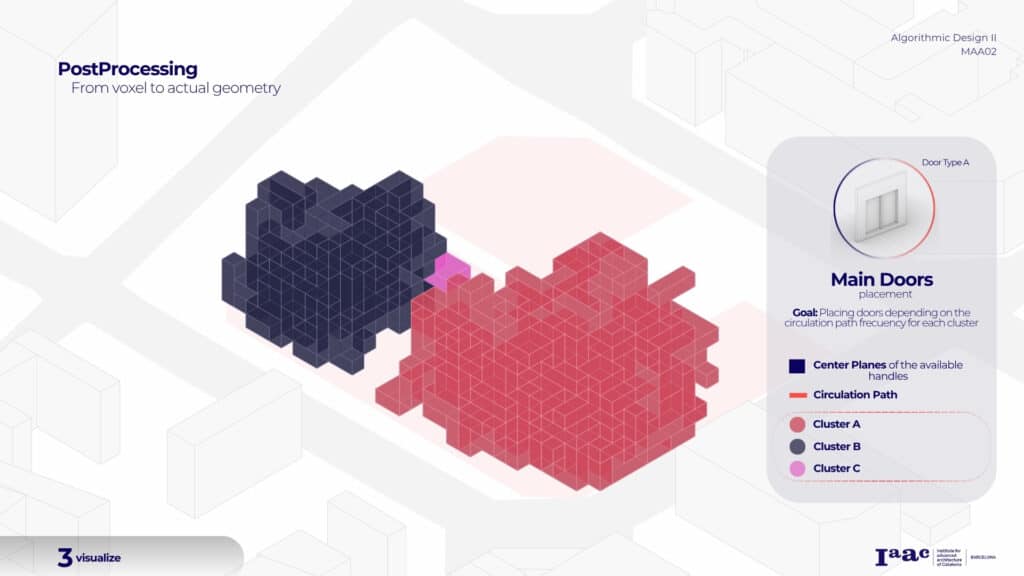
To analyze how many clusters or buildings we have using graph theory.
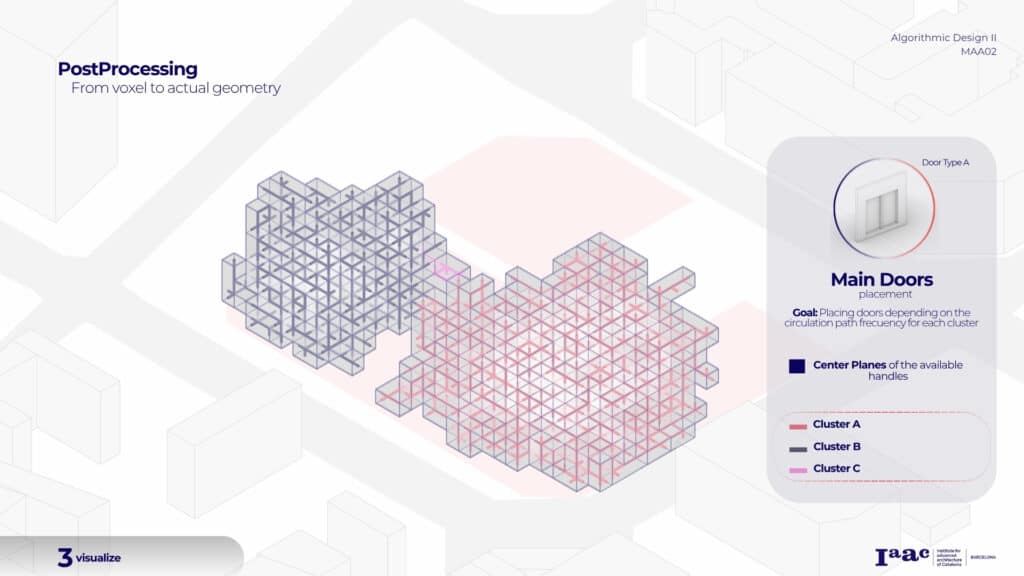
Along with the circulation pass in each object and shortest path algorithm.
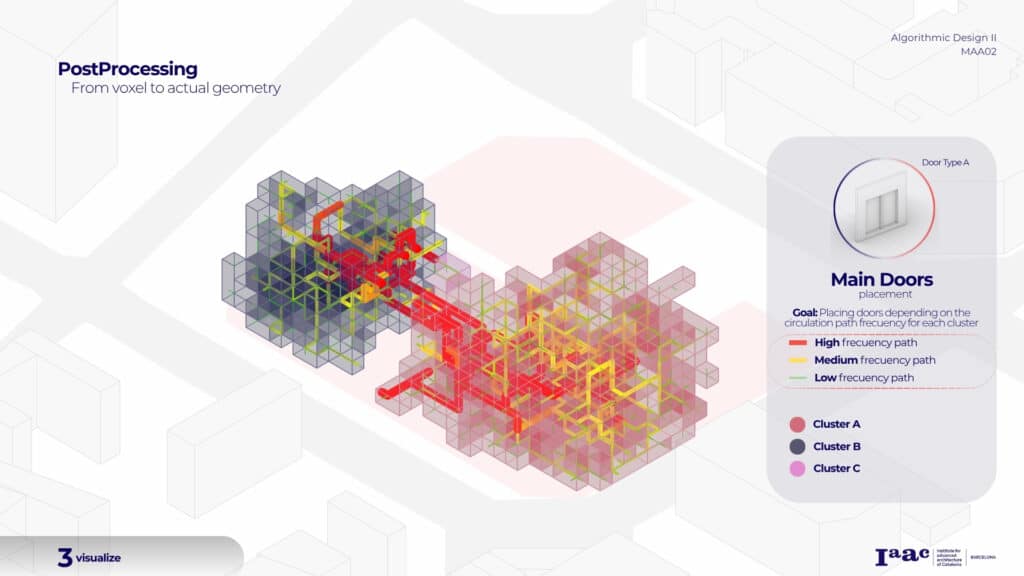
We got the a frequency map for the entire assemblage.
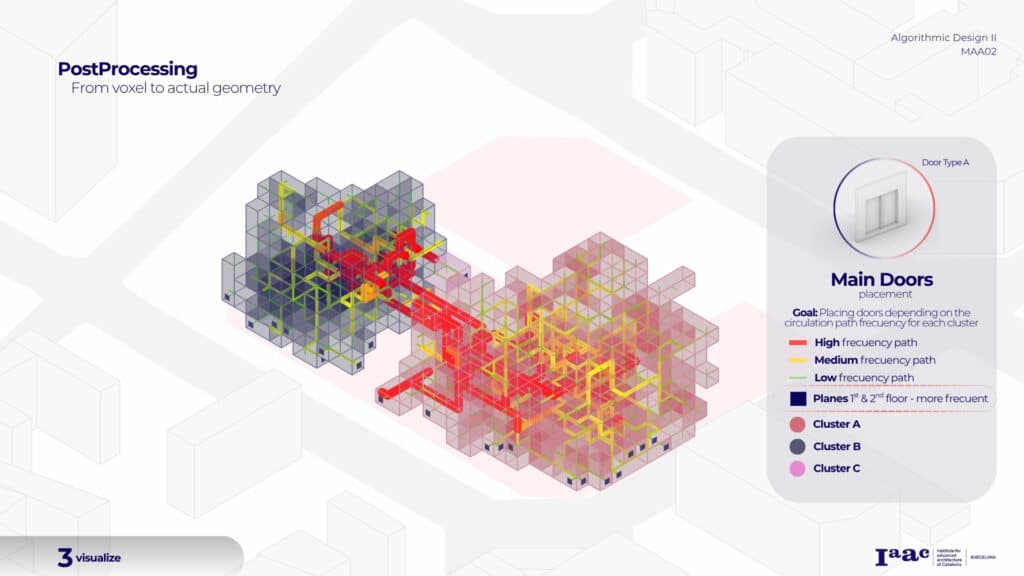
By combining this data with the available handles in the first floors.
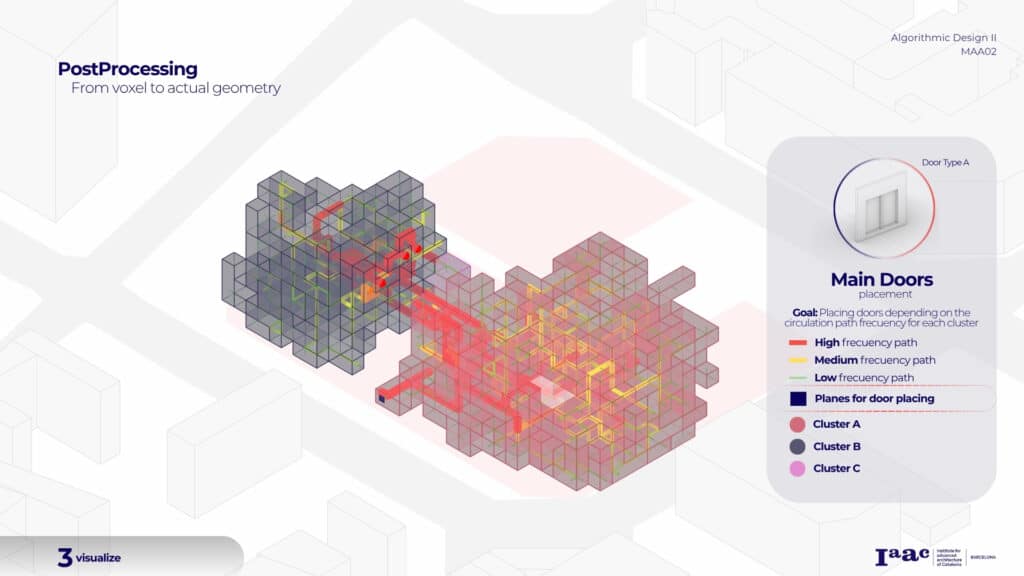
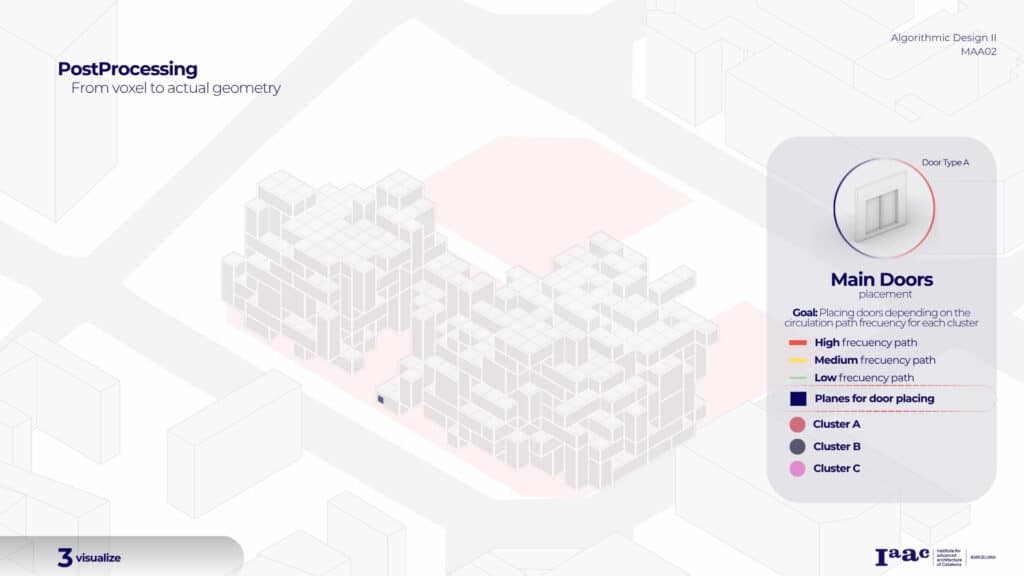
We could choose to place the entrances in a frequent place while also taking the site conditions into account.

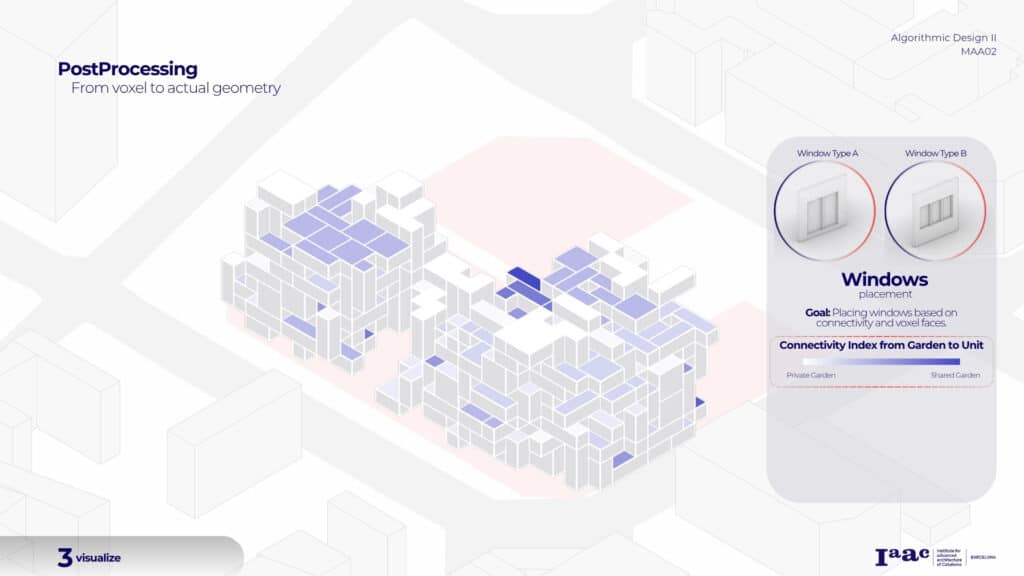
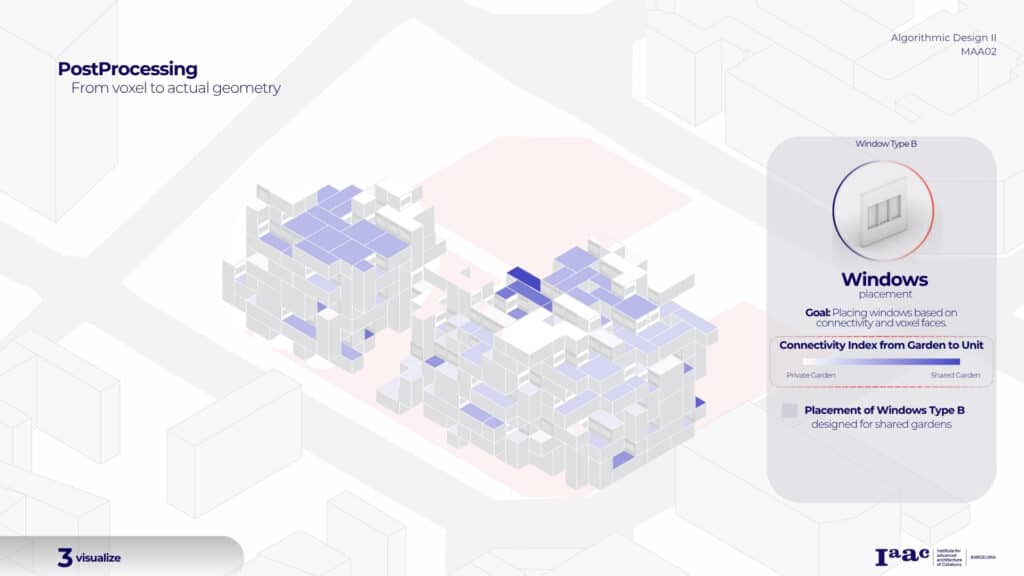
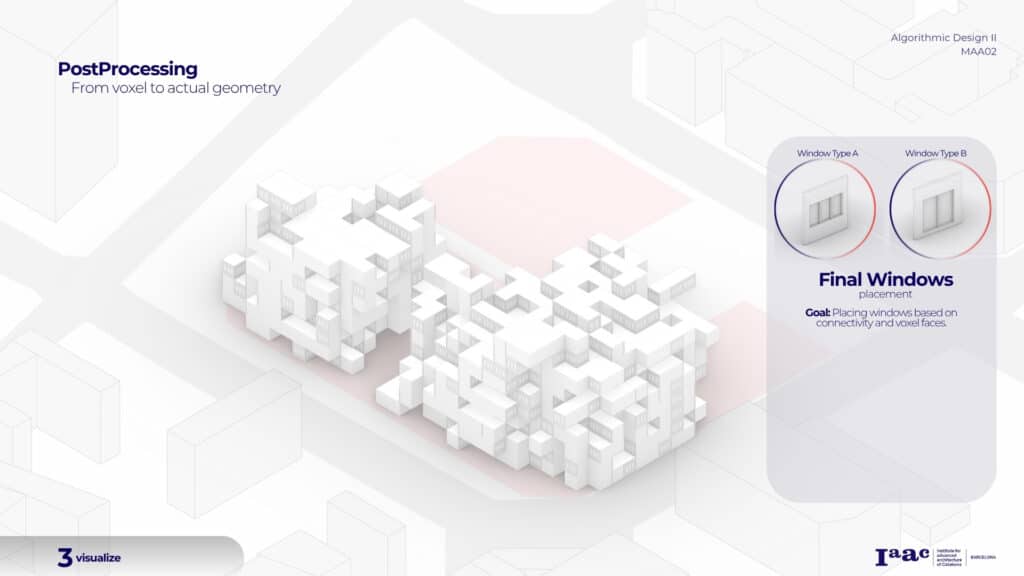
In order to define the windows facing the outdoor spaces we used the mapping of outdoor-indoor connectivity criteria
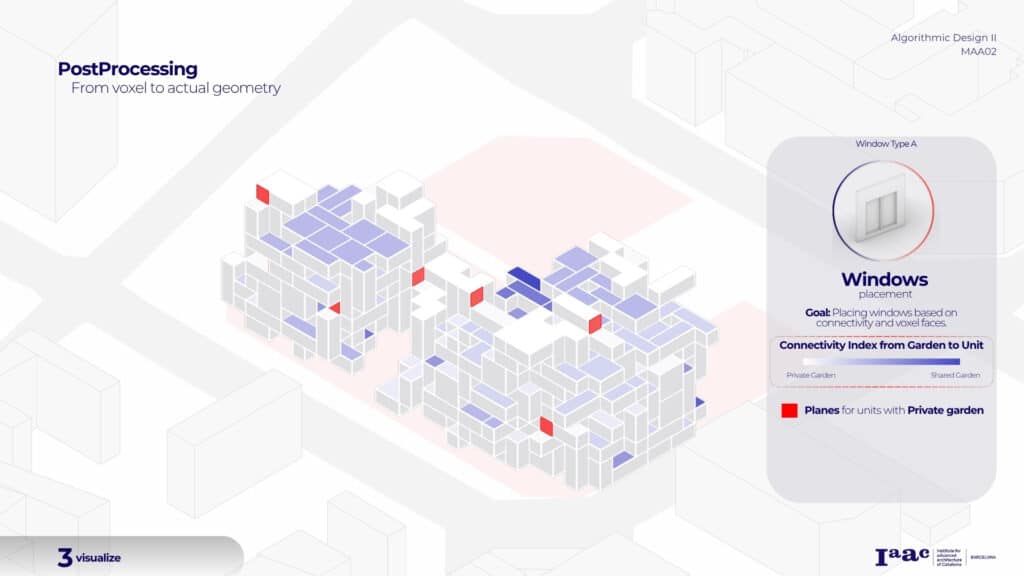
For the assembly objects or living units facing a private outdoor space.
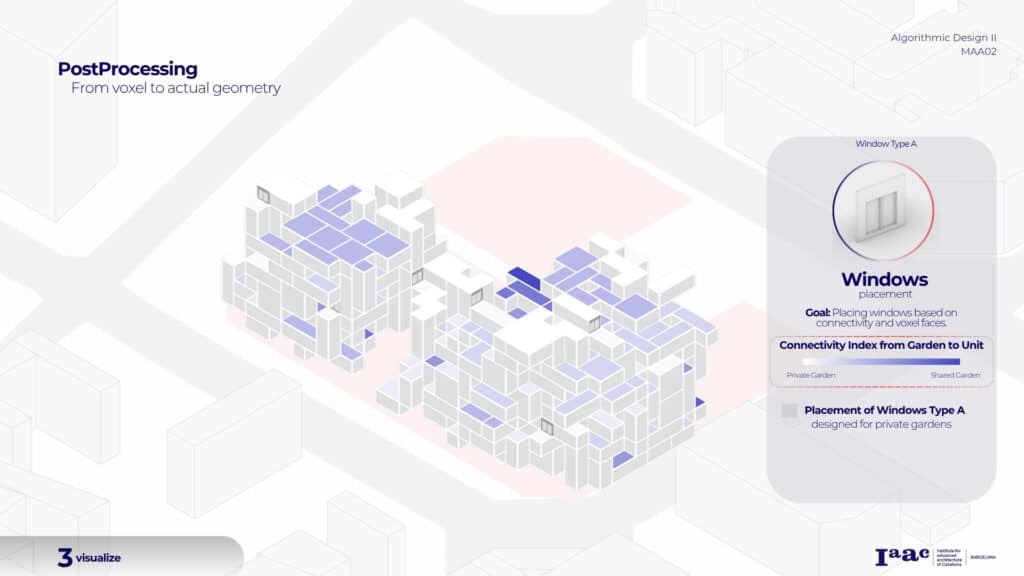
We placed ground to ceiling windows.
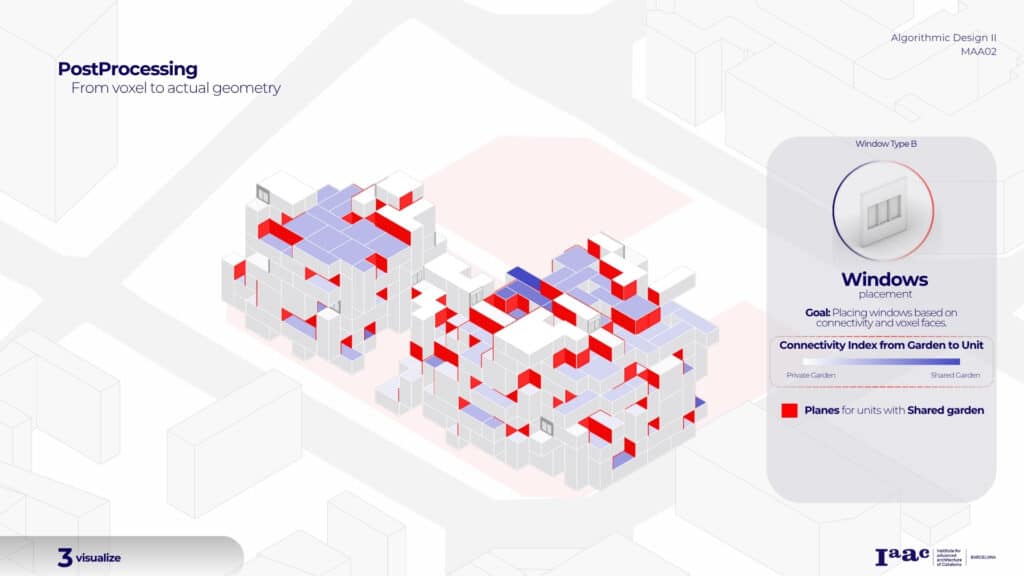
For the units connected to shared outdoor space, to achieve more privacy, we placed smaller windows.
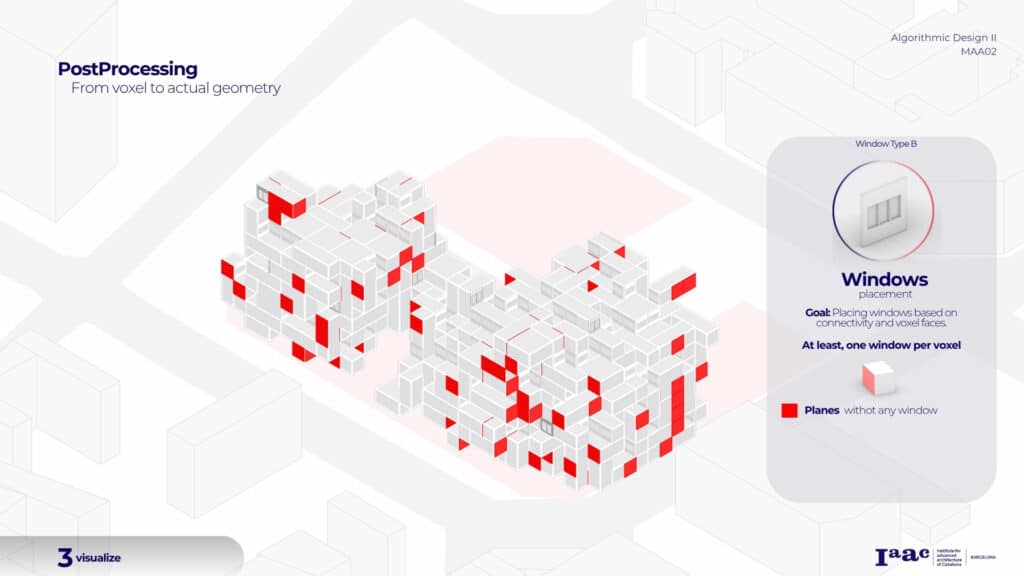
In order to place the additional windows we extracted the amount of windows each voxel has and made sure to have at least one window per voxel.
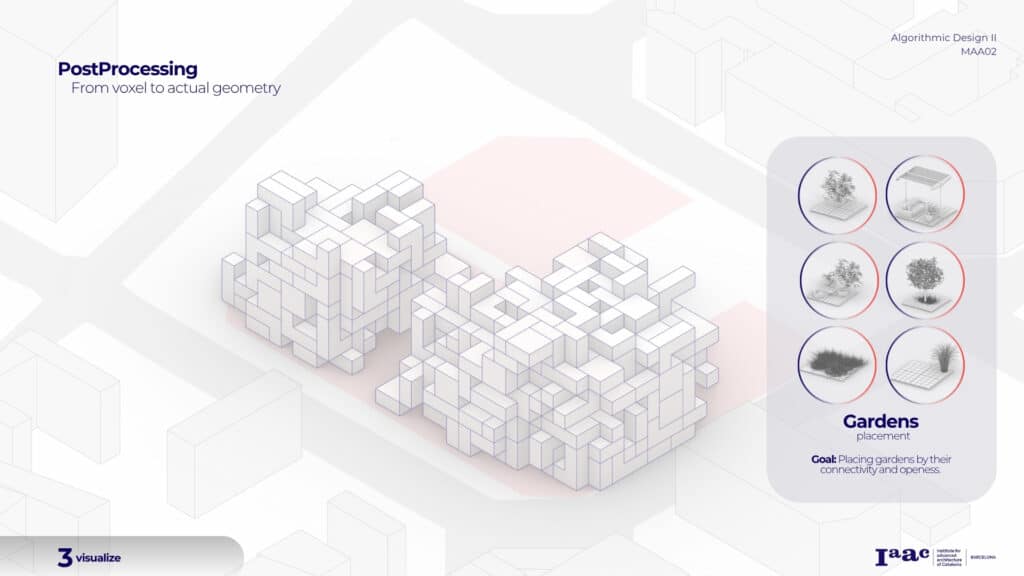
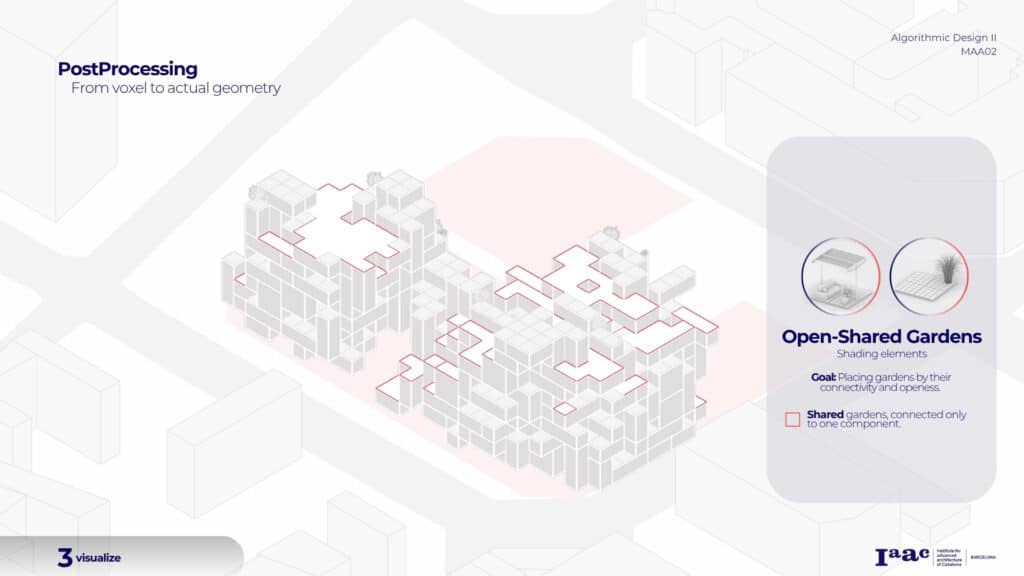
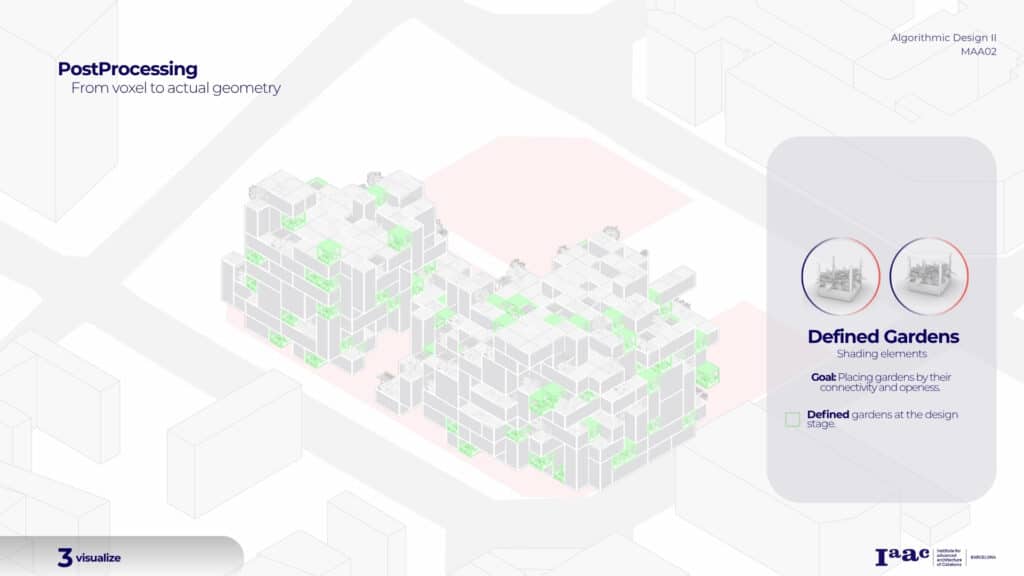
continuing with the garden placement process, we designed six different elements to respond to the specific conditions of each area.

This placement was based on two main evaluation criteria: sky openness.
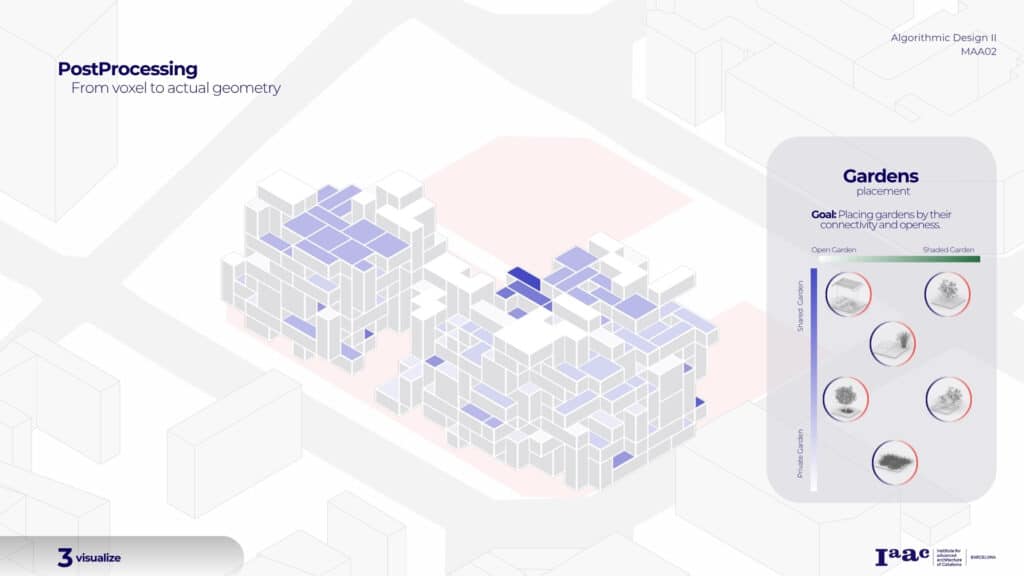
And connectivity index, helping us decide where each element should be located within the assemblage: open or shaded, and private or shared.
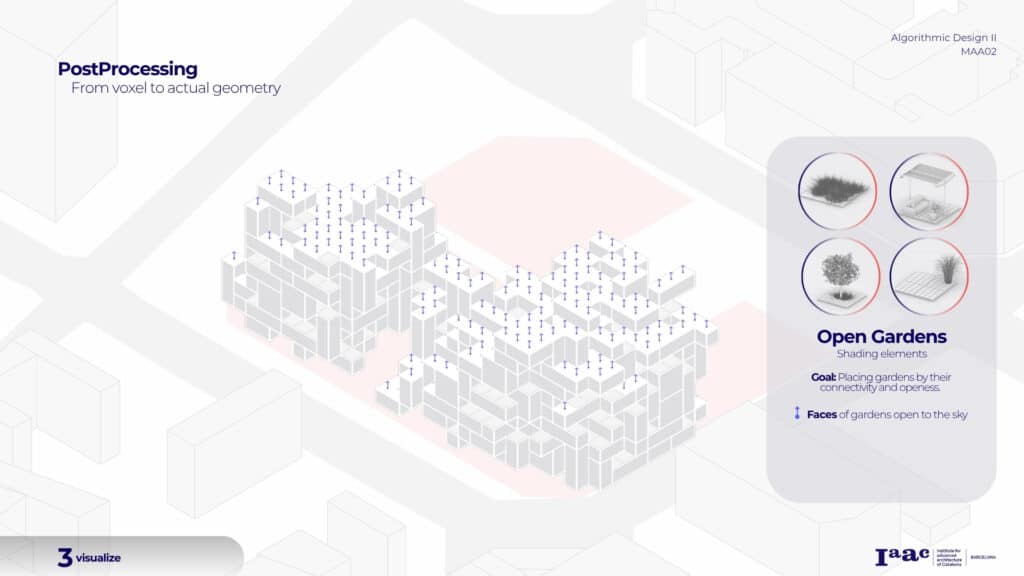
We started with the open gardens, designing a set of elements mostly intended to provide shade.
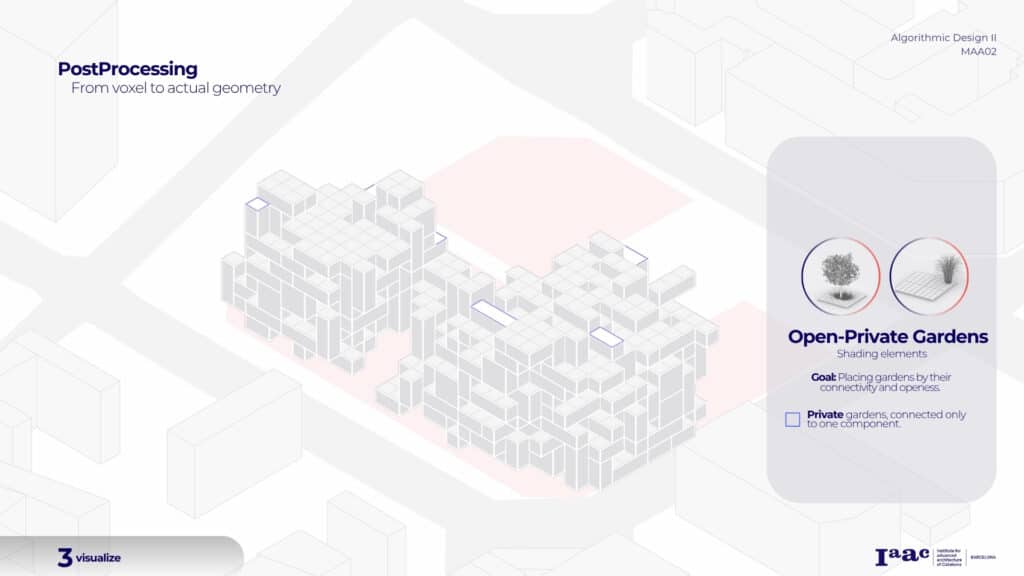
Private gardens were defined as those directly connected to just one component.
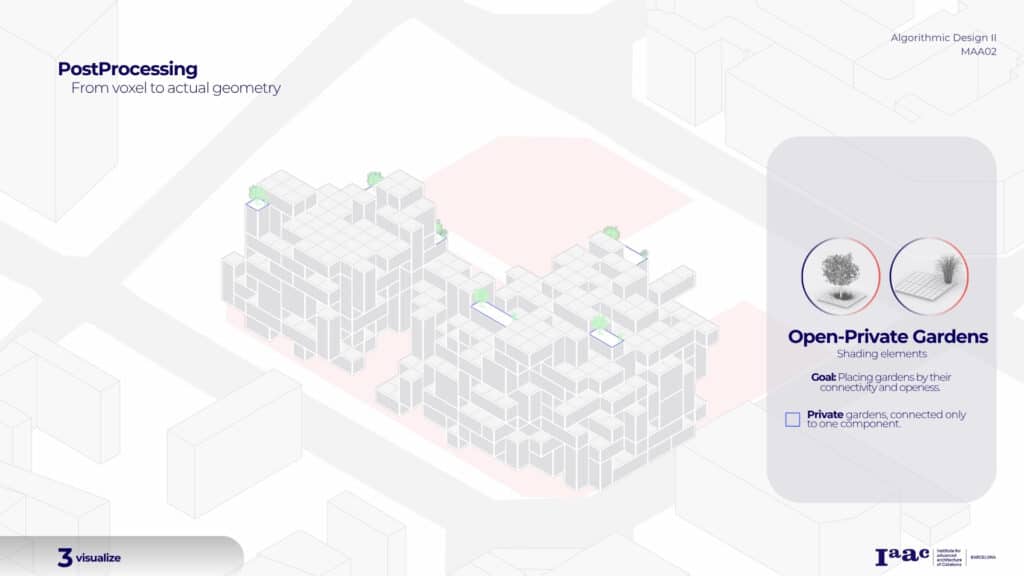
and positioned our designed element within the chosen area.
For open and shared spaces, which are areas used by two or more components.
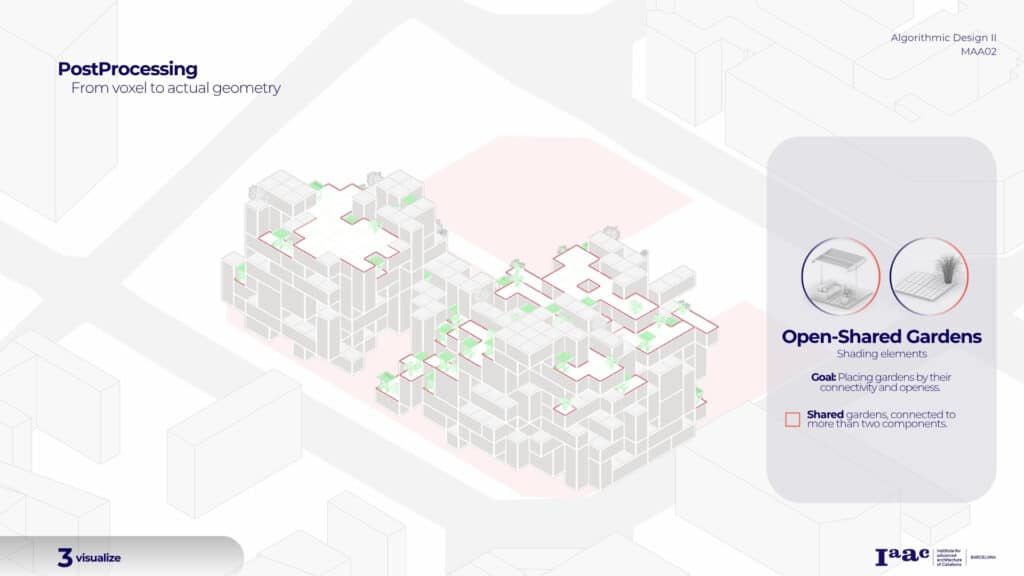
We added elements designed to make interaction between people in the community more natural and frequent.

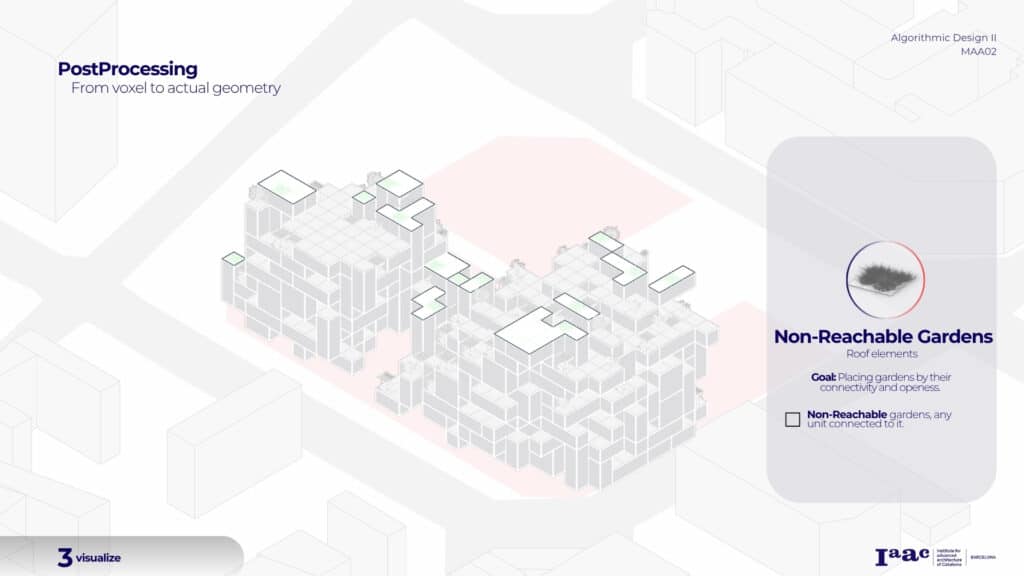
For those areas that aren’t connected to any component, we designed them without any intended human use or interaction.
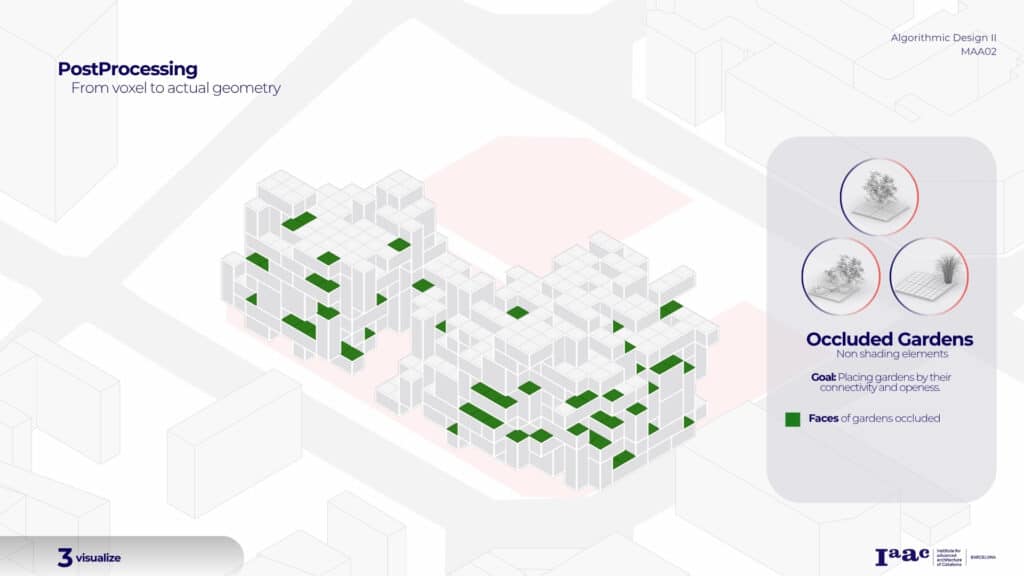
On the other hand, in the occluded gardens, the design was shaped by elements that could exist comfortably in shaded conditions.
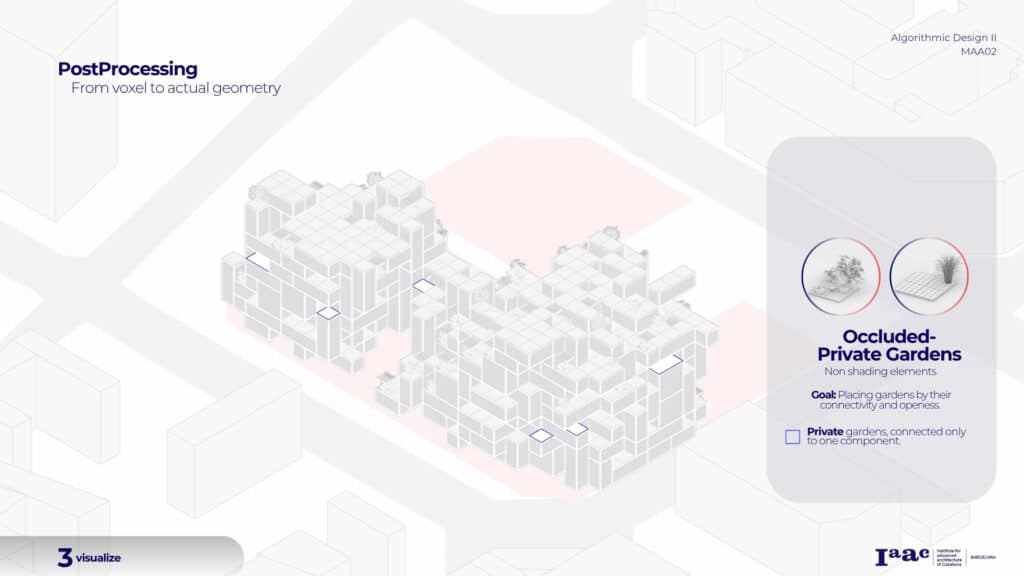
Likewise, for the shaded private gardens, we applied the same strategy as with the open ones — selecting only those areas connected to a single component.

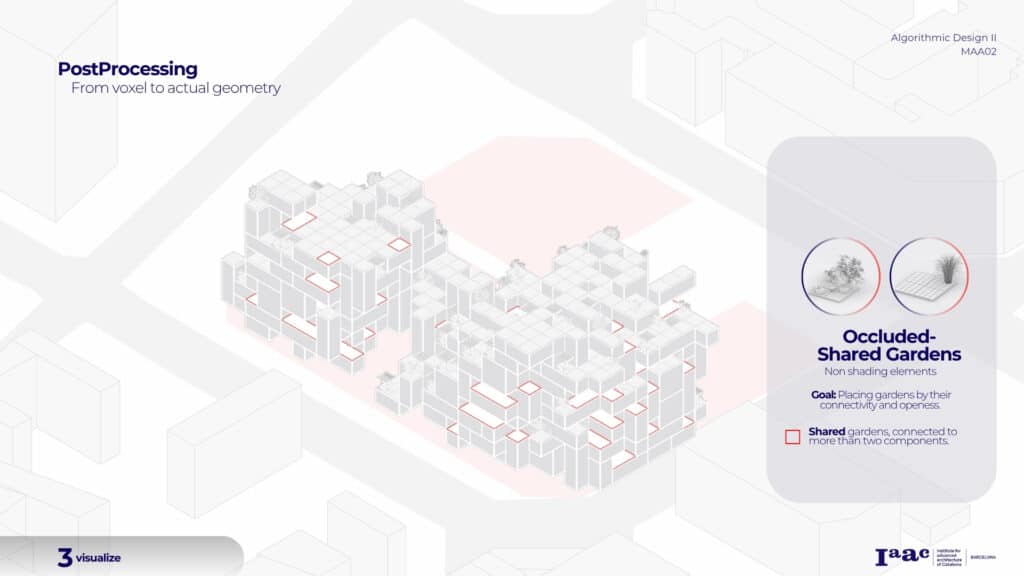
Similarly, for the shaded shared gardens, we focused on areas connected to multiple components.

Providing spaces that encourage active community engagement.
As mentioned at the beginning, it was also important to identify which gardens were associated with each component.
So we bring it back here to close this stage of the garden placement process.
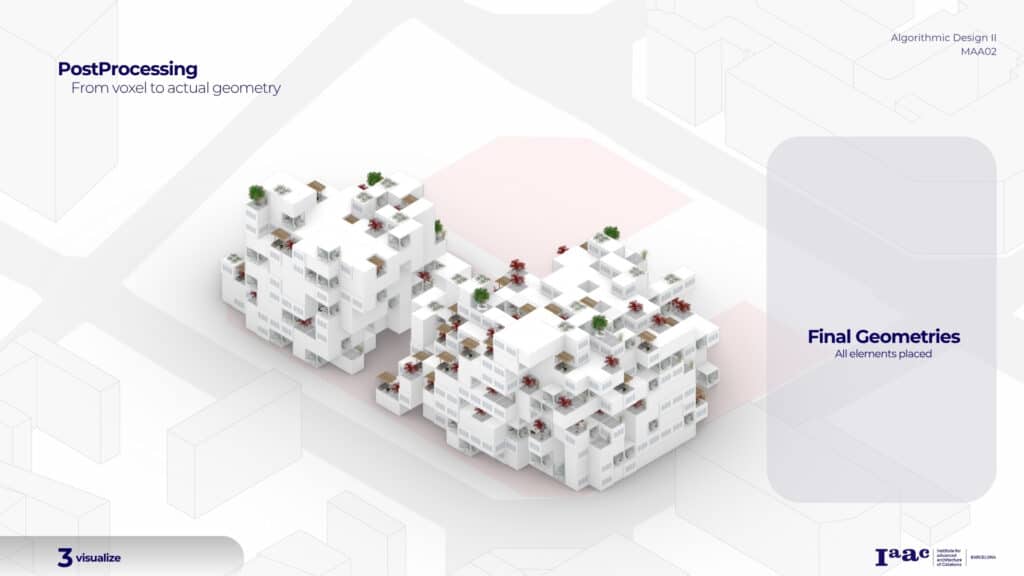
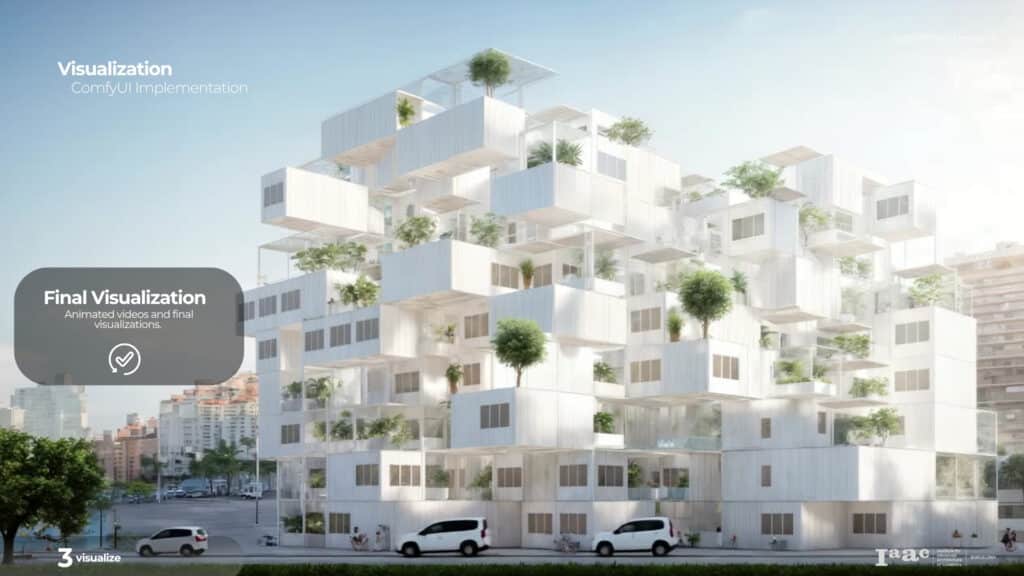
And finally bring all our elements together to visualize them within the full assemblage.
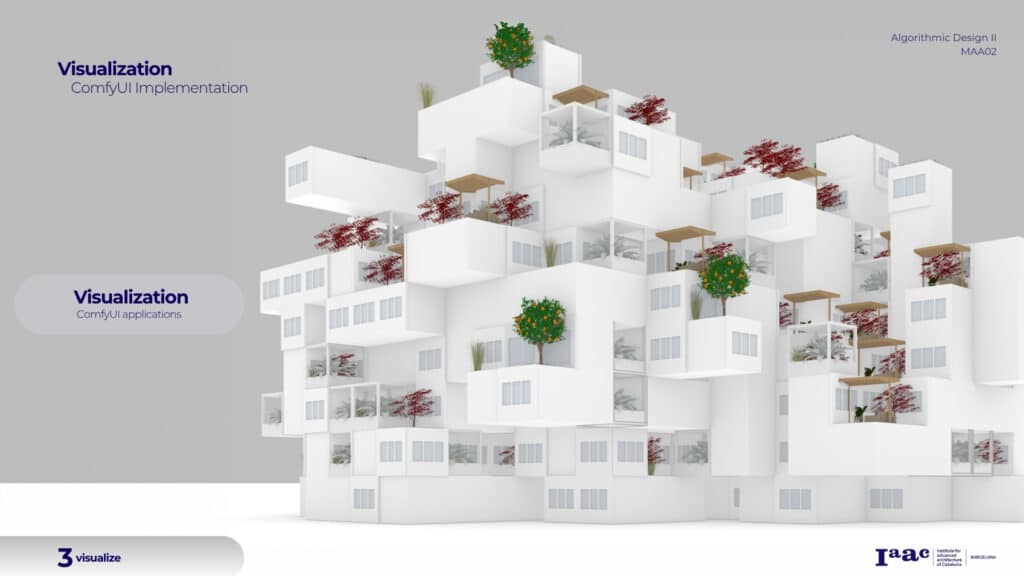
Now, shifting perspective to our last part— we wanted to go beyond analysis and explore how the basic design of our architectural elements could also serve as a foundation for visual storytelling. That’s where ComfyUI came in, allowing us to bring the assemblage to life through image generation.
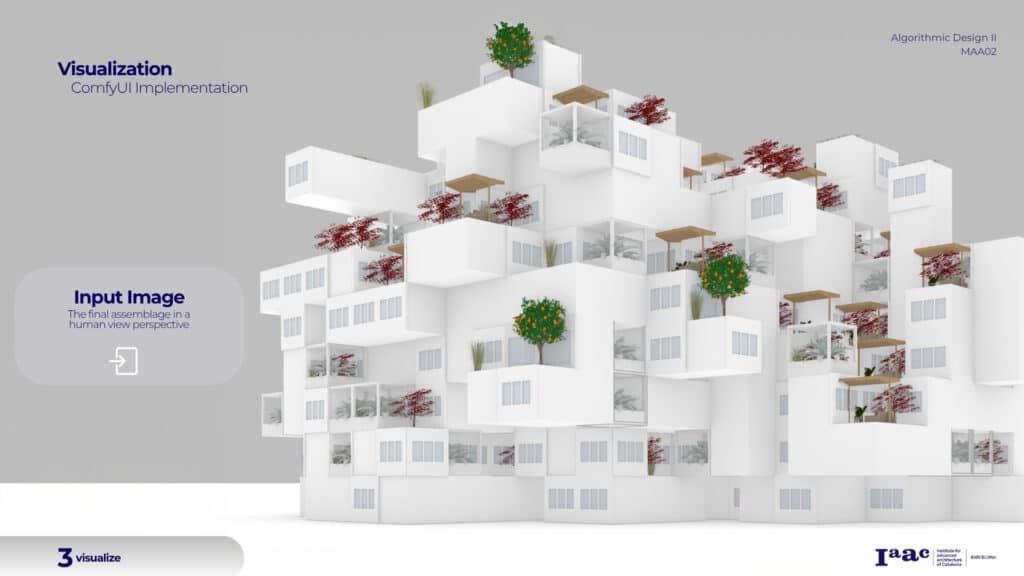
Our process starts with a human-scale image input of the assemblage, which is then refined through a series of post-processors.
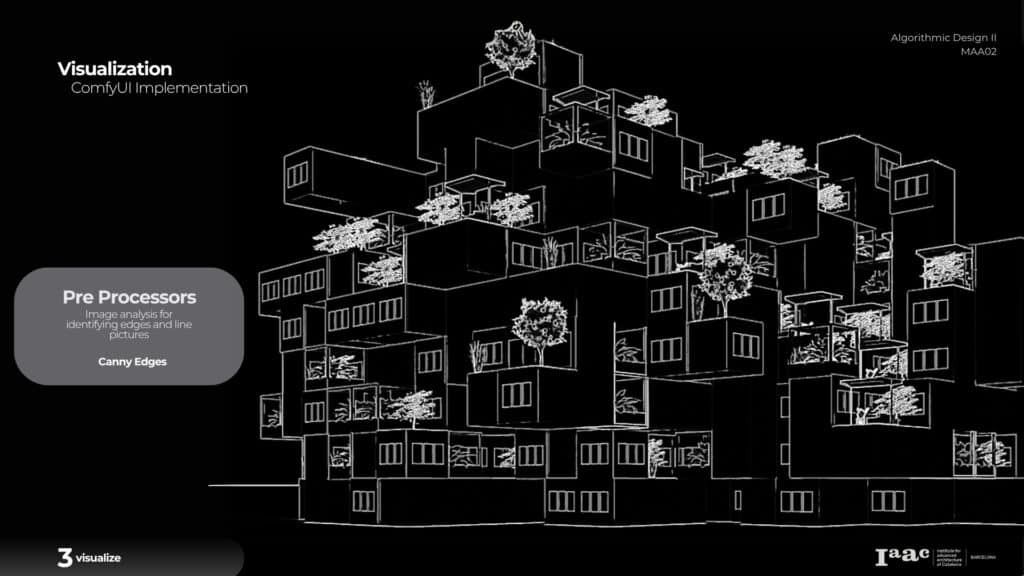
like Canny edges pre-processor to extract the main lines and geometry — allowing us to control specific architectural details like windows, openings, and overall form during the post-processing stage.
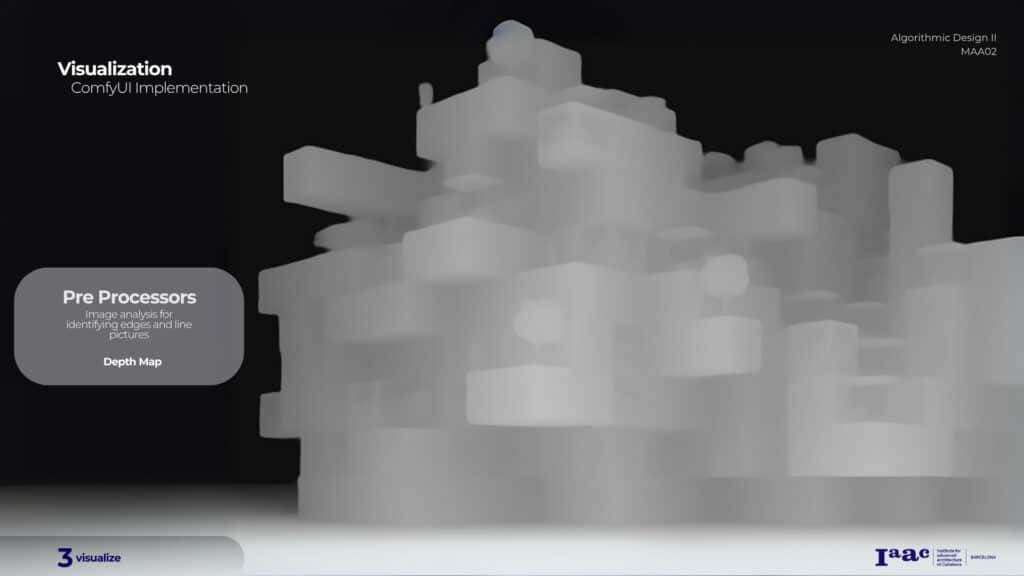
We also used a depth map pre-processor to extract the spatial depth of our image — allowing the model to understand distances, scale, and spatial hierarchy within the assemblage.
This pre processors allowed the model to understand distances, scale, and spatial hierarchy within the assemblage and its general geometrical compoistion.
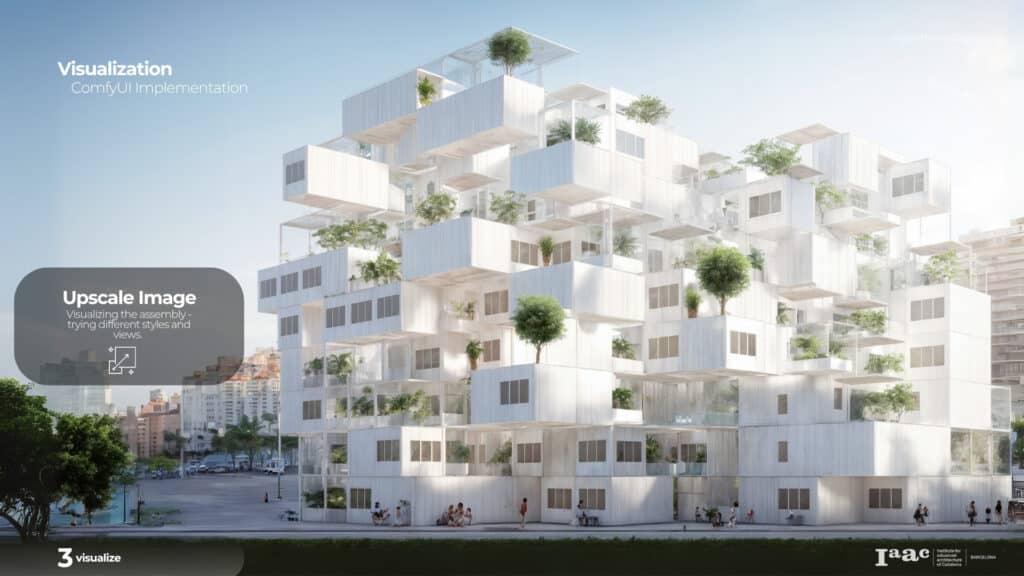
Finally, once we had the generated image, we applied an upscaler to enhance the resolution and refine the visual quality.
giving our assemblage a more polished and detailed architectural look.
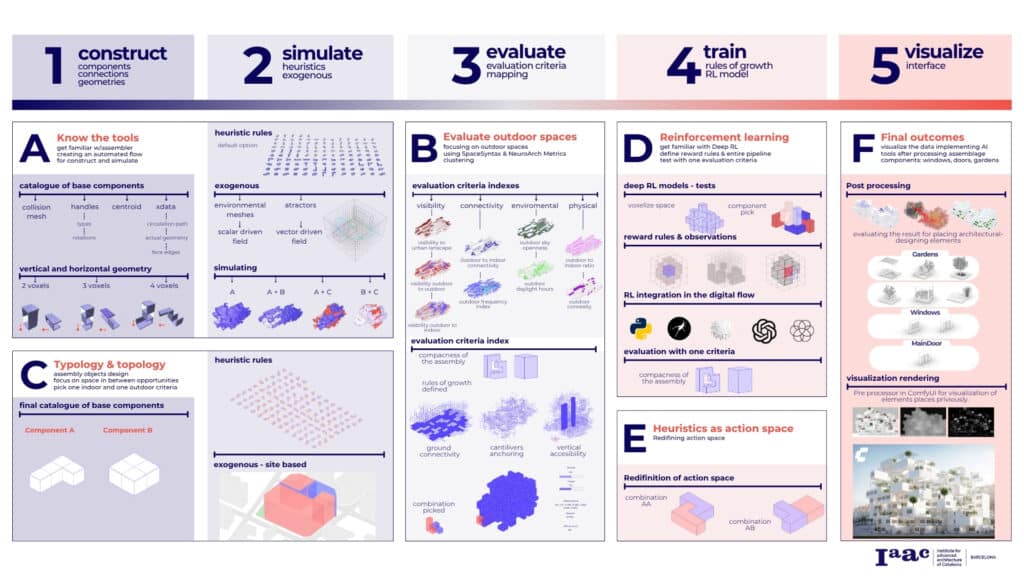
As a summerize of our thesis process, we followed 5 steps, In this research map, you can see the development of each of the chapters presented in different stages of the research.
References:
- Bonafede, A. (2021). Versus Habitat: Multi-agent spatial negotiation for topology-aware architectural assemblages [Master’s thesis, Università di Bologna]. AMS Tesi di Laurea. https://amslaurea.unibo.it/id/eprint/23408/
- Massafra, G. (2024). ReLighting Spaces – Addestramento della cognizione all’accesso alla luce diurna in assemblaggi spaziali combinatori tramite Reinforcement Learning [Master’s thesis, Università di Bologna]. AMS Tesi di Laurea. https://amslaurea.unibo.it/id/eprint/32405/
- Edelstein, E. A., & Macagno, E. (2012). Neuroscience and architecture: Designing with the brain in mind. SAGE Publications.
- Mallgrave, H. F. (2018). Architecture and embodiment: The implications of the new sciences and humanities for design. Routledge
- Hillier, B. (1996). Space is the Machine: A Configurational Theory of Architecture. Cambridge University Press.
- Erioli, A. (n.d.). Assembler Documentation. Notion. https://ale2x72.notion.site/Assembler-Documentation-aa694addf78a4263bd1d066ff8019dbb
- Mintrone, A., & Erioli, A. (2021). Training Spaces: Fostering machine sensibility for spatial assemblages through wave function collapse and reinforcement learning. Proceedings of the eCAADe 2021 Conference. https://papers.cumincad.org/data/works/att/ecaade2021_148.pdf
- Sánchez, J. (2016). Combinatorial design: Non-parametric computational design strategies. En ACADIA 2016: Posthuman Frontiers: Data, Designers, and Cognitive Machines (pp. 44-53).
- Yang, D., Sun, Y., di Stefano, D., & Turrin, M. (2018). A computational design exploration platform supporting the formulation of design concepts. ResearchGate. https://www.researchgate.net/publication/329859699_A_Computational_Design_Exploration_Platform_Supporting_the_Formulation_of_Design_Concepts
- Finch 3D. (n.d.). Finch 3D: A generative design tool for architects. Recuperado de https://www.finch3d.com
- Intelligent City. (n.d.). Platforms for Life: Sustainable urban housing solutions. Recuperado de https://intelligent-city.com
- DeLanda, M. (2016). Assemblage theory. Edinburgh University Press.
- Deleuze, G., & Guattari, F. (1987). A thousand plateaus: Capitalism and schizophrenia (B. Massumi, Trans.). University of Minnesota Press. (Original work published 1980)
- Watanabe, M. S. (2002). Induction Design: A Method for Evolutionary Design. Springer Science & Business Media.
- Alexander, C., Ishikawa, S., Silverstein, M., Jacobson, M., Fiksdahl-King, I., & Angel, S. (1977). A pattern language: Towns, buildings, construction. Oxford University Press.
- Stiny, G. (2006). Shape: Talking about seeing and doing. MIT Press.
