
Animating Light with a 6 Axis Robot
Light painting—an extraordinary photography technique that transforms the darkness into a canvas and lights into brushes. In this blog post, we’ll present our concept of Van Glow, a robotic arm End Effector that can create animations with light.
Context
Light painting is a photographic technique where exposure is made by moving a light source or by moving the camera, and the paths of light sources are captured and recorded on photographic media during a long exposure. It’s a process where the movement of light, typically in a dark environment, is captured by a camera with an open shutter over a period of time, resulting in a dynamic and visually striking image. This form of photography essentially uses light as a medium to create images, where darkness acts as the canvas and light sources as the brushes. Understanding this technique involves exploring its principles, equipment, and methods, which allow photographers to create these unique and artistic images.
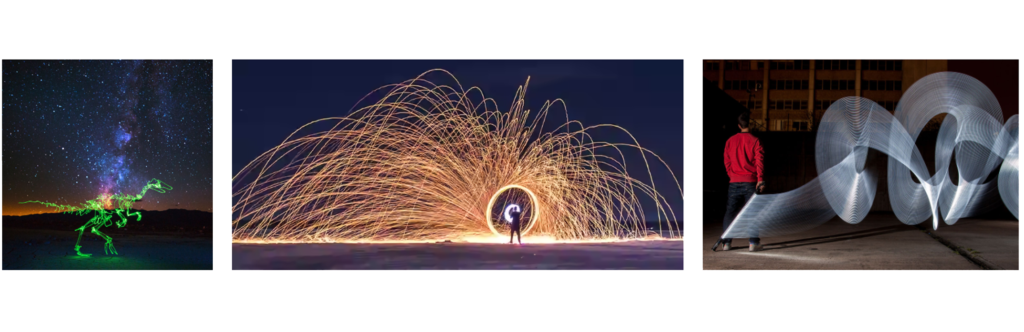
Figure 01: Examples of hand held light-painting photography
State of the Art
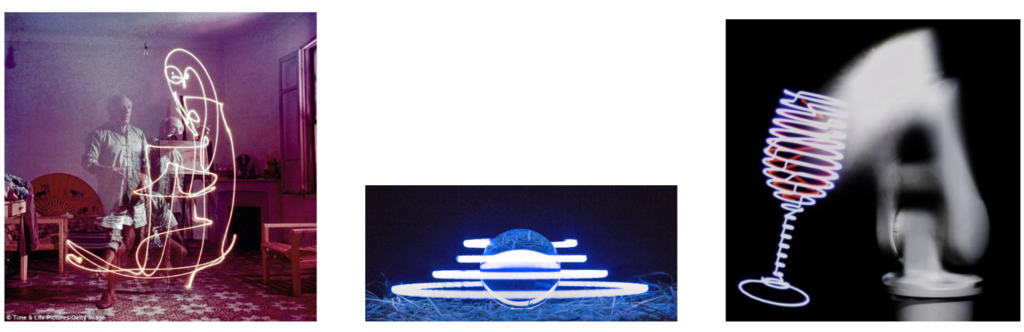
In the current landscape of light painting, various projects showcase the vast potential of this technique. From the early experimentation by visionaries like Pablo Picasso to modern innovations such as Josh Sheldon, who inspired us by utilizing a 3D printer and a single LED to animate light. Another project, conducted by IAAC, involved using a robot to paint with light, though it did not incorporate animation or full automation.
What We Want
Our objective extends beyond capturing singular moments, as we aim to animate light sources, creating a sequence of moving visual spectacles. The focus is on achieving a seamless flow of light, manipulating individual lights to introduce fluidity and dynamic changes throughout the exposure. To realize this innovative vision, we have developed a specialized end effector for a robotic arm. This advanced tool allows precise control and movement of light sources, enabling the creation of complex, animated light paintings. By capturing multiple frames and combining them into a sequence in post-production, we can create a captivating display of light in motion, pushing the boundaries of traditional light painting into new realms of creativity and technological integration.
Hardware
To achieve our goal of painting animations and being able to create a smooth surface, individual lights and color changes with light we started by developing a stratergies of how we can achieve the different effects.
The main aims were:
- LED strip that can change colors
- A diffuser that can cover the LED Strip for a smooth surface effect.
- A way to capture the Images automatically.
Van Glow V1
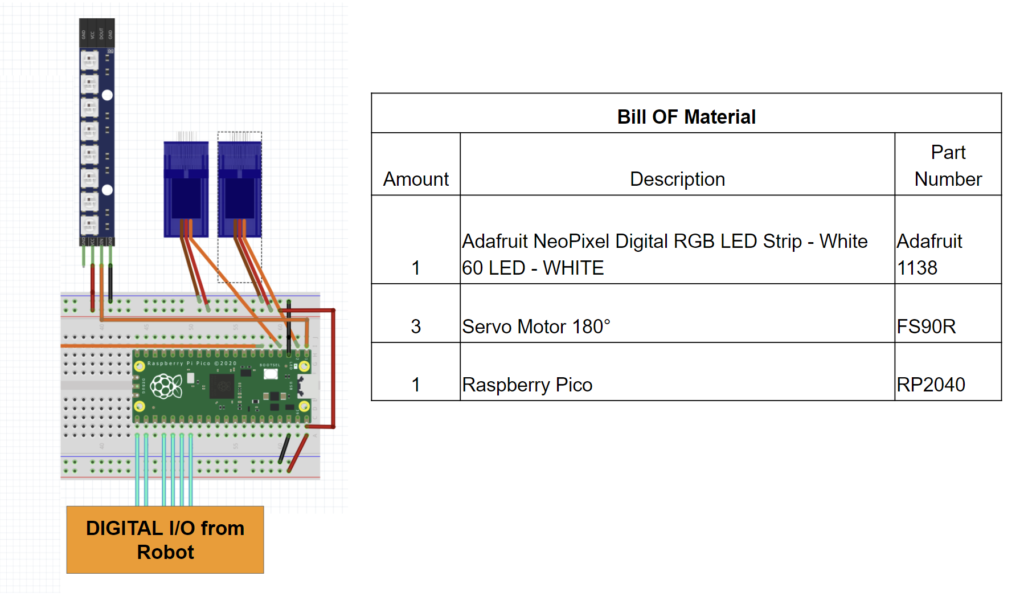
For the hardware, we employed a Raspberry Pi Pico and programmed it using CircuitPython. This choice provided us the flexibility to leverage Python instead of Arduino, offering advantages, particularly when engaging in more intricate projects. Our selection of components includes an Adafruit Neopixel LED strip, a diffuser sheet, and two servos. These components will eventually be connected to the robot for activation.
The design was fully developed based on the function we aimed to create. To achieve a smooth light, we needed a diffuser over the LED strip. The diffuser had to maintain the same distance to the LEDs as there is in between them to create a smooth surface and avoid the visibility of the LEDs. When we wanted a single LED to glow or the whole array, we needed the diffuser to be removed. That’s why we used the two servos to control the diffuser.
In the first prototype crafted from cardboard above, we’ve successfully implemented controls for both lights and servos using buttons. These buttons serve as placeholders for the digital outputs of the robot. This version features six buttons for various functions. The first three (from left to right) are dedicated to the colors R, G, and B, allowing for individual color triggers as well as the option to mix them. The fourth button activates a single LED, the fifth initiates camera functions, and the sixth places a diffuser over the LED strip.
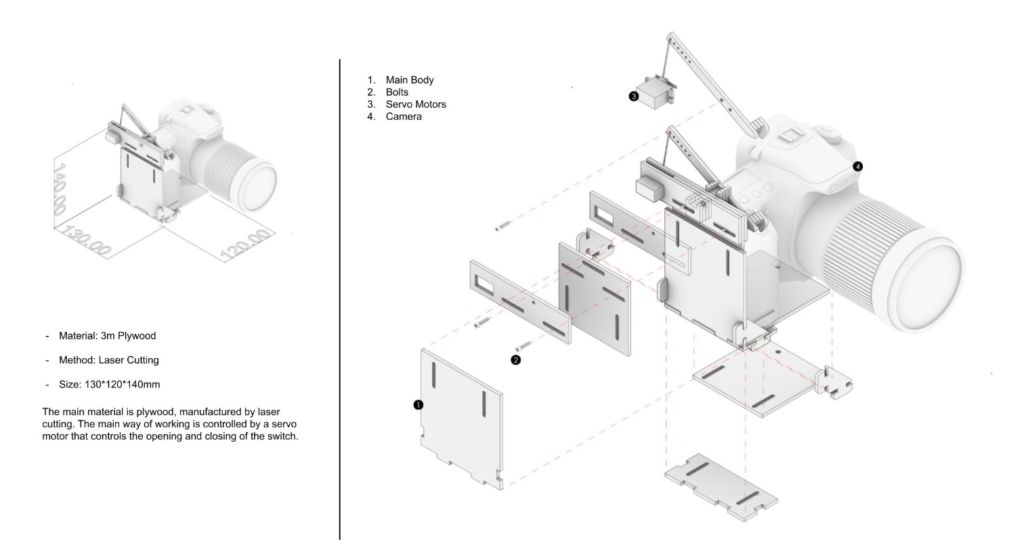
Camera Trigger
The Camera Trigger posed a significant challenge in this project, primarily due to our choice of camera. We opted for the Nikon 7100D, as it was readily available to us. Initially, we considered using a USB cable to connect to the camera, intending to cut it and trigger the camera with a simple signal from a relay. Essentially, the relay would simulate the press of a button, much like a remote trigger, but this approach proved unsuccessful. After experimenting with various triggering methods, and faced with time and technological constraints, we ultimately decided to construct a physical trigger operated by a servo motor. This solution allowed us to press the button on the camera reliably and effectively.

How it works
To go through a single frame of light painting, the robot has to fullfill mutilple movements and actions. In summary, this is what needs to be completed:
- Trigger the Camera to open the shutter
- Turn on the chosen LED’s when ready to shoot.
- Turn LEDs off when Finished painting or moving to the next target
- Trigger the Camera to close the shutter again.
The six-axis capability of the robotic arm permits precise orientation of the LEDs, enabling them to be aimed directly at the camera.

Video
We made a short video to show the capability of Van Glow:
Final Designs
Design & Robotic Simulation
To achieve the effect of animating with light, we opted to employ simple geometries and alter their positions in a manner that would enable seamless looping. The designs we generated were only constrained by time. Given the fast-paced nature of this module, we were unable to explore further possibilities. We would have liked to delve into more intricate designs, address issues with delays, and facilitate more color mixing during the movements. Below there are some examples of the movement the robotic arm had to complete to achievee the designs.


