1 | INTRODUCTION
What is willow weaving and why do it with a robot?
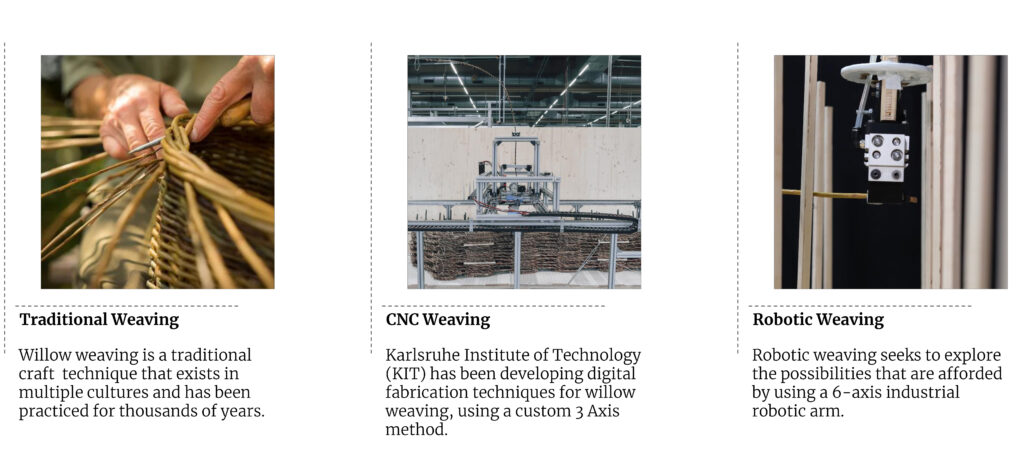
Willow weaving as a robotic operation needs to be understood in context. Our archaeological records date bake basket weaving back over 14000 years, older than pottery. An ancient craft that is practiced today in virtually the same way that it has always been practiced.
Karlsruhe University of Technology has been experimenting with integrating willow weaving into modernised construction methodologies. They have created composite willow earth slabs and formulated a custom manufacturing process involving a 3 axis cnc machine and a customised willow extruder. They have created multiple demonstrators, showing the promise of this material as a modern low-carbon building material with structural possibilities.
The question that our investigation seeks to answer, is what new avenues of exploration can be opened up through the use of a 6-axis industrial robotic arm. HOw does this pick up on the understanding that has been developed by KIT and their approaches to advanced construction using willow, and how does this open up corridors not yet explored.
2 | WILLOW MODULE PARAMETERS
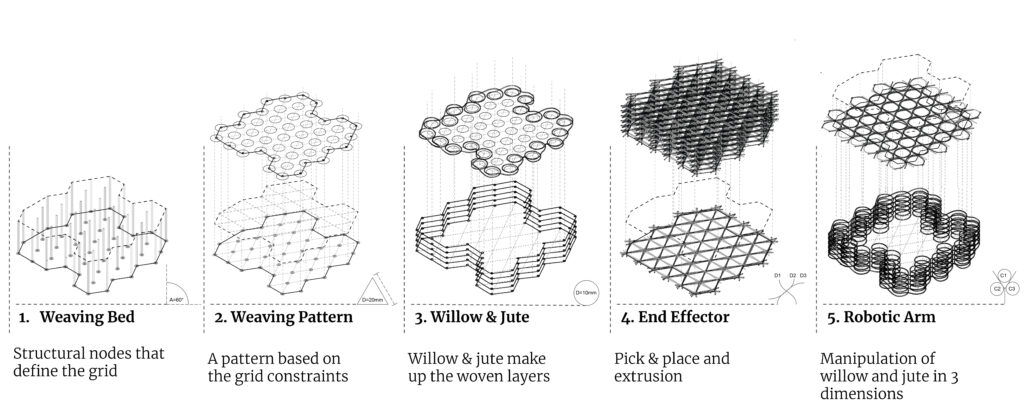
These 5 parameters make up the constituent parts in the production of a willow module
The process of willow fabrication with the 6 axis robotic arm that we followed can be broken down into 6 keys parameters. Firstly there is the weaving bed. This can be thought of as the structural grid and constraint which the weaving pattern needs to follow and adhere to. In this way, all further steps are subordinate to this parameter. Next is the weaving pattern itself. The weaving pattern creates the pattern of material placement, which has both a structural and aesthertic characteristic. Choosing an appropriate pattern needs to balance both. Furthermore, there is the material properties itself to be considered. Which is the third parameter. The material we used is willow branches and jute yarn. These materials were applied in layers until a panel module is produced. The elasticity and bending tolerances of the willow branches play a major factor and need to be accounted for in the pattern, as they may break if the radius of a turn is too small. The next parameter is the end effector which has an associated actuation process. In our cases we used a multi purpose end-effector which could pick and place, as well as deposit jute. the end effector has a geometry that also needs to be accounted for. The last parameter is the 6-axis robotic arm which is the object responsible for the manipulation of objects in space, collecting the willow branches, weaving them through the grid, as well as securing them with jute.
3 | WEAVING PATTERNS
Willow weaving pattern development and iteration
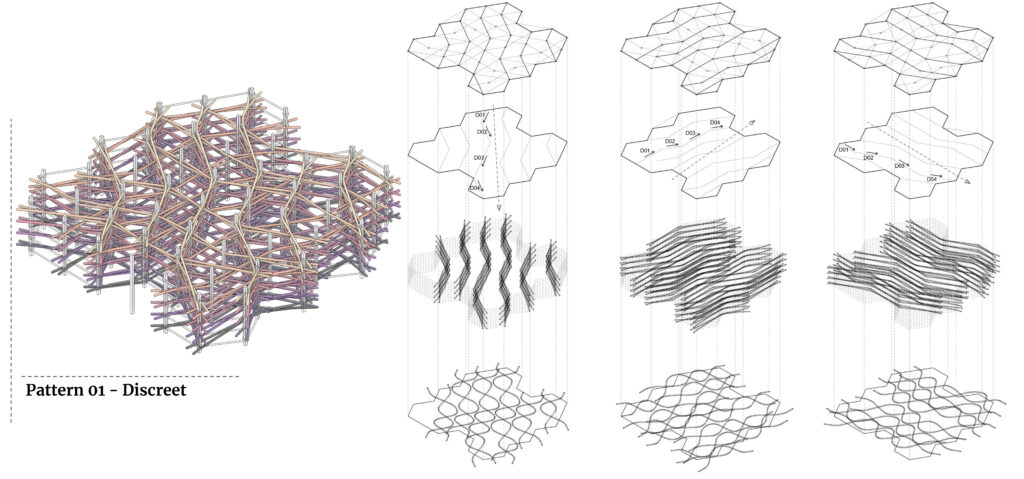
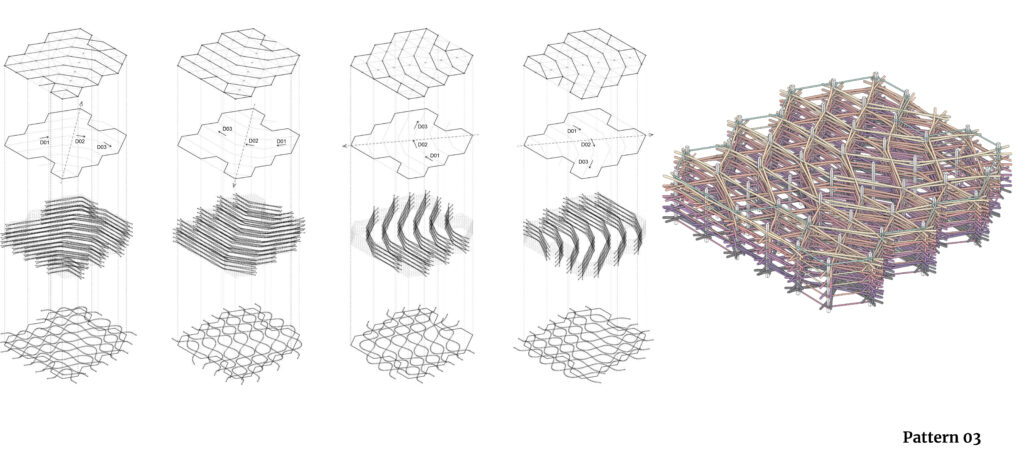
We looked at 3 different computational strategies for determining our weaving pattern. We looked at discrete vectors, which fixes the direction of willow branches along fixed predetermined paths. We also looked at something called a Hamiltonian path, which seeks to create a continuous path through a series of points in the shortest possible path without repeating the same points. The last pattern we experimented with was a shortest path generation, which looked at what the shortest path from the perimeter to a random point is. Which results in branching or stream like paths.
Discreet Vectors

Hamiltonian Path

Shortest Path

Of these computationally generated options, the strategy we decided to try, was the discreet vector option. In theory it functions well and produces a strong and complex form. HOwever, in practice what ended up happening is that along certain vectors the willow branches were not in any tension and were hanging freely. Here we discovered that willow weaving relies on three points in a straight line in order to be effective.
After this we deployed a manual strategy which we designed and created toolpaths for manually. This pattern made use of our new understanding of grid requirements for stable weaves. In this case the reality and our simulations were much better aligned.
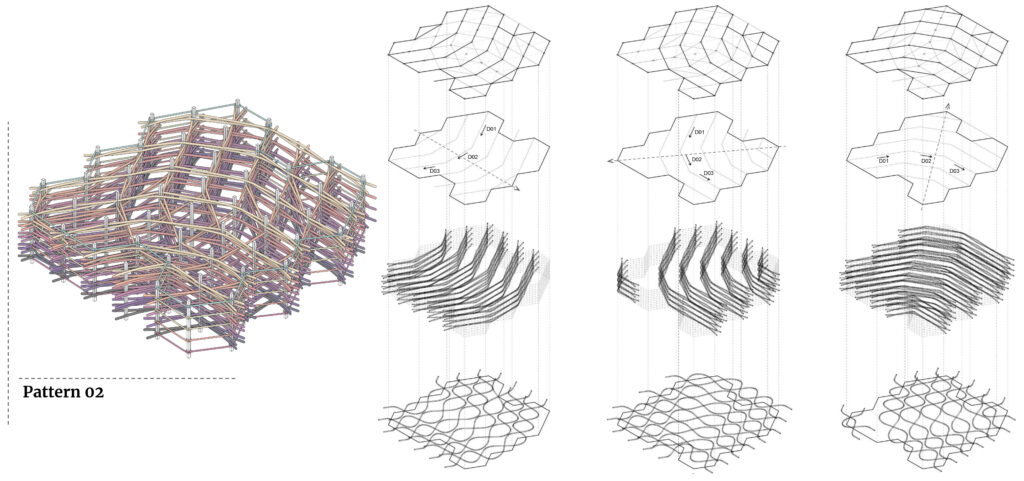
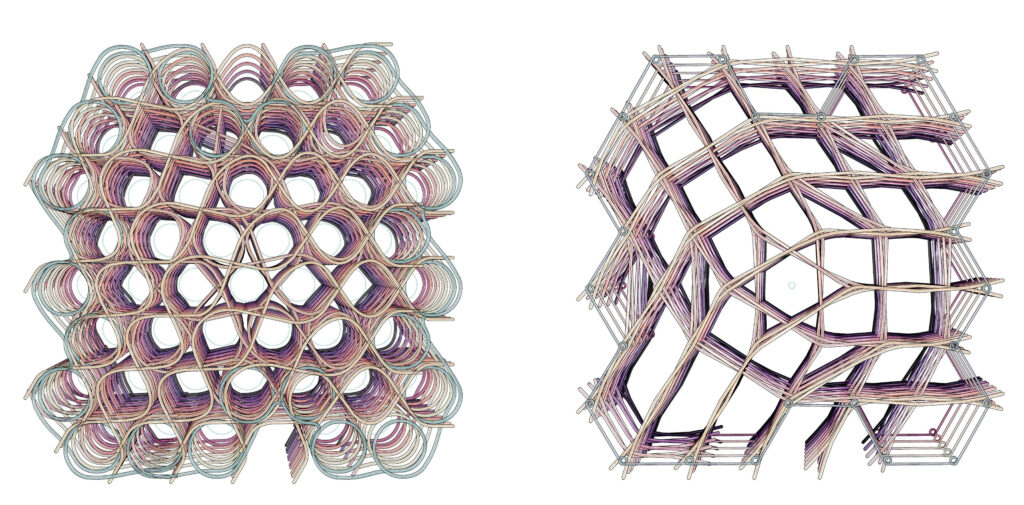
3 Dimensional Tool Path of willow
This graphic illustrates what the willow toolpath looks like, next to what the pattern looks like when all the members are tensioned.
4 | ROBOT SIMULATION
Operation
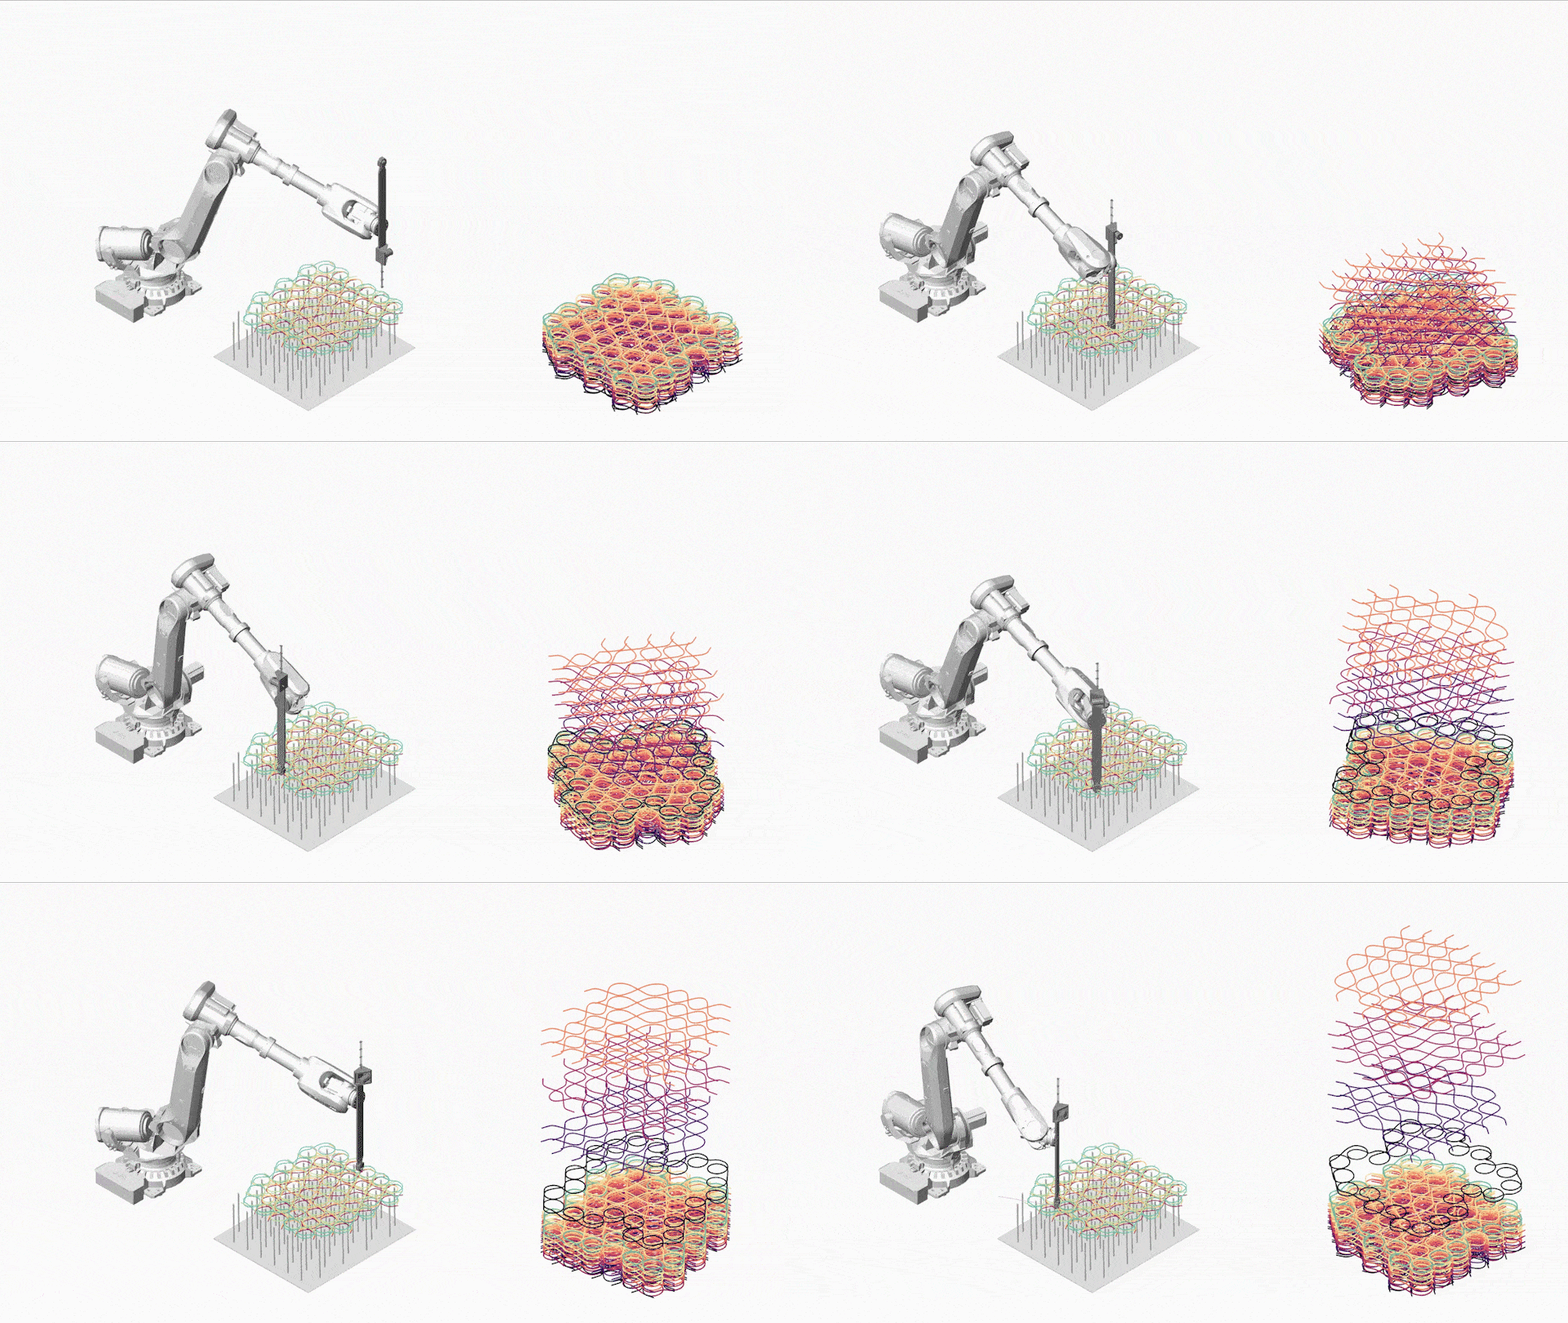
This simulation shows the toolpath of the robot, as well as the various layers that make up the woven module. Each layer is individually simple, however in conjunction form a strong and complex woven lattice.
5 | PROCESS IN ACTION
Documentation of the production process in reality
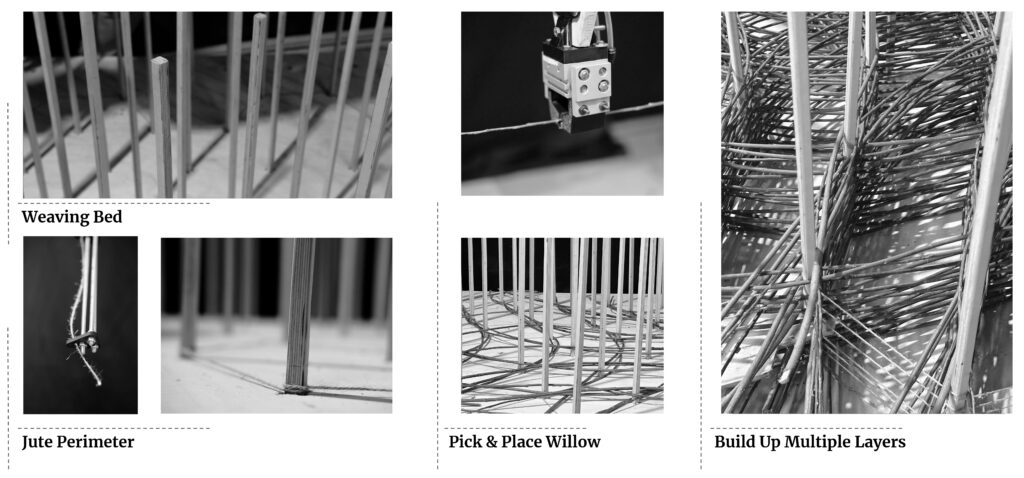
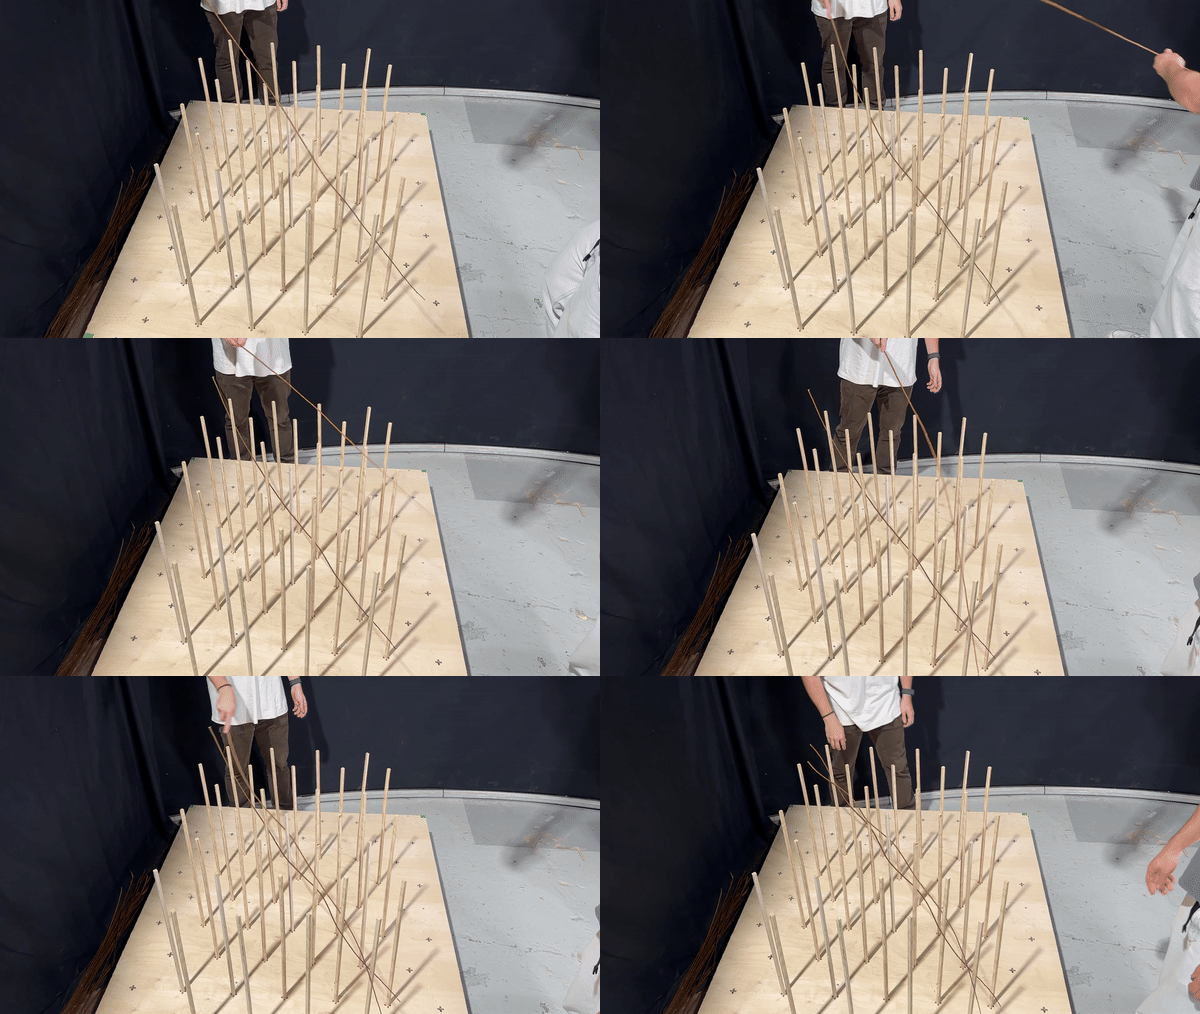
This image shows the different elements that have been discussed and how they were implemented in reality. One thing this image does not show is how much human intervention and labour was required in order to ensure that this operation occurred successfully. In reality, the process ended up being very unreliable ad was entirely dependent on constant human intervention in order for it to function.
6 | LIMITATIONS & IMPROVEMENTS
1. Weaving Bed
Given that in reality we utilised far more human intervention than we would have liked and the process did not run as reliably as one would want for a construction system to be considered robust, we decided to look into specific things we could change in order to better execute our design.
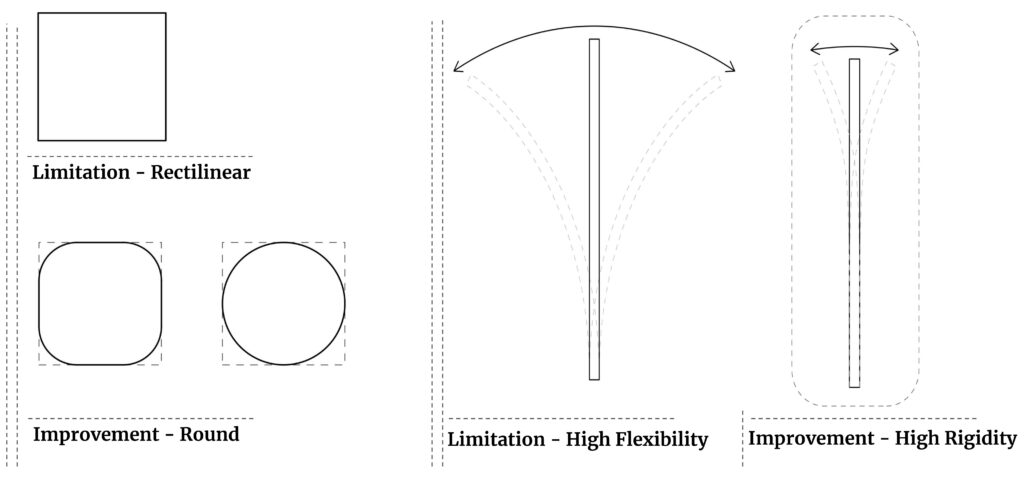
The first thing we looked at in this regard is the weaving bed.The pole profile had a major impact on the friction between the willows and the poles as they were woven, as knots in the willow would regularly catch on the sharp edges of weaving poles. we found a large increase in efficacy after sanding down the corners and think this could be taken further by having completely round poles.
The next limitation we faced was the flexibility of the poles. Pole flexibility made it easier to weave willow branches, as it added tolerance. However in turn, the large amounts of tensions applied by the willows, deformed the poles and warped the final geometry.
2. Weaving Pattern
When it comes to the weaving pattern there were factors influencing structural integrity that became apparent to us. One is the necessity of triangulation. The pattern that we designed resulted in a diamond lattice. This pattern lacks structural rigidity and doesn’t effectively resist deformation. Therefore triangulation strengthens the structure. The second parameter at play is the perimeter joint condition. When a willow joint in the perimeter is unidirectional it lacks multi directional stability and results in a weak perimeter. Thus, it is necessary to have a joint with willows from at least two directions and ideally perpendicular.
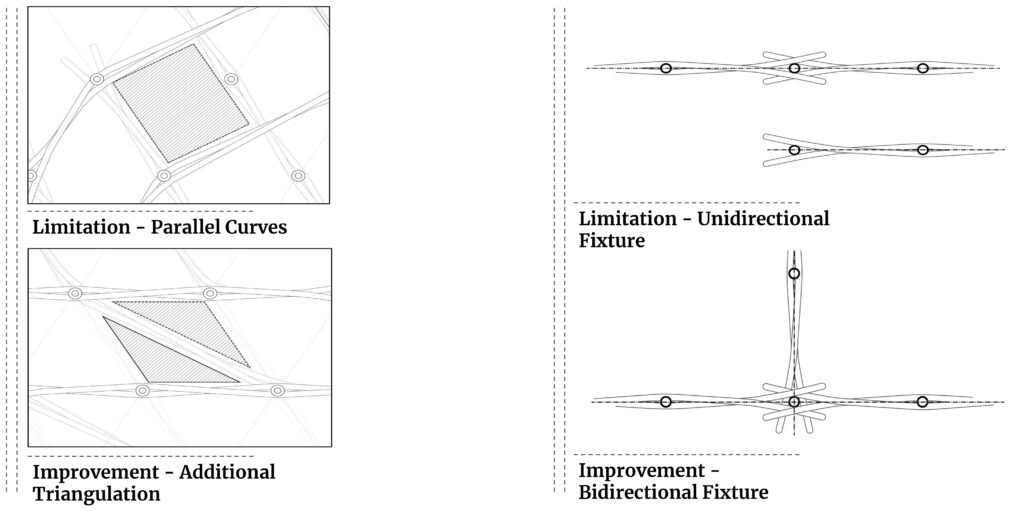
This example shows an additional layer of willows making up a more complex pattern. The additional layer has resulted in triangulation and thus a stronger module. Additionally in the perimeter, this has resulted in bi-directional joint conditions. Ultimately this pattern results in a much more stable module.
3. Material – Willow
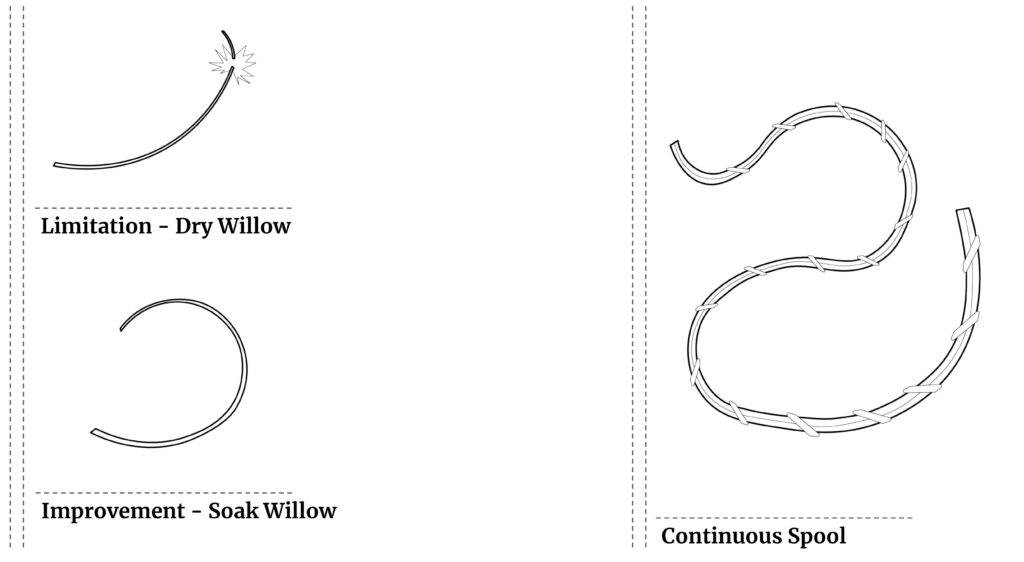
The willow that we worked with was allowed to dry over time, but was not processed in any additional manner. This results in a slightly more brittle and stiff material than we would have ideally wanted. Thus, we think that processing the material would result in much better outcomes. There are two main strategies for processing willow in order to make it more malleable and susceptible to weaving. The first strategy is to steam the willow, this takes roughly 24 hours. However, this process is highly energy intensive. Alternatively, the willow can be soaked for 2 to 3 months. Although this process is comparatively much slower, it is much less energy intensive and is a far greener alternative. Looking at how KIT has woven willow in the past, they made use of a continuous willow spool. We believe this strategy is ingenious and is the ideal path to take.
4. End Effector
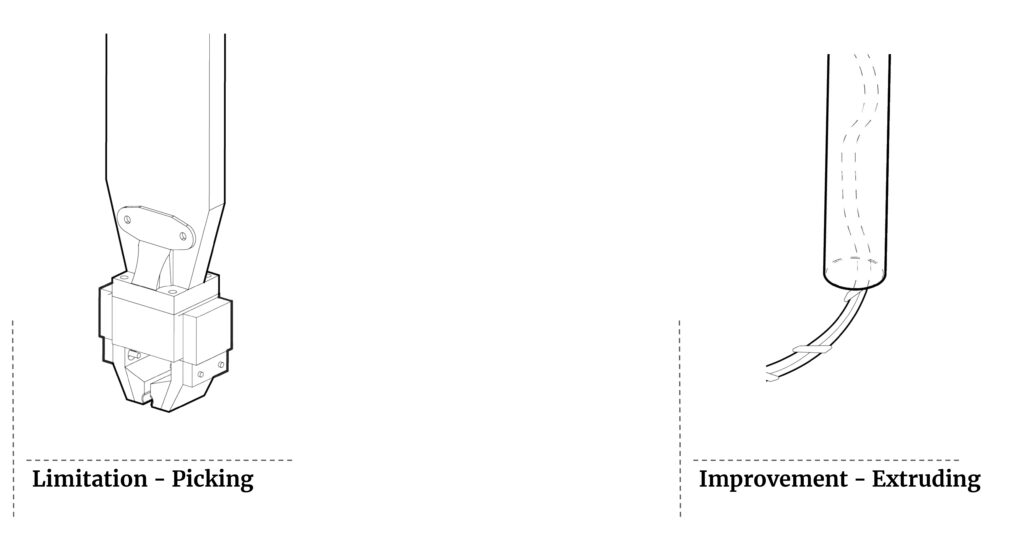
In terms of the end effector, we think that a pick and place strategy for willow weaving is not necessarily the best choice. It introduces additional point of failure because of the willows nonuniform geometry and thus is tricky to pick up without additional sensors or careful effort being paid towards placing the willows. For this reason similarly to before, we think an extrusion strategy making use of a willow spool will reduce the footprint of the end effector and reduce the failure points during picking.
5. Robotic Arm
One of the biggest problems we face was designing a toolpath that would weave the willow in a way that places minal stress on the branches in order to not break them, whilst simultaneously avoiding the poles. This proved to be very difficult and in the end not efficacious. In this sense if we had to weave willow branches again in a pick and place strategy, using a swishing motion that weaves the willow branches, without having to place the end effector in between poles, would be ideal.
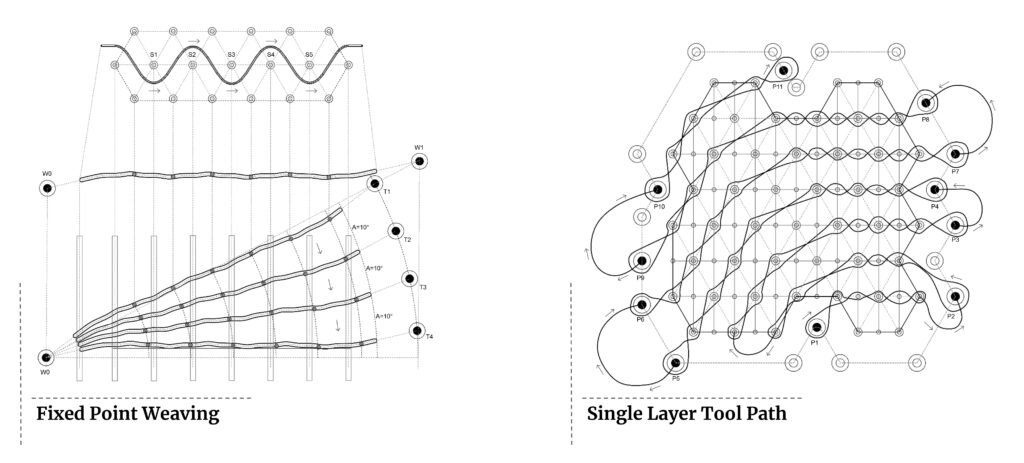
Swishing weaving technique
7 | SPECULATION
Speculation as to an appropriate application of willow weaving via robotic arms
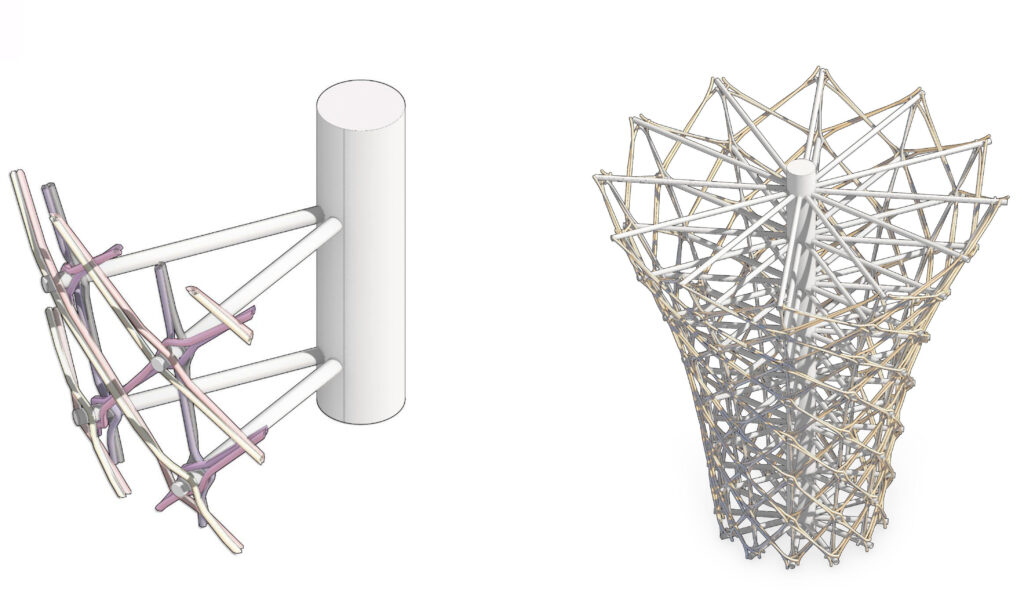
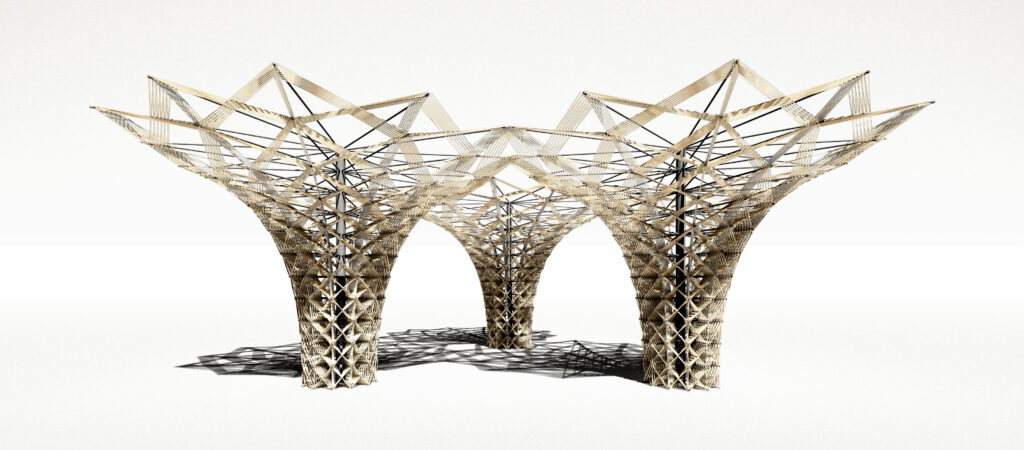
In terms of what we believe this technology would be most suitable for, in some sort of future application. We think that in using a tool with 6-axis of freedom the geometry and construction method should make use of this characteristics. Towards this end, we believe that non-planar willow weaving has the potential to make use of the weaving bed strategy proposed by KIT, whilst simultaneously making use of the potential inherent in an industrial robotic arm.
Speculation towards continuous path weaving
This image further showcases how through the use of willow spools a pattern can be developed using the hamiltonian path, resulting in a continuous weave for an entire module.

8 | CONCLUSION
In an age of a rapidly transforming construction industry where technology is evolving faster than we can learn to use it, there is a certain poeticism and beauty in looking towards the lessons that are left to us by the past and wisdom in making that has been cultivated over the ages. This workshop has allowed us to see past and the present are working together in harmony. I look forward to seeing what the future is for willow in robotic construction, as well as what other traditional craft practices can be integrated into how we approach advanced construction and architectural design.

