Github : https://github.com/Clarrainl/Lego_AR_Interface
Introduction
What if LEGO instructions could appear right on your table, adapting to the bricks you have?
Lego_AR_Interface turns the simple act of LEGO building into a smart and interactive experience. Combining computer vision, real-time projection, and gesture recognition, the system guides users through constructing custom models—no screen touches required.
Concept: Build from Random Bricks
The core idea is simple: you bring the bricks, the system brings the model.
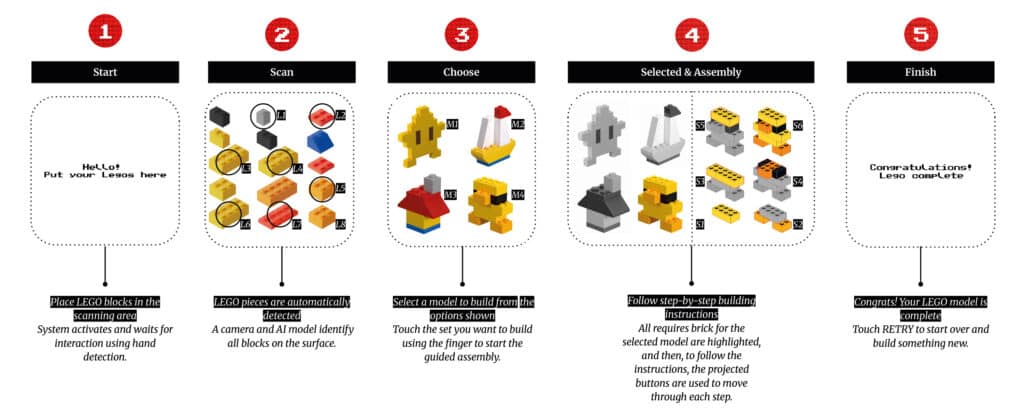
Users place any LEGO pieces they have on a designated area of the table. These pieces are scanned and analyzed by an overhead camera. Then, based on what’s detected, the system suggests possible models to build.
Instead of relying on pre-packaged sets, Lego_AR_Interface celebrates improvisation and reuse by letting users create from what they already have.
Scanning and Model Suggestion
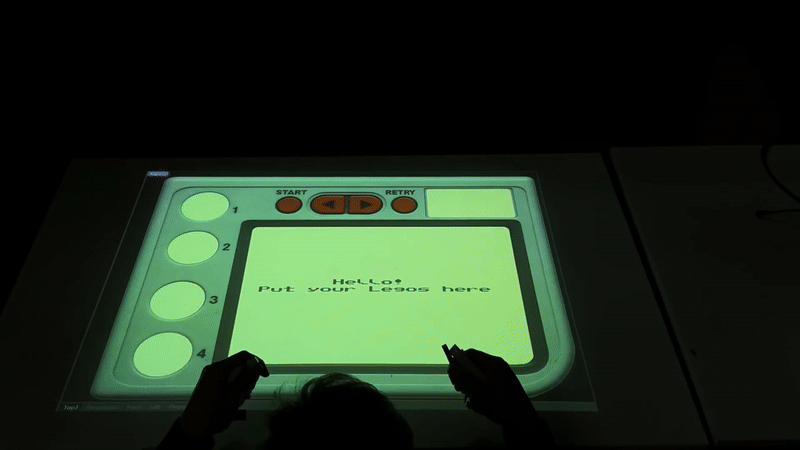
Once the bricks are placed, the system enters SCAN mode.
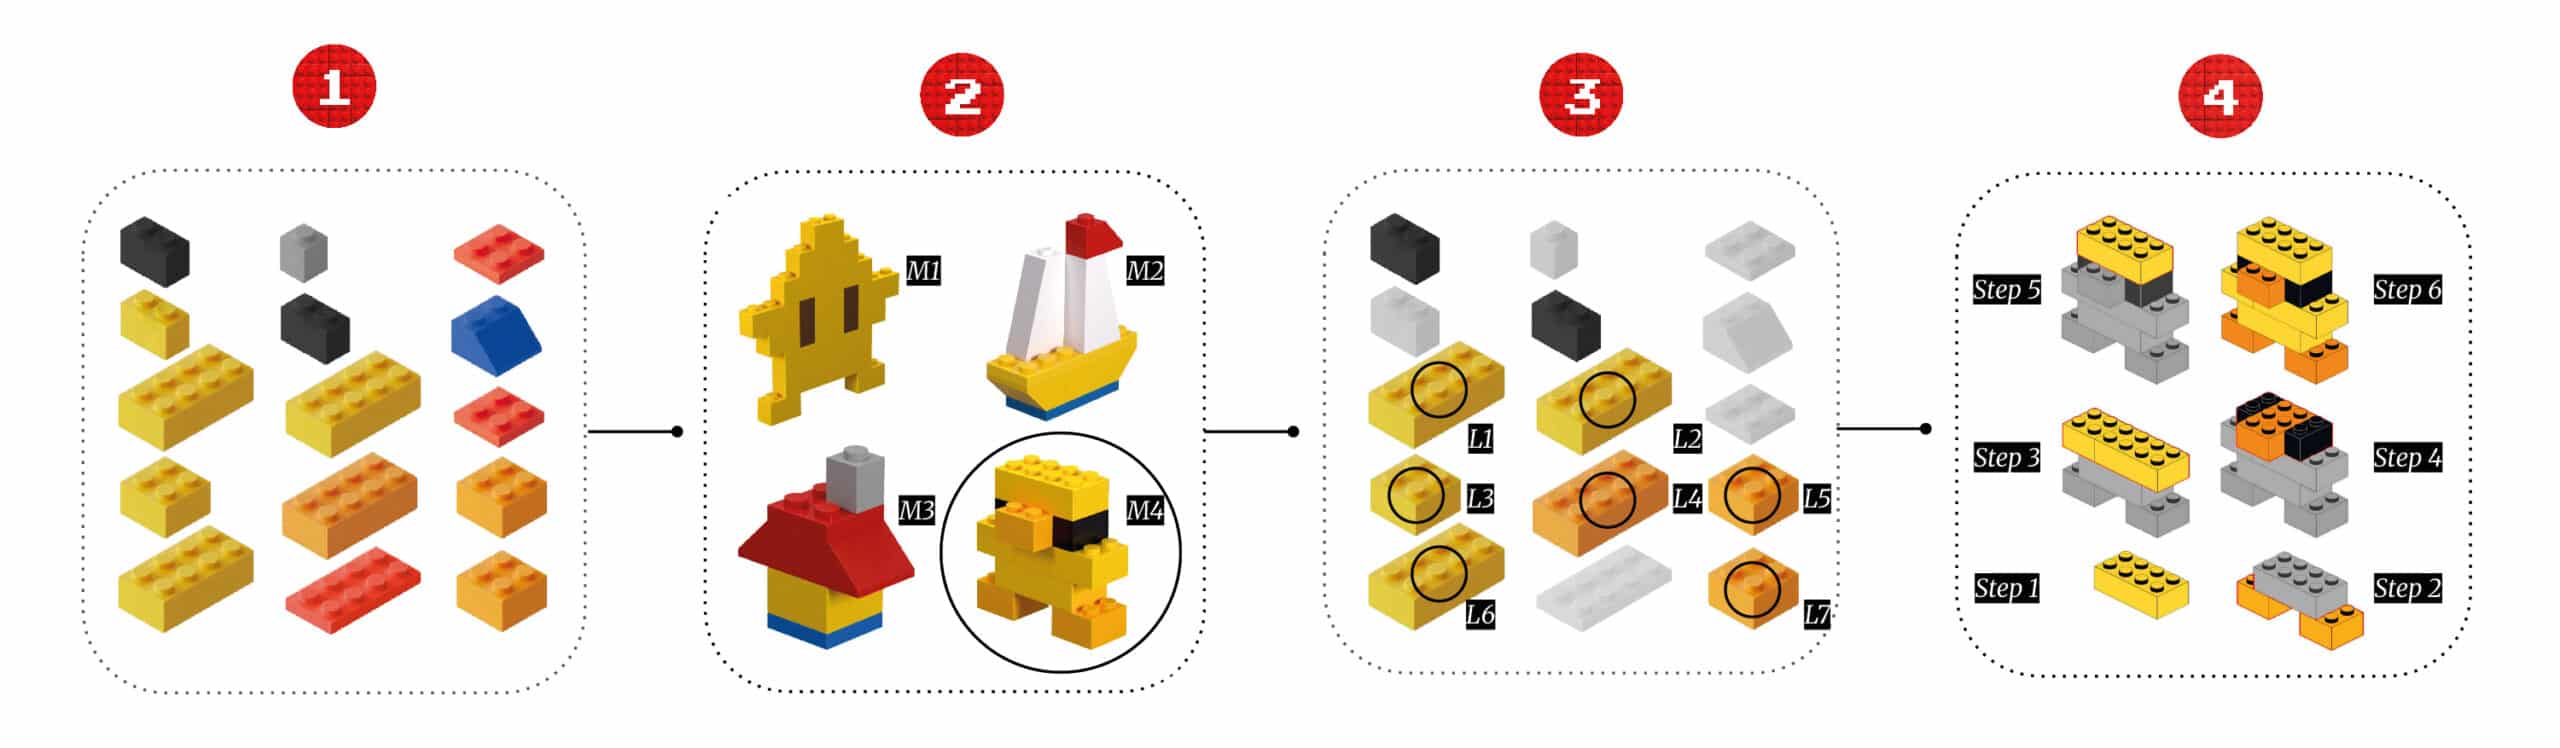
Using a custom-trained YOLOv8 model, it identifies and locates each brick on the table surface. These detections are then passed to the backend logic, which cross-references them with a predefined set of possible builds.
The system proposes four different model options, displayed directly on the tabletop through projection. Each suggested set is tailored to the scanned bricks—no instructions needed.
Identifying the Right Pieces
After selecting a model, the system highlights exactly which bricks are needed to begin building.
Each step in the process is visually guided. The projector overlays colored circles on the physical bricks that are needed in the current build step, reducing confusion and helping the user focus on what matters.
This makes assembly faster, easier, and more engaging, especially for kids or beginners.
Gesture-Based Interaction and Controls
The experience is entirely touchless.
Thanks to MediaPipe, the system continuously tracks the user’s fingers. Each button (like START, NEXT, RETRY) is a projected circle. When a fingertip hovers over it for more than 0.4 seconds, the system registers the action.
No mouse, no keyboard, no screen. Just your hand and light.
This interaction method makes the system more intuitive and hygienic—especially important in public or educational settings.
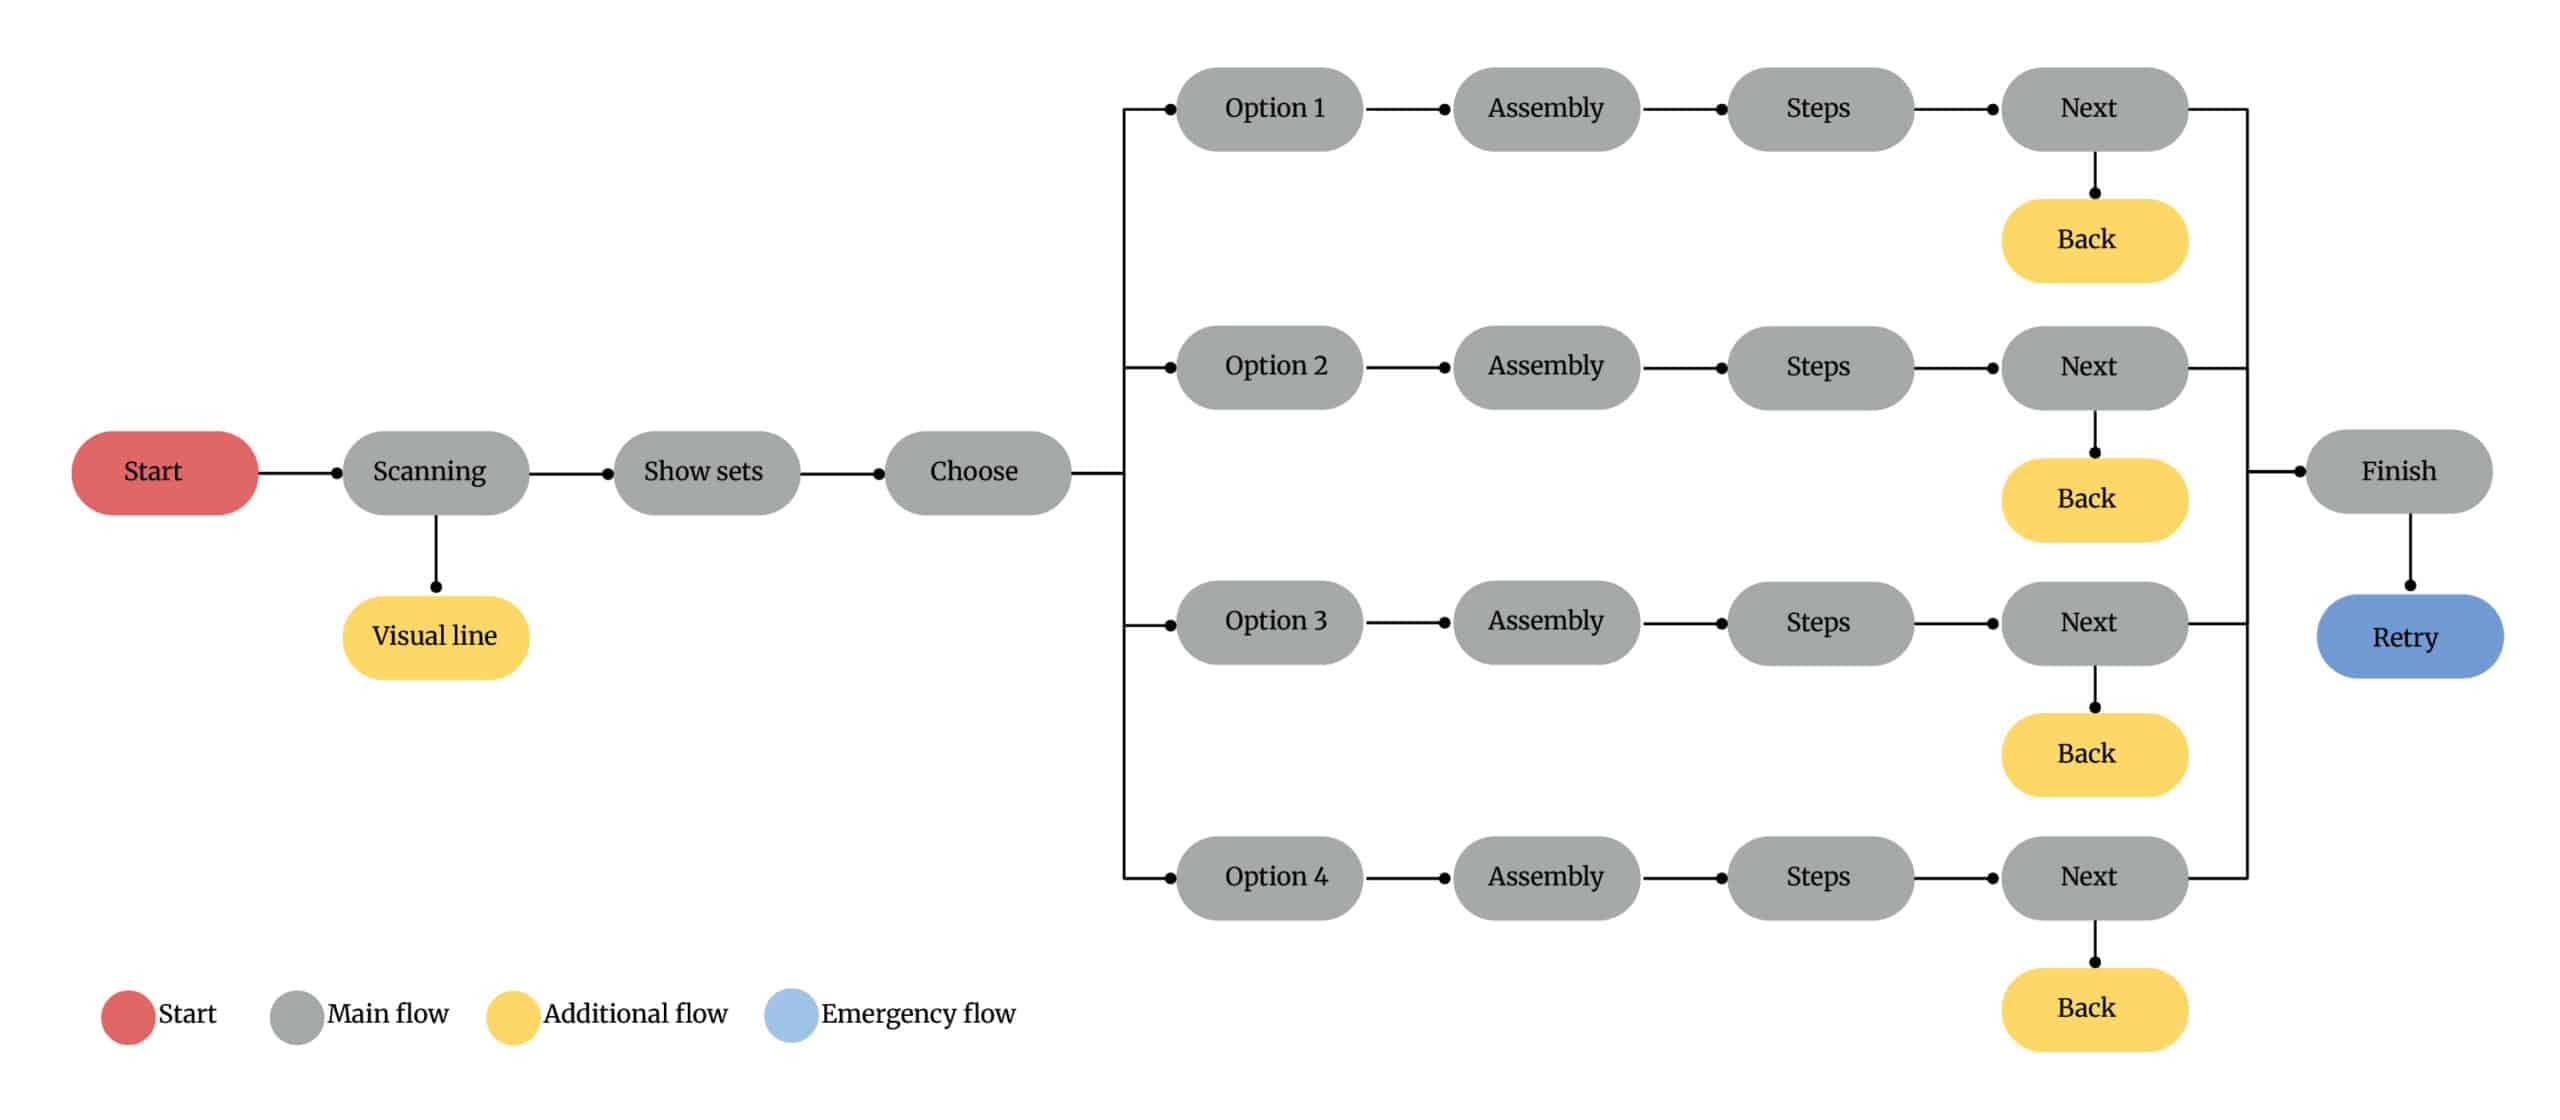
From Start to Finish: User Journey
The entire process is organized into a finite state machine (FSM), which ensures clear transitions and structure:
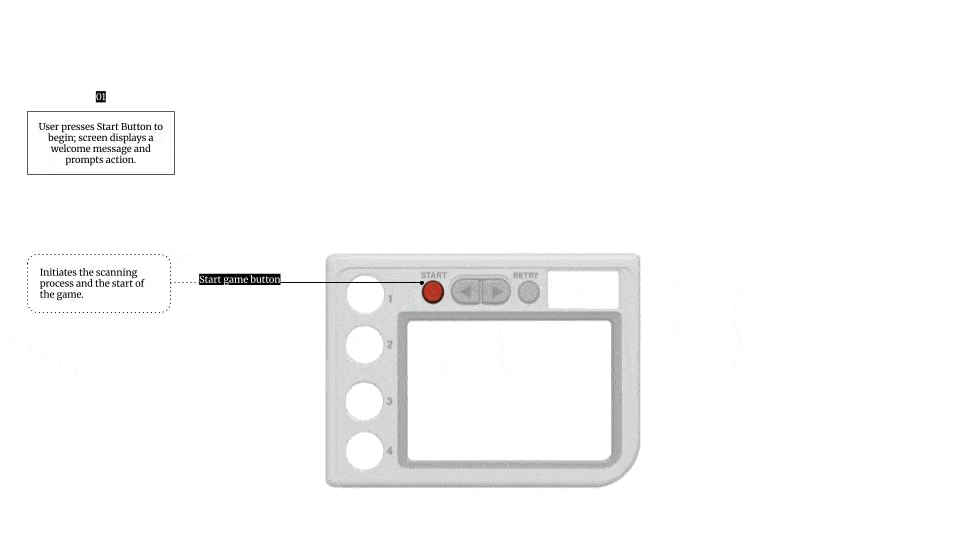
- START – User sees a welcome message and presses
START. - SCAN – Pieces are detected and analyzed.
- CHOOSE – Four models are displayed; user selects one.
- ASSEMBLY – Step-by-step instructions guide the user.
- FINISH – Completion message is shown; user can press
RETRY.
Every step is guided visually, with state updates sent via UDP between Python and Grasshopper.
System Architecture and Communication
The system is composed of two main parts:
– Back-End (Python)
lego_main.py: Main loop handling camera capture, FSM logic, MediaPipe tracking, and YOLOv8 detection.lego_fsm_controller.py: Controls transitions between states and handles user interactions.- UDP Socket: Transmits real-time data (FSM state, pointer position, detected bricks) to Rhino/Grasshopper.
– Front-End (Grasshopper + Rhino)
- Receives data and updates UI accordingly.
- Handles projection: buttons, instructions, brick highlights.
- Visual layer fully rendered in Rhino, aligned with real-world table.
All communication is done through UDP (localhost, port 5005) for fast, responsive interaction.
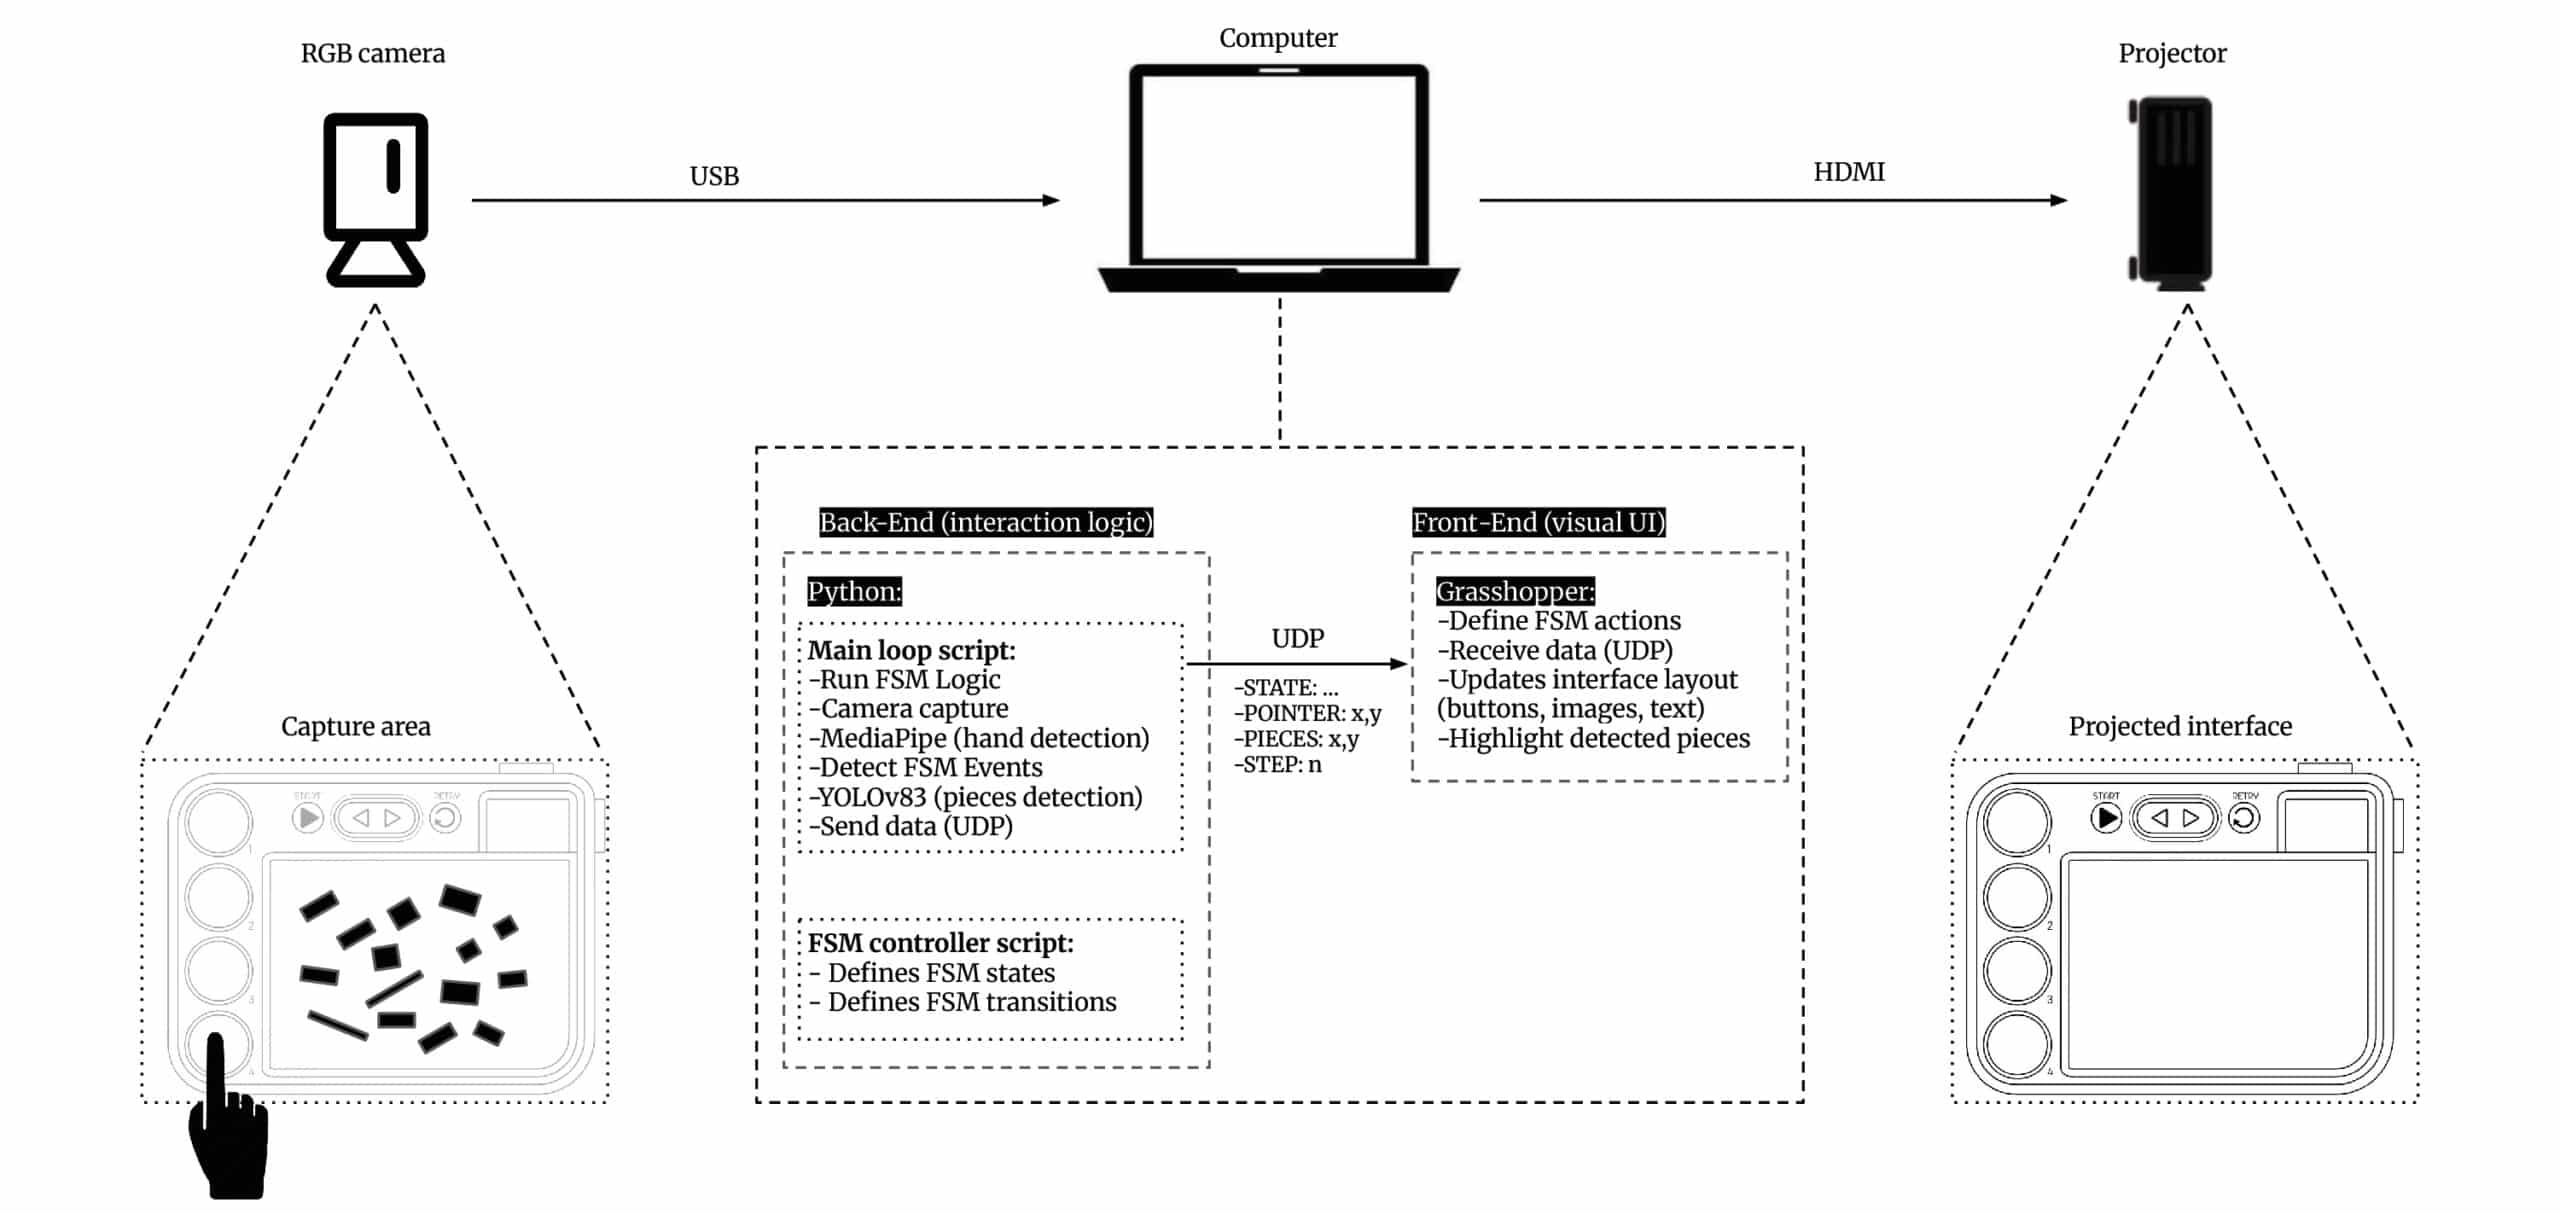
Physical Setup: Camera, Projector & Surface
The system is lightweight and easy to install:
- Projector displays the Rhino/Grasshopper UI onto the tabletop.
- RGB Webcam mounted above captures brick positions and hand gestures.
- Laptop runs both the backend logic and frontend UI, communicating via localhost sockets.
No external hardware or microcontrollers required—just vision and light.
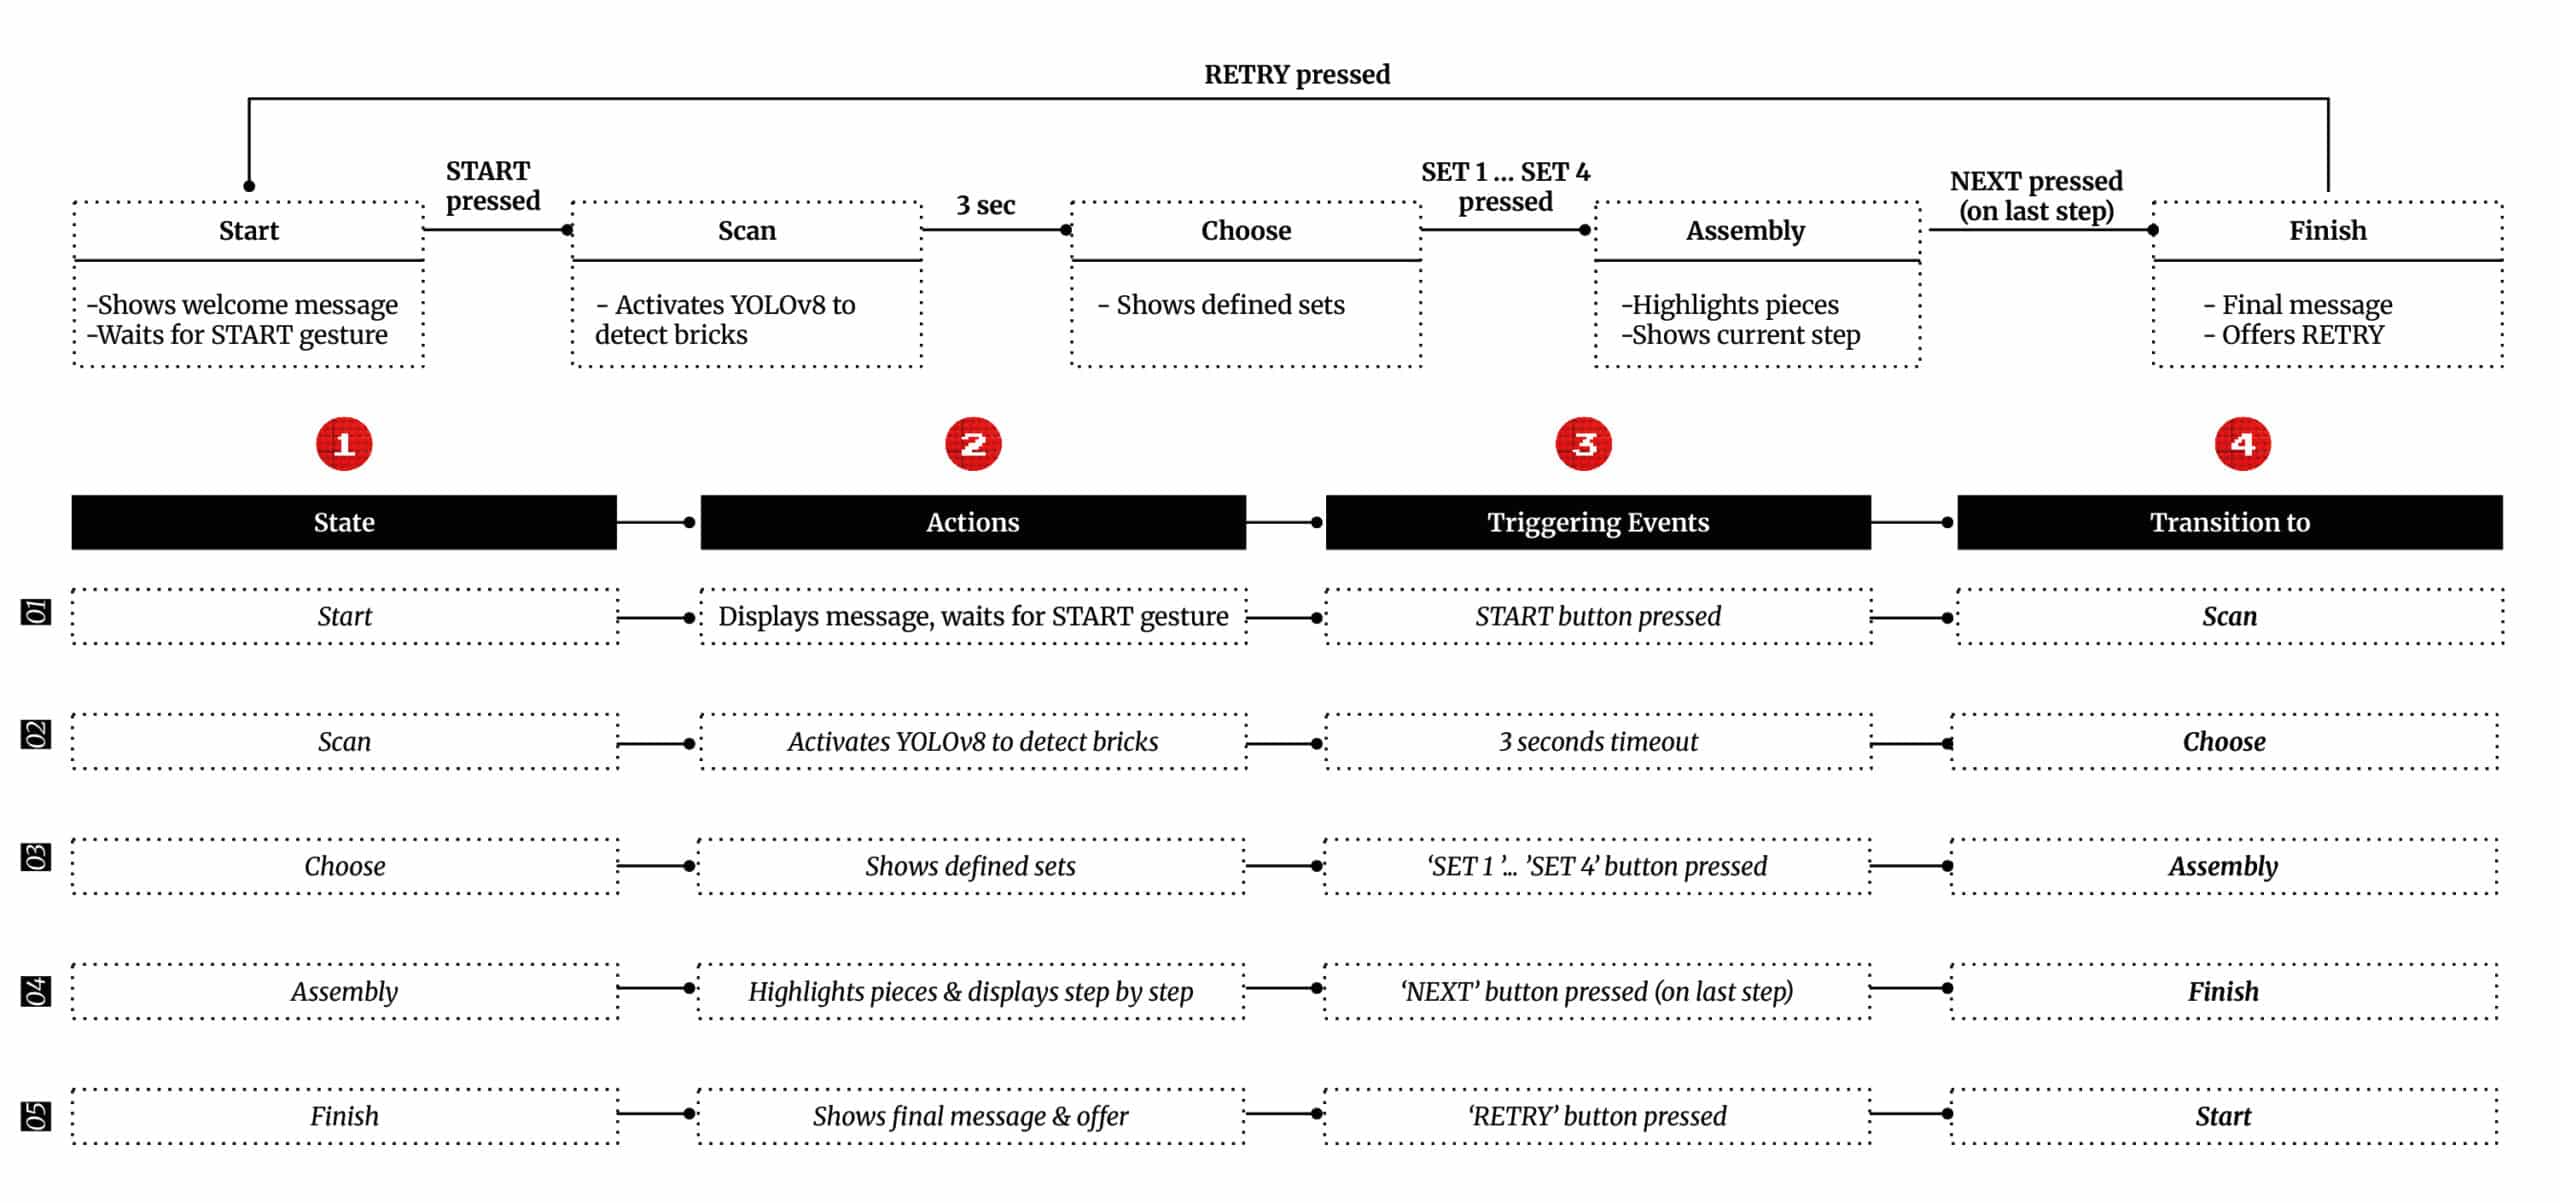
FSM State Transitions Explained
Every stage of the interaction is managed by the FSM:
- START
Shows “Put your legos here.” Waits for user input via hover gesture. - SCAN
Captures frame, runs YOLOv8, identifies piece locations. - CHOOSE
Displays four build options (SET 1–4). User selects via finger hover. - ASSEMBLY
Shows image for each step. Highlights necessary bricks with overlays. - FINISH
Displays a “congrats” message. Allows RETRY to begin again.
This structured flow makes the system robust and predictable, ideal for user testing and iterative design.
DEMO
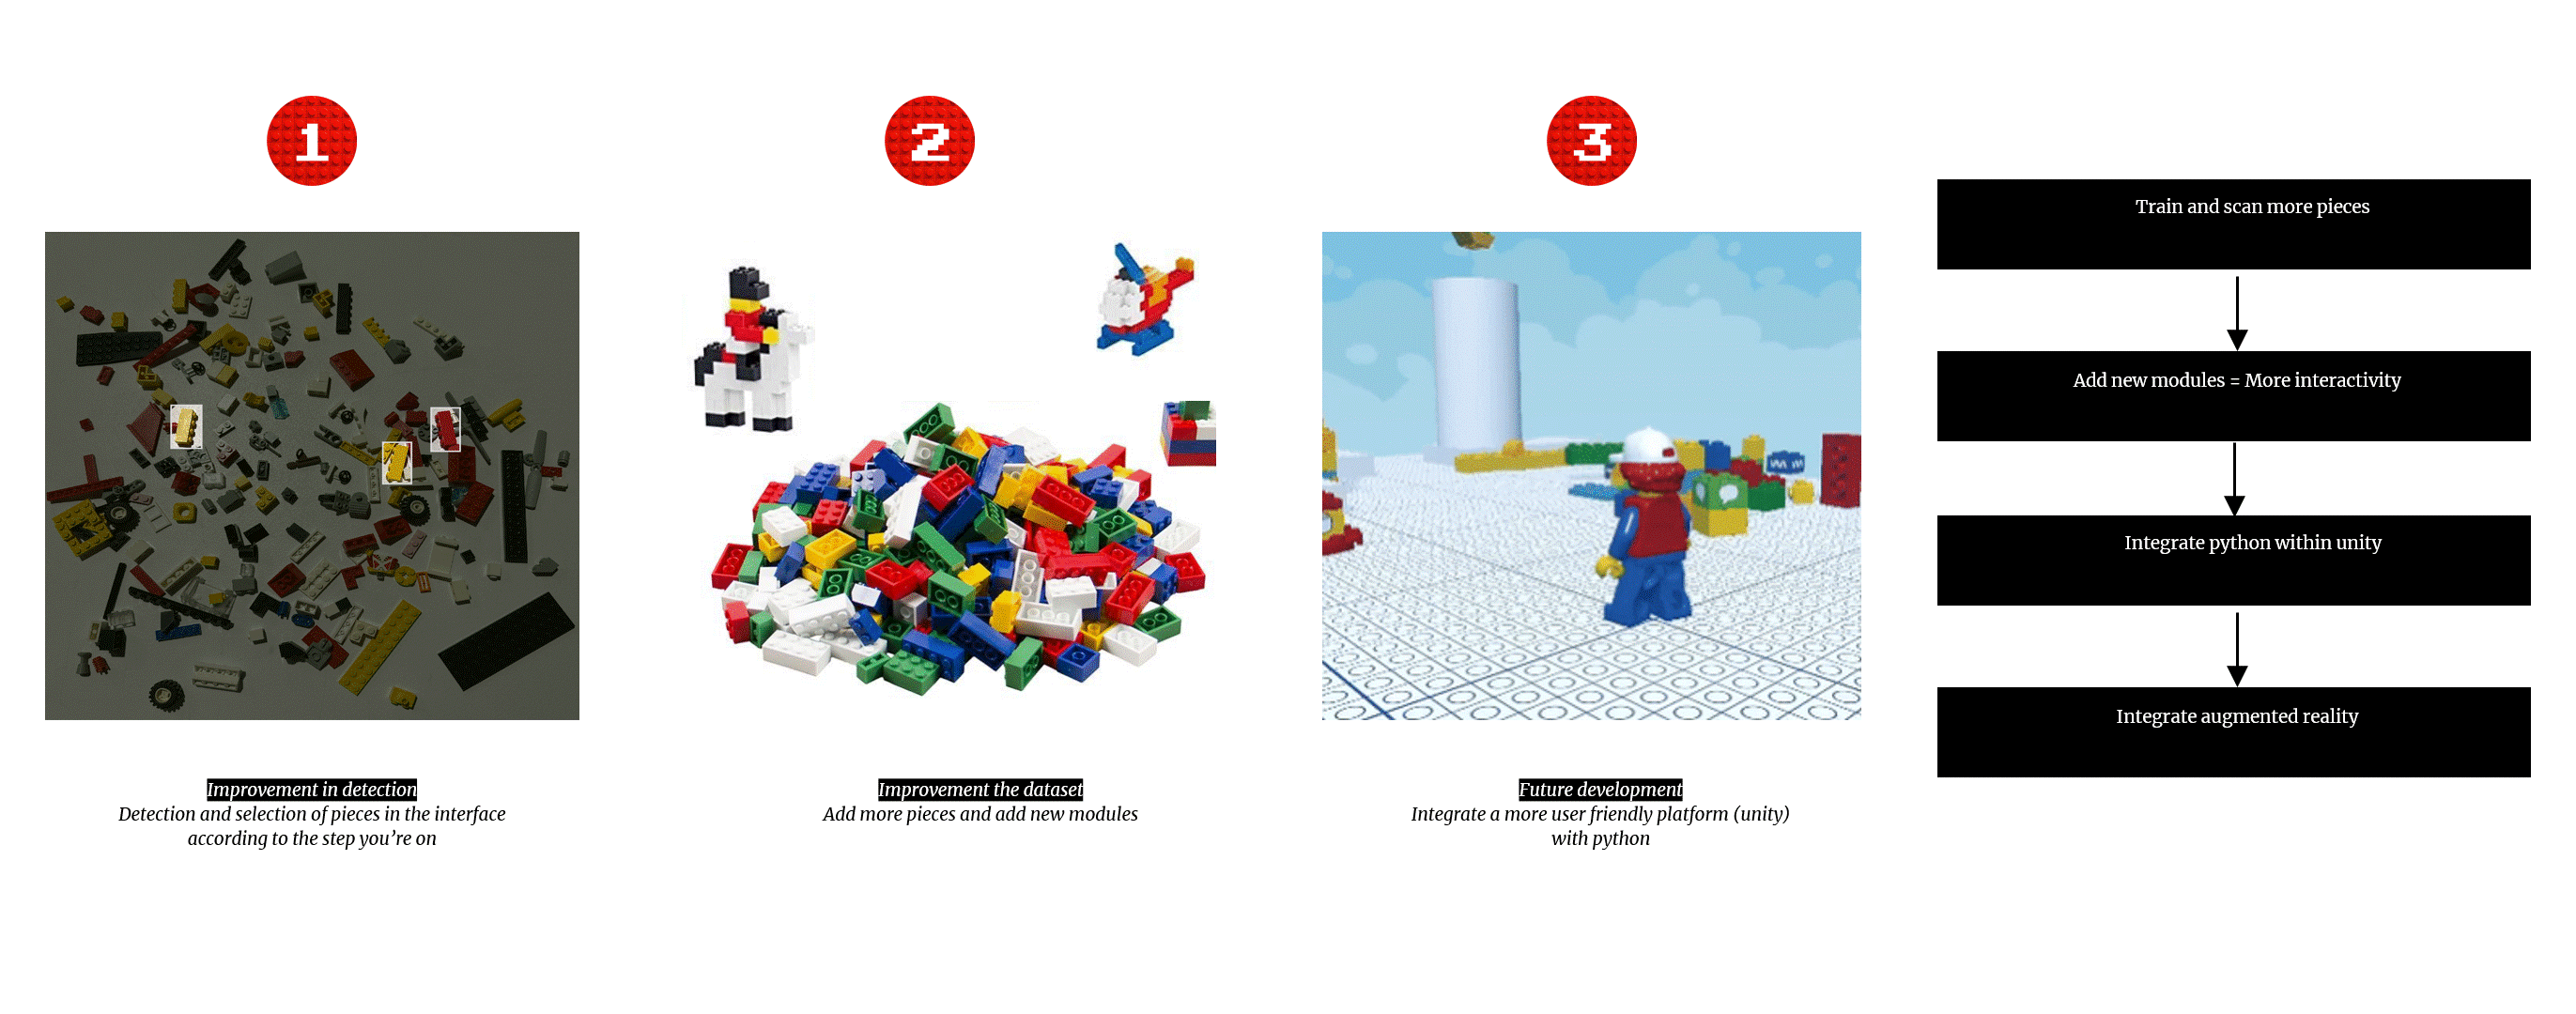
Future Improvements and Development Path
Although the current prototype is fully functional, there’s room for exciting evolution:
- Expand the dataset: More brick types = more model variety.
- Improve detection: Better accuracy in poor lighting or overlapping pieces.
- Port to Unity: For a more interactive 3D UI and AR integration.
- AR headsets: Eliminate the need for a projector entirely.
- Custom model builder: Let users design their own builds with scanned bricks.