
Empowering Architectural Design with AI Diffusion
This research explores the use of ControlNet with Stable Diffusion to enhance architects’ control over AI generated designs made by diffusion models. The objective is to expand the creative scope in architecture and transform the perception of AI from a potential threat into an opportunity for innovation and increased efficiency.
State-Of-The-Art Midjorney and DALL-E 2
State-of-the-art artificial intelligences like Midjourney or DALL-E 2 can fabricate high-quality images. Despite its impressive output, it falls short in controlling the composition of the image and maintaining consistency from one image to the next. This deficiency makes it challenging to reproduce the same object from diverse perspectives, limiting its applicability for architects. It might still serve as an inspirational tool substituting Pinterest in order to explore new concepts but fails at being applicable to create a submission for a competition for example.
The Open Source Alternative: Stable Diffusion
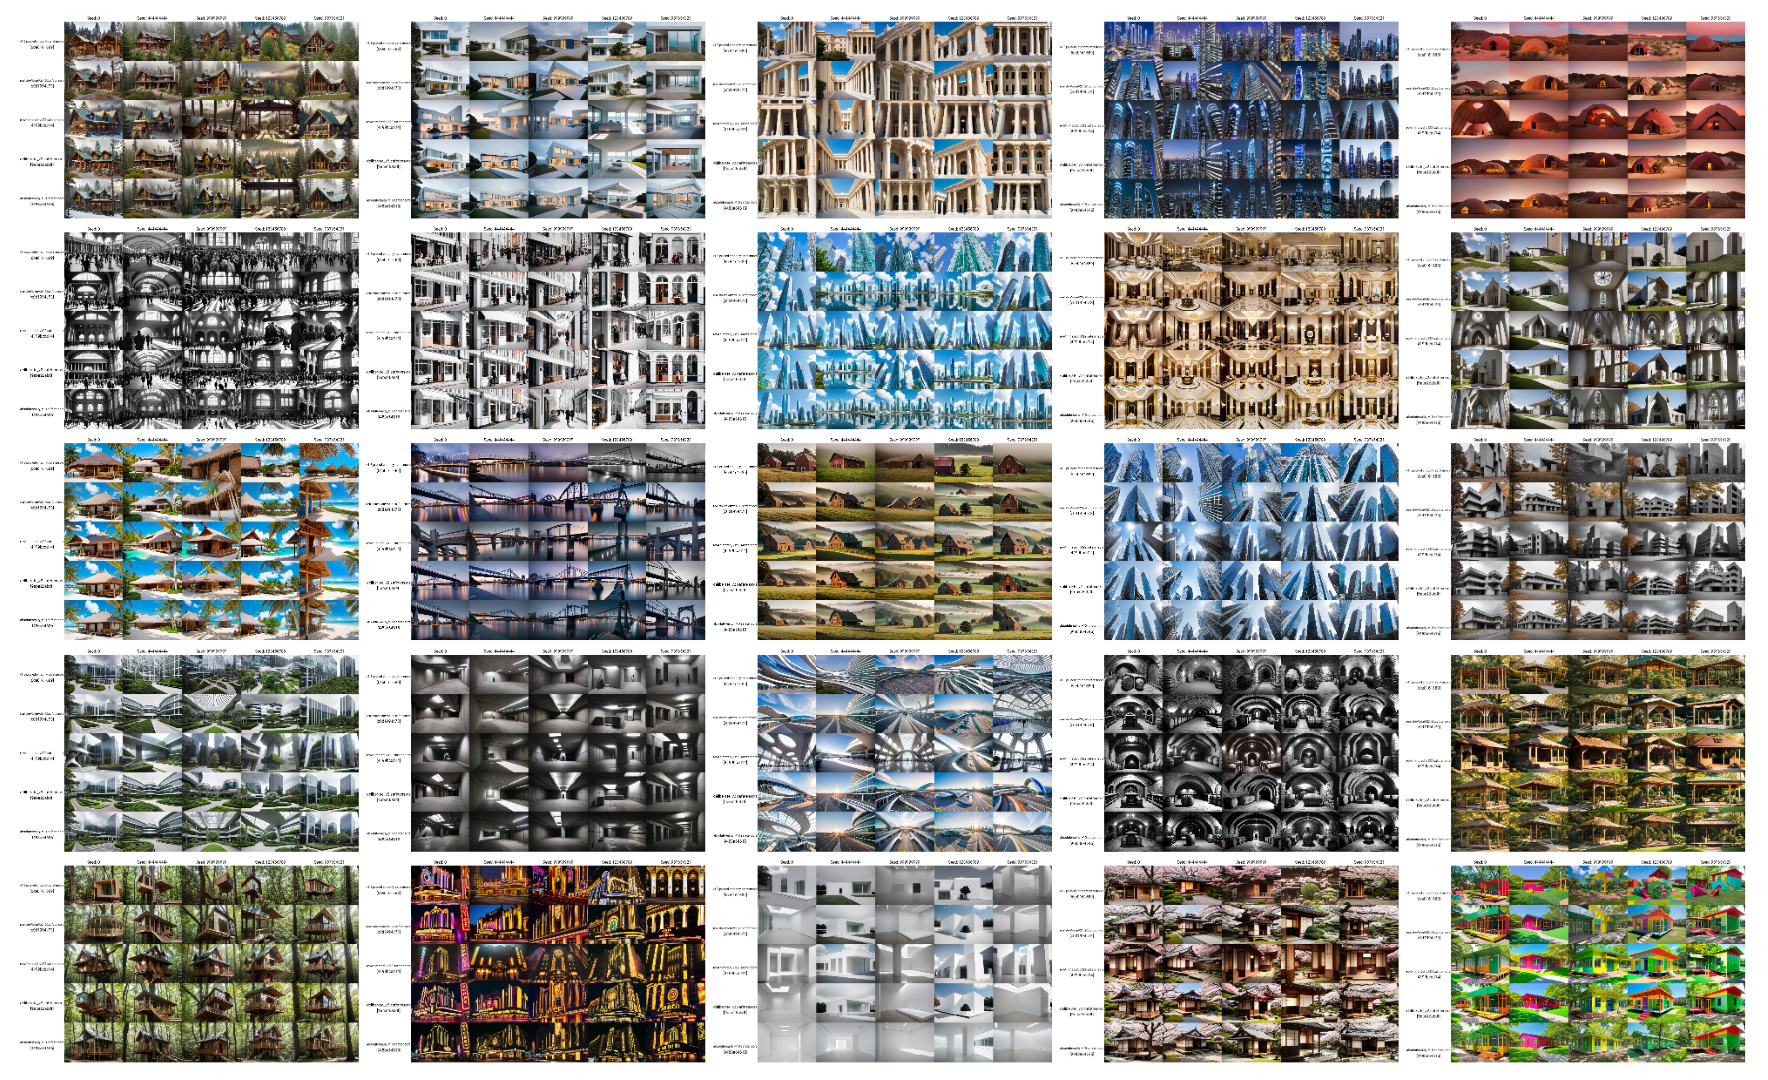
Since both of the previous state-of-the-art AI’s are closed source it is nearly impossible to adapt them to the architects needs. Instead, Stable Diffusion, an open-source AI that excels as well in generating images from textual prompts, has a thriving community rapidly creating new extensions when ever there is a need for it. Before going more into the different methods of controlling the image genration process, it is important to choose the best model as a starting point. As expected a comparative study of various models reveals that newer versions tend to produce superior-quality results with more intricate details that closely align with the input prompt.
First Attempts in Taking Control: Image2Image and Instruct Pix2Pix
In order to gain more control over the image composition, CAD drawings are utilized. The first method explored is Image2Image. It was also the first one to be available inside of Stable Diffusion. Despite its promise, the results are underwhelming—it struggles to add significant detail to the base image without distorting the geometry too much.
The second method, Instruct Pix2Pix, offers a slightly improved outcome and was the next break through in the image to image conversion for Stable Diffusion. It integrates the use of natural language prompts to facilitate the transition from the base image to the generated result. While the quality of the results sees an improvement, achieving the desired output still remains a challenge.
The Final Breakthrough: ControlNet
Finally, we arrive at ControlNet. This technology provides the much-needed control during the diffusion process of Stable Diffusion, bringing us strikingly close to achieving the desired result. Even changing details to the generated image is finally possible thanks to its preprocessors and their ability to capture the images content.
The Mechanics of ControlNet
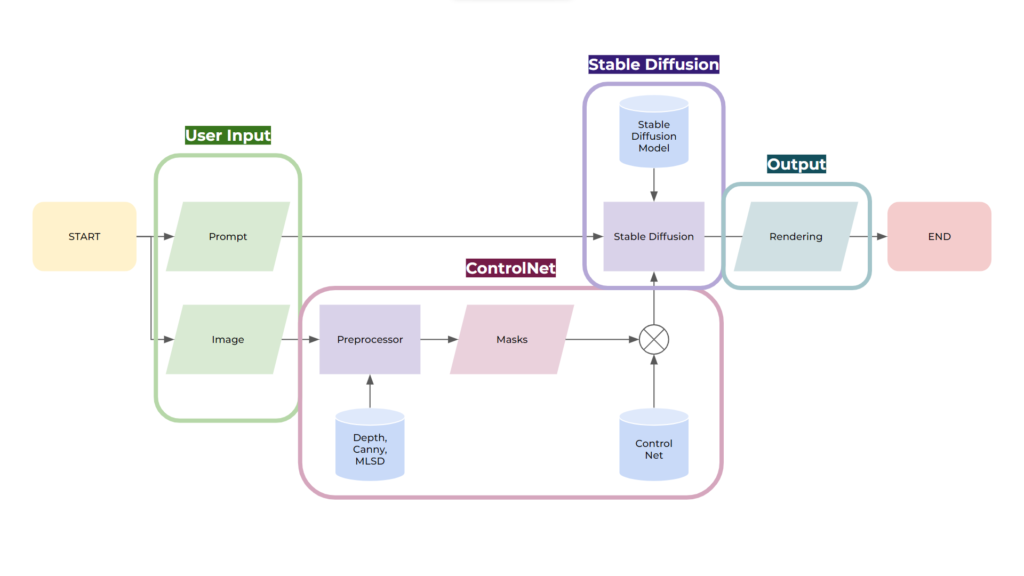
The exploration of ControlNet begins with a comprehensive understanding of its operation. As illustrated in the following diagram, Stable Diffusion paired with ControlNet accepts two user inputs: a text prompt and an image. The text prompt is fed directly into Stable Diffusion, while the images are converted into masks using a variety of preprocessors. These then merge into Stable Diffusion, along with its text prompt and ControlNet models, guiding the diffusion process based on the preprocessed image.
ControlNet: The Role of Preprocessors
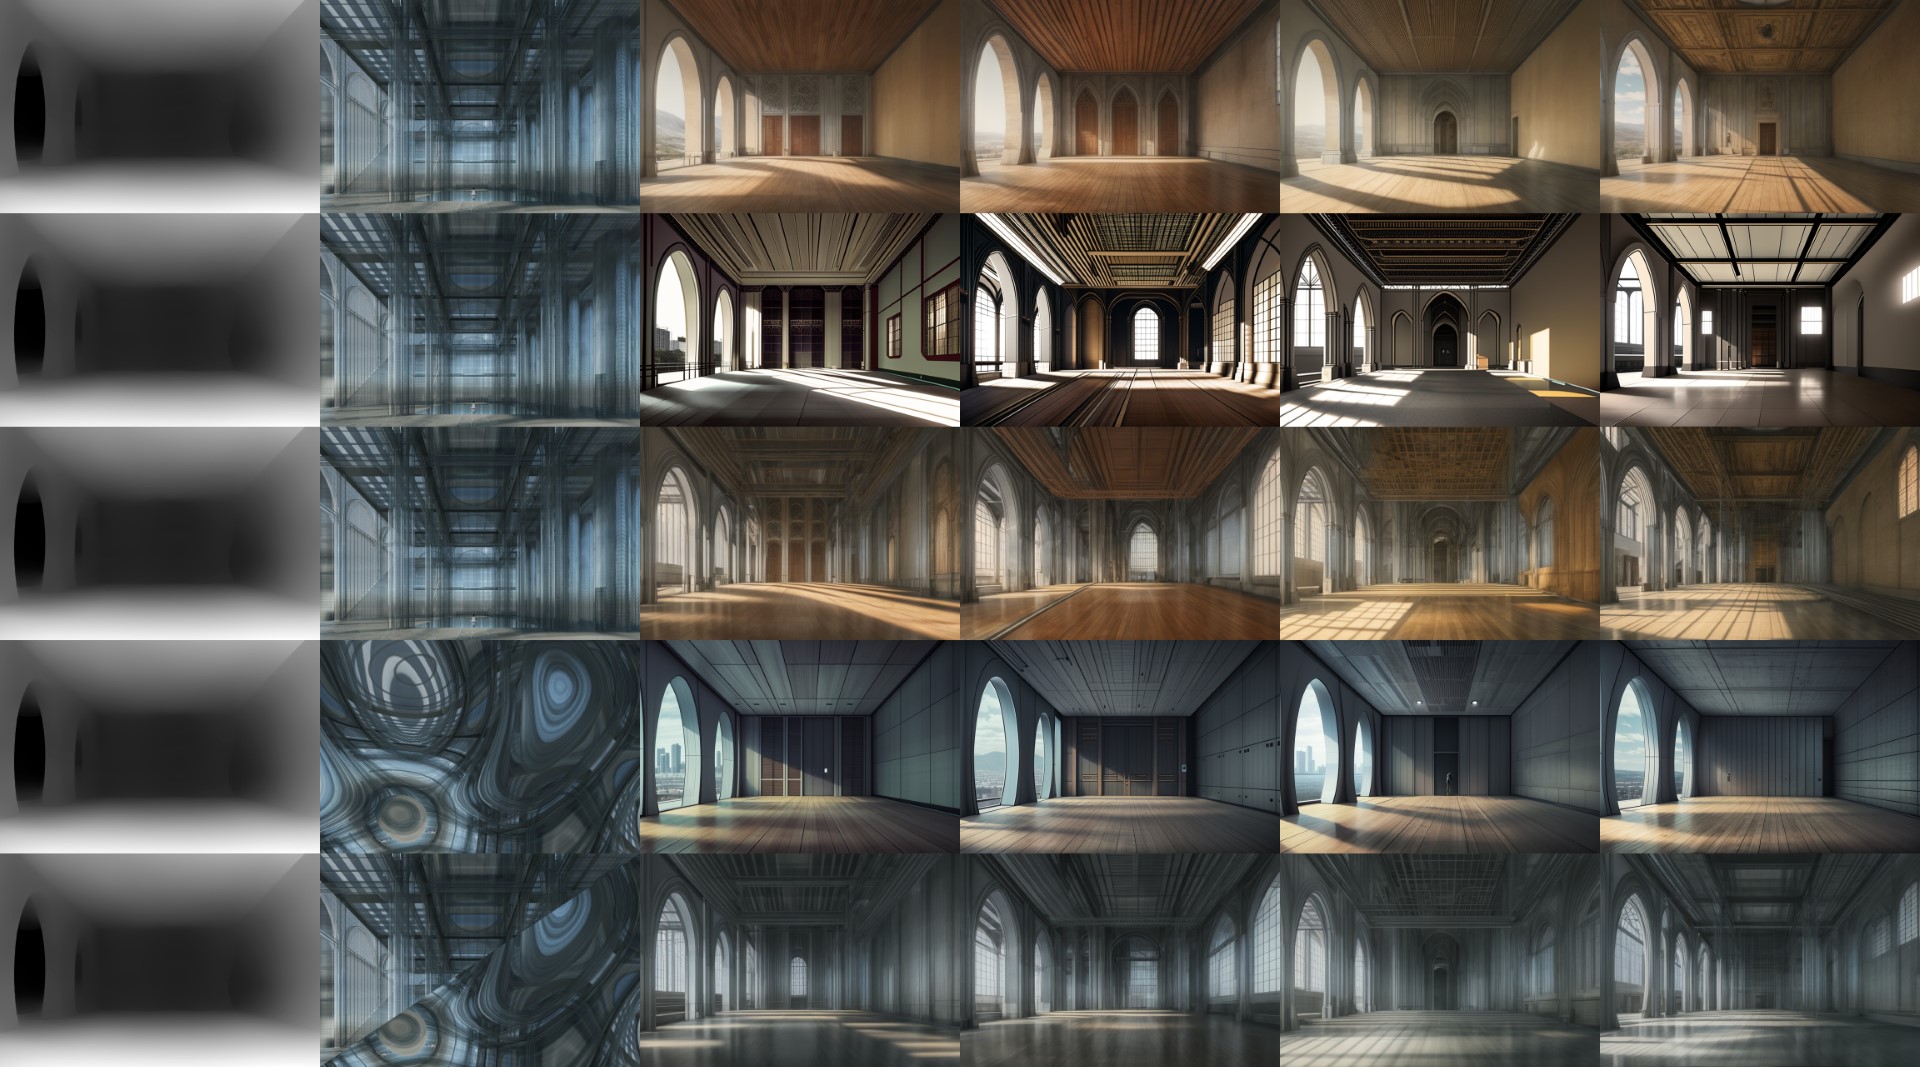
An integral part of ControlNet’s operation revolves around preprocessors. These components generate the masks that ControlNet uses for its models to guide the diffusion process, enabling the creation of images that mirror the shape of the input image. The choice of preprocessor can significantly influence the outcome, as each of them carries distinct advantages and limitations.
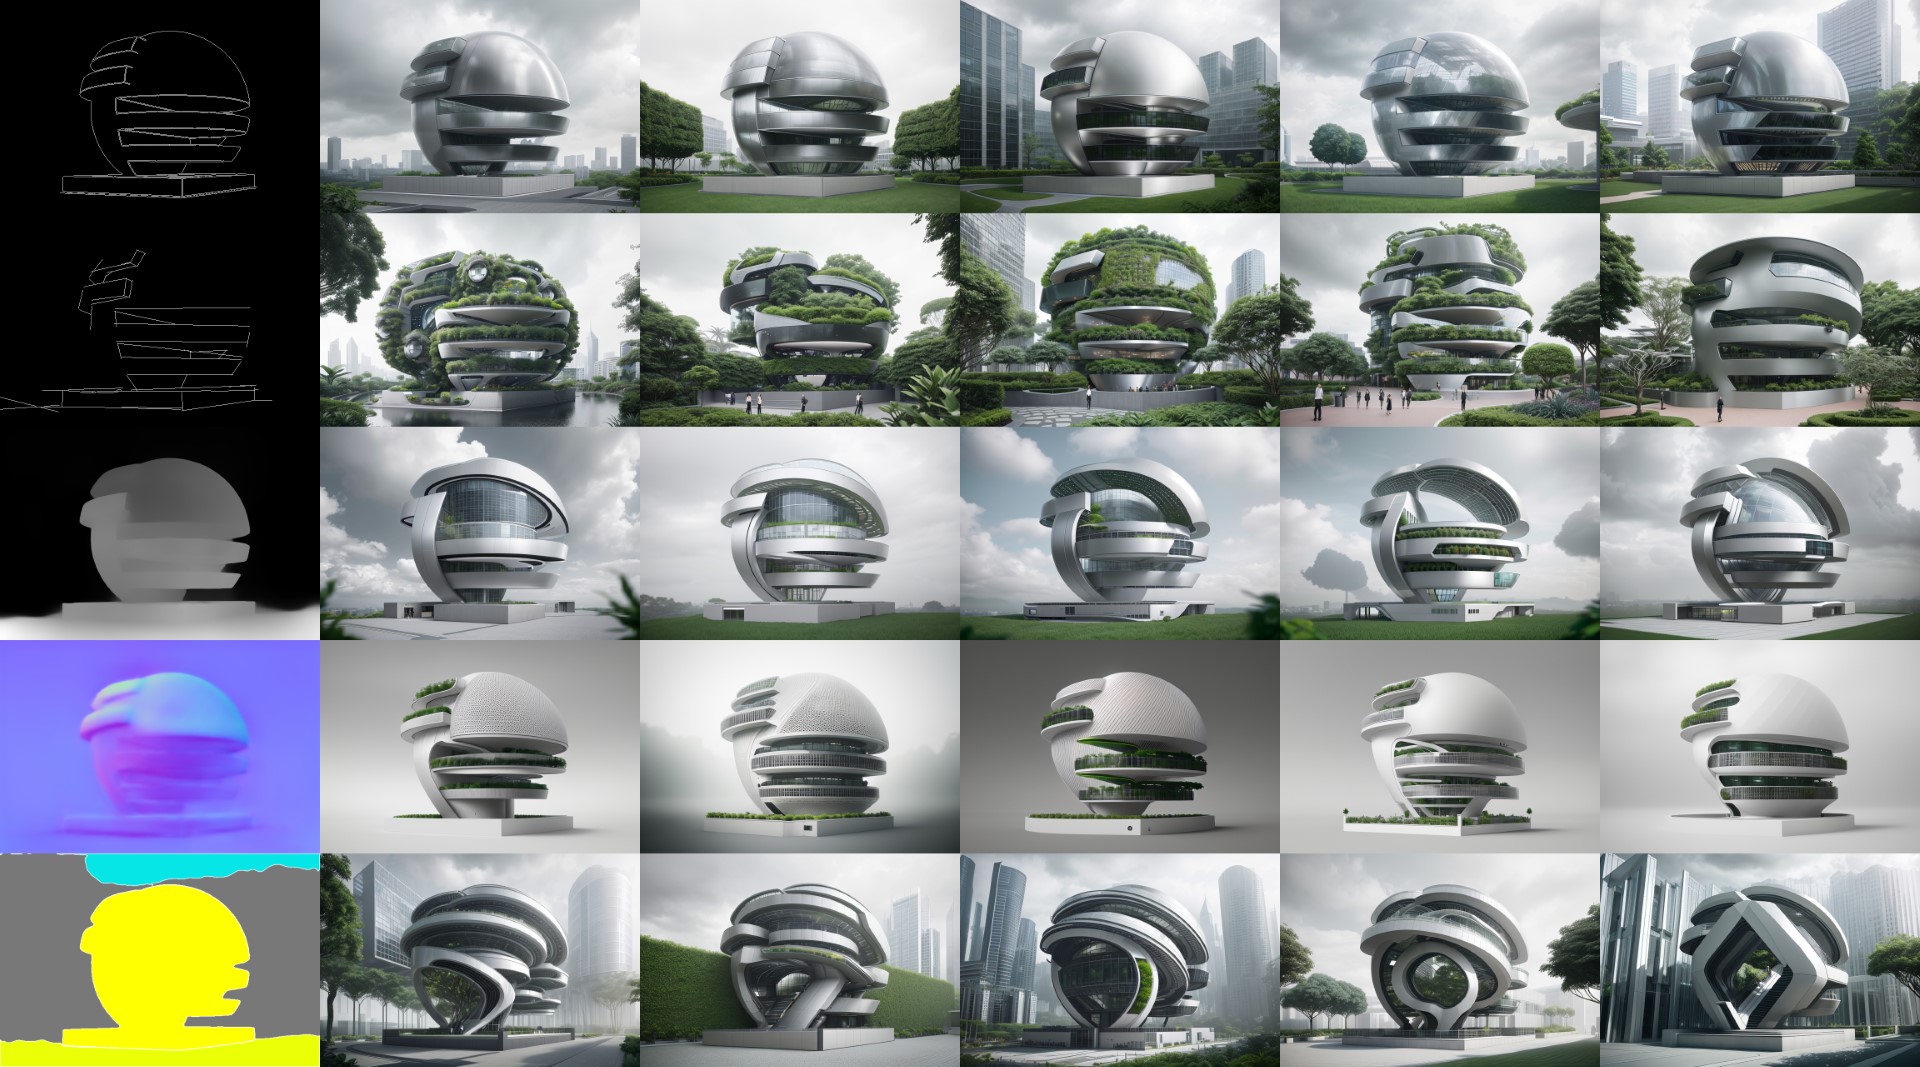
Let’s get into the five different preprocessors utilized in this research to capture the shape of the input.
- Canny Edges identifies all the edges in an image where there’s a contrast between colors. Particularly beneficial for organic shapes, Canny Edges can nonetheless yield excessively noisy results if the input is cluttered or messy.
- MLSD, or Minimal Line Support Descriptors, excels in detecting all straight lines, making it a highly effective tool for capturing architectural drawings. However, its application is limited when it comes to curved elements, which it often overlooks.
- Depth Midas creates a depth map of an image, a feature that proves useful in establishing the correct depth and composition. Despite its advantages, Depth Midas struggles with capturing finer details.
- Normal BAE generates a normal map of the input. While this method can stumble with complex shapes and often flattens backgrounds, it holds potential in certain scenarios with organic shapes.
- Finally, we have Segmentation. As the name implies, this preprocessor segments the images, creating masks for each element in the picture based on trained categories. It lacks an understanding of depth and detail, but can be incredibly helpful when a user wishes to specify what exactly they want to generate at a certain spot of the image.
Each of these preprocessors offers a unique approach to guiding the diffusion process. Depending on the specific requirements of the design, one might find one more suitable than the others. However, the power of ControlNet lies in its flexibility, allowing for a variety of preprocessors to be used in conjunction, harnessing the strengths of each to produce high-quality, controlled results.
*For the sake of readability when a specific ControlNet preprocessor is used it means that the according ControlNet model was used inside of Stable Diffusion to use the mask during image generation. All models used are from the ControlNet version 1.1
ControlNet: Achieving Desired Styles with Reference Modes
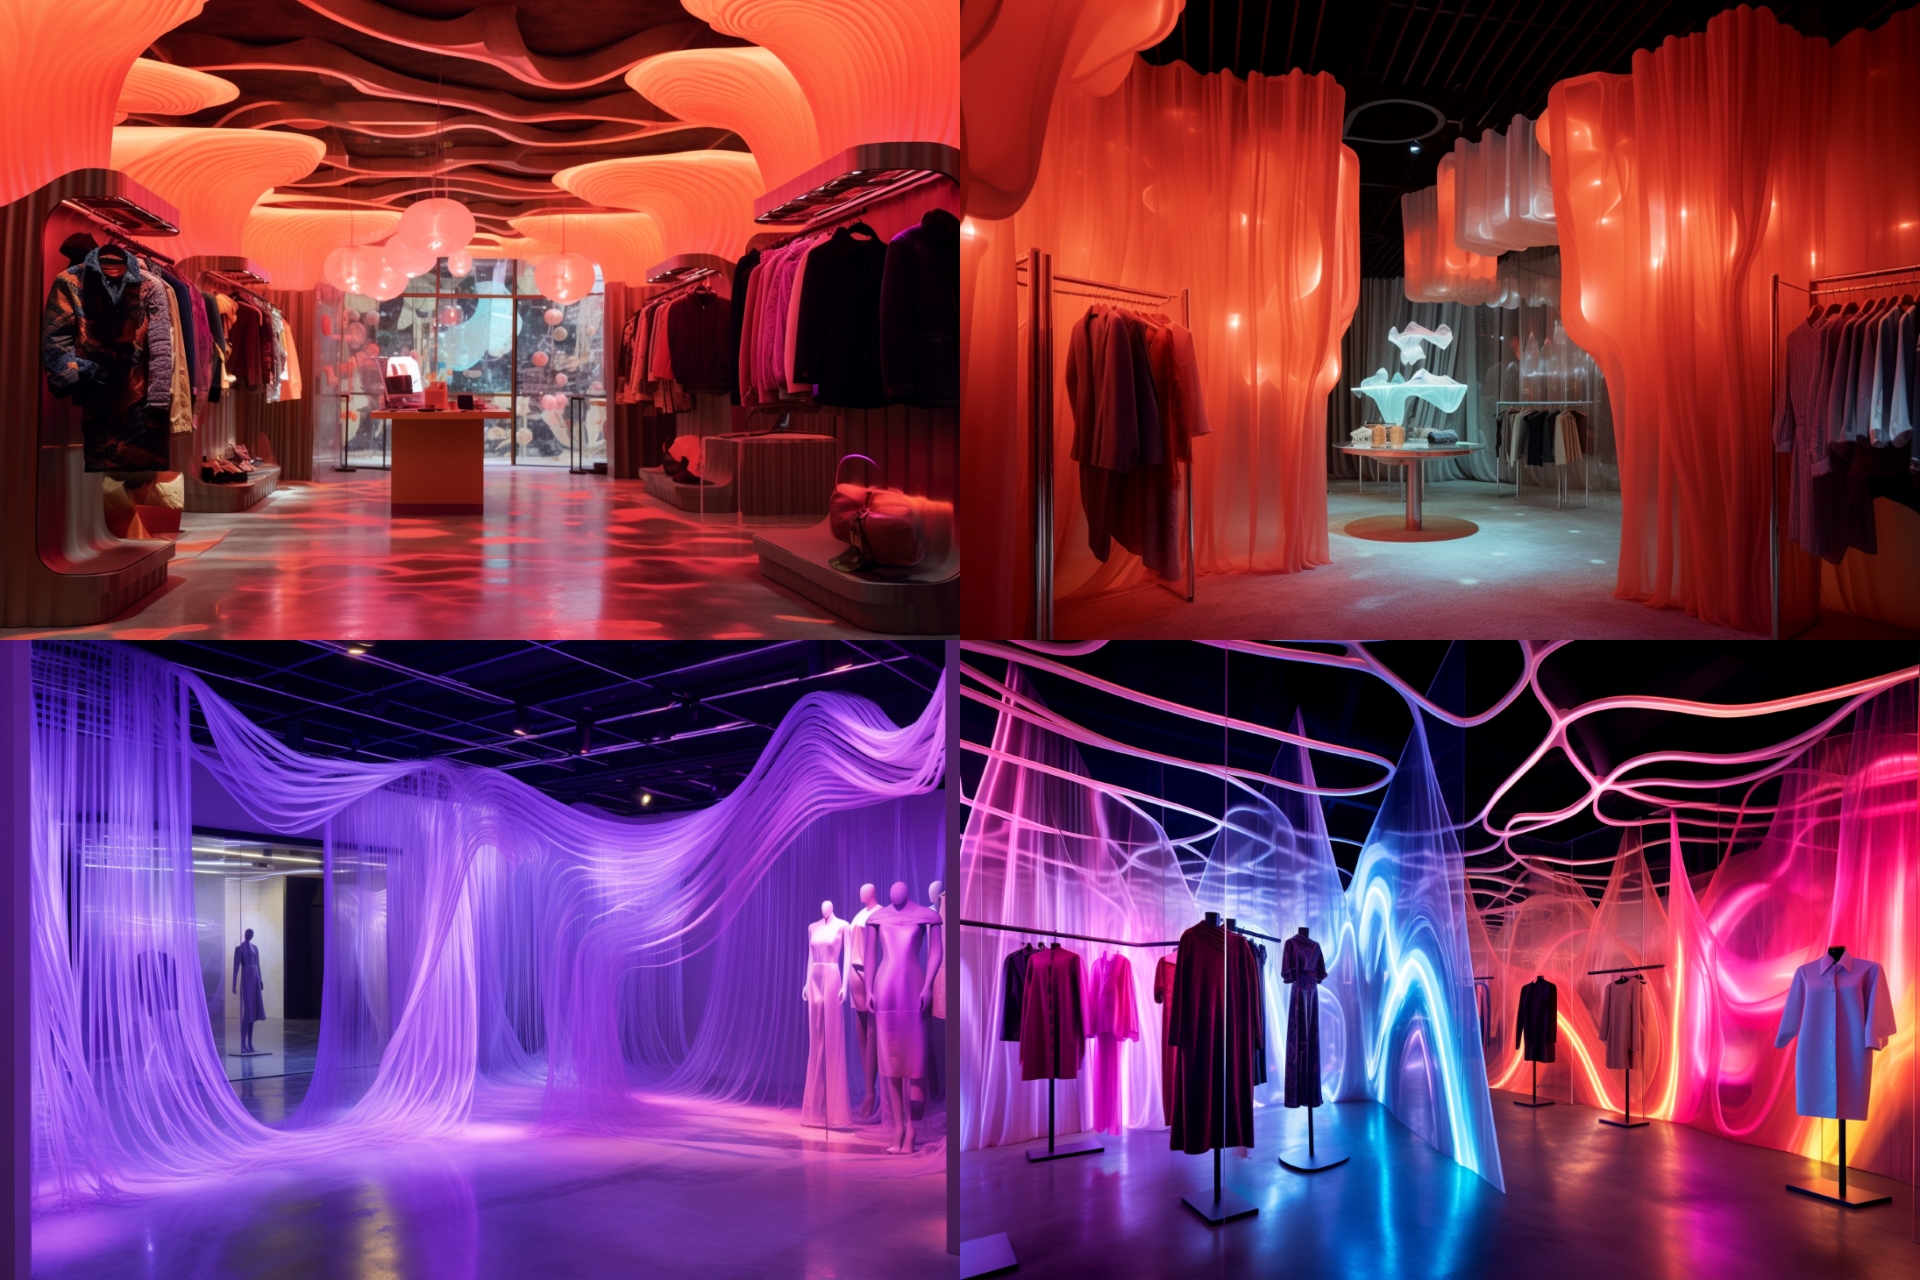
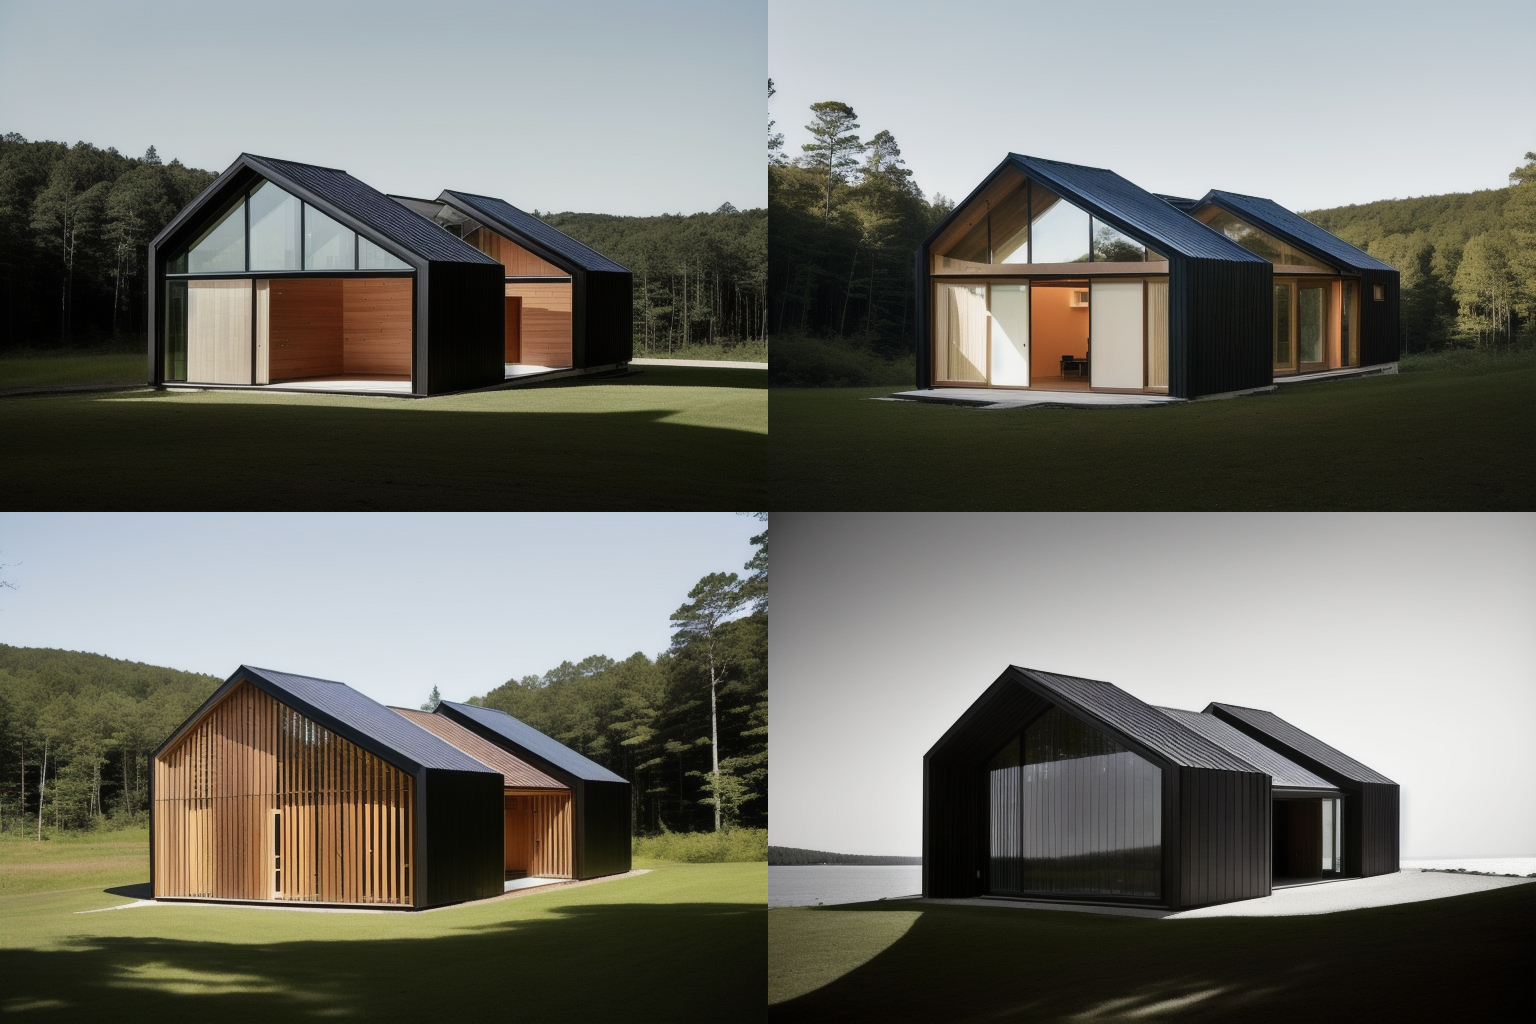
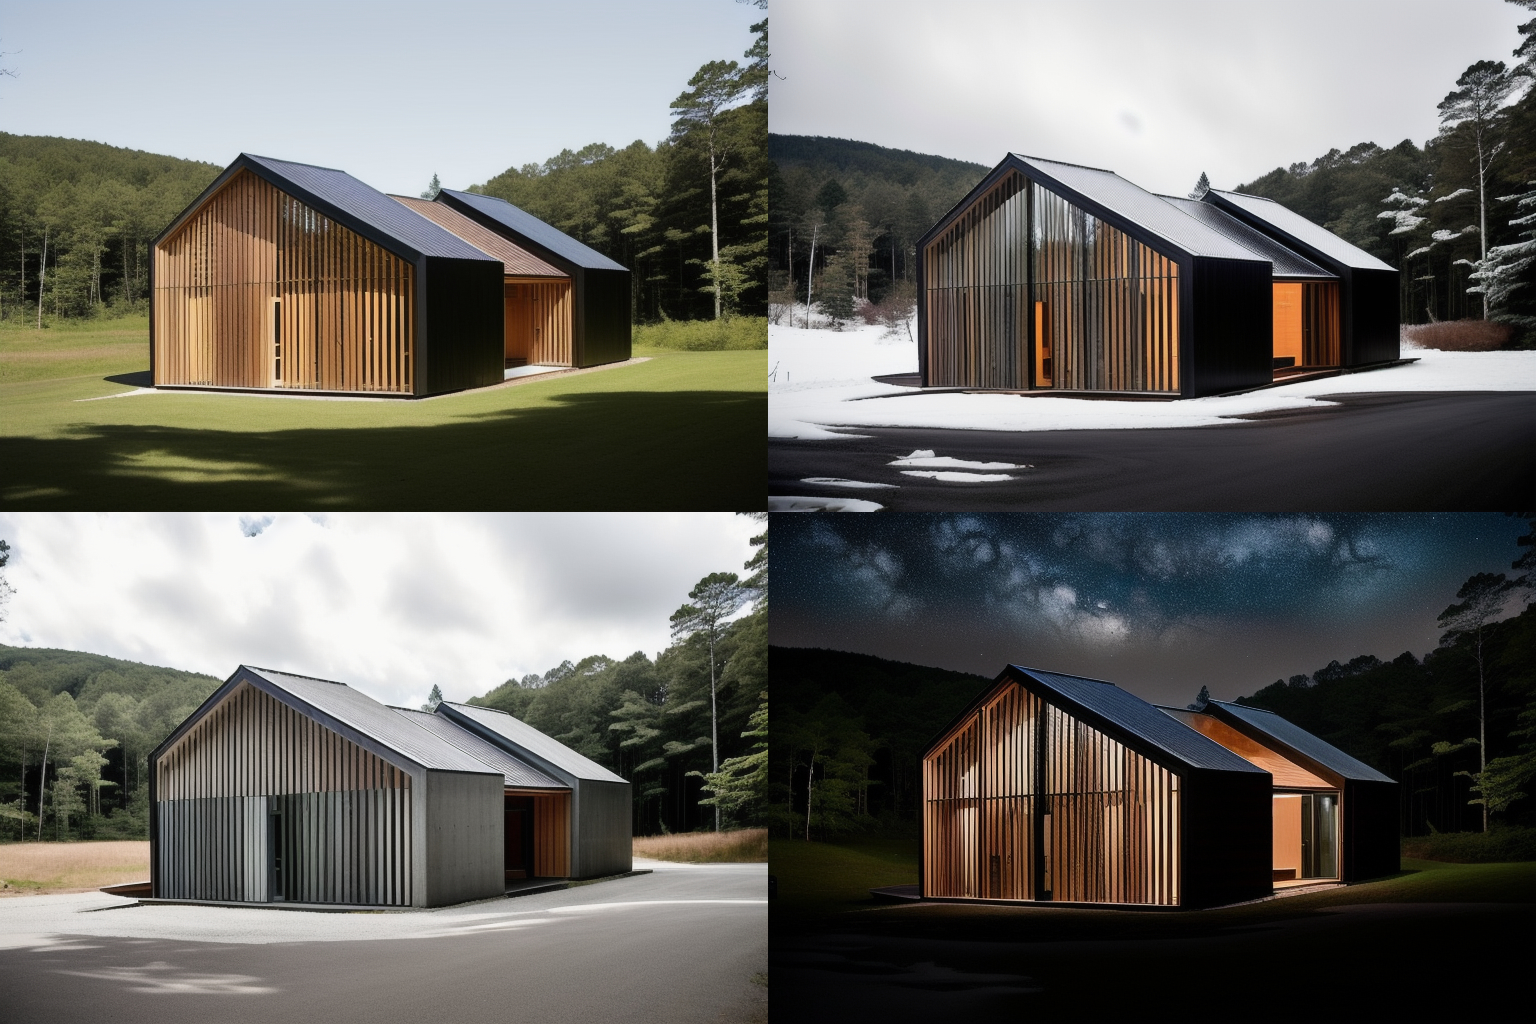
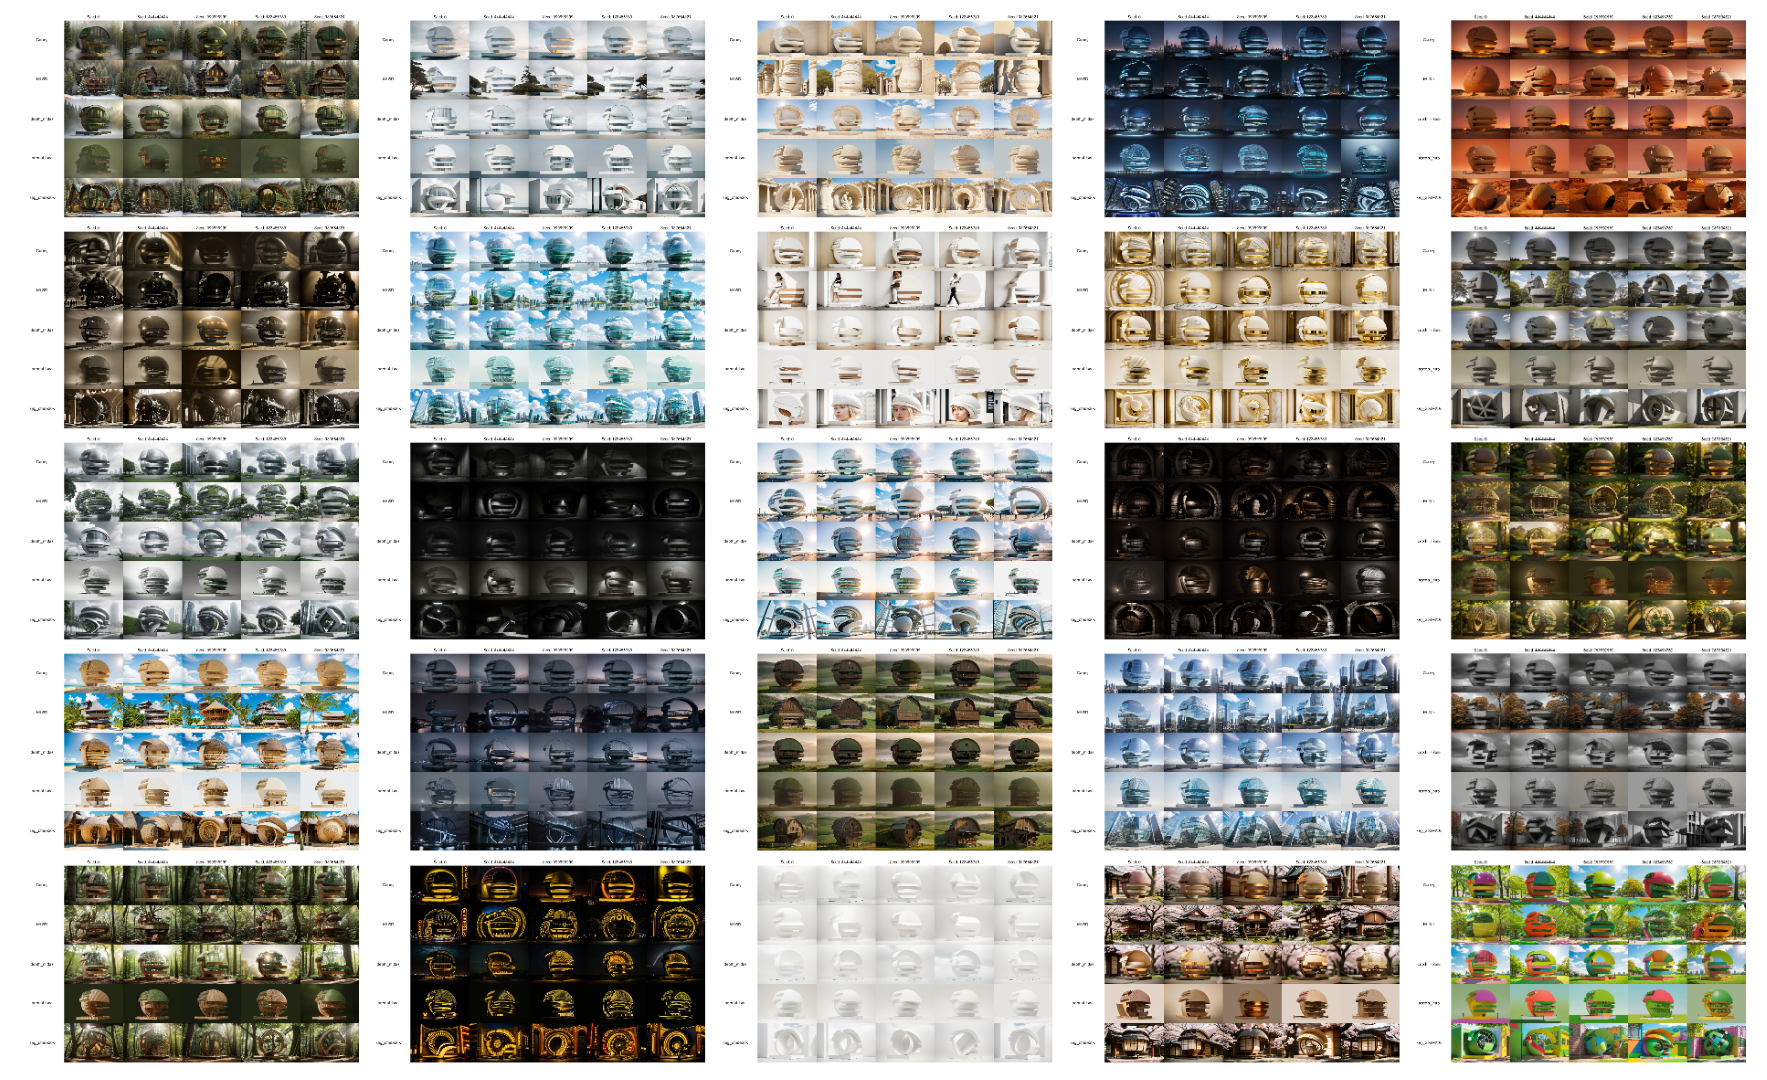
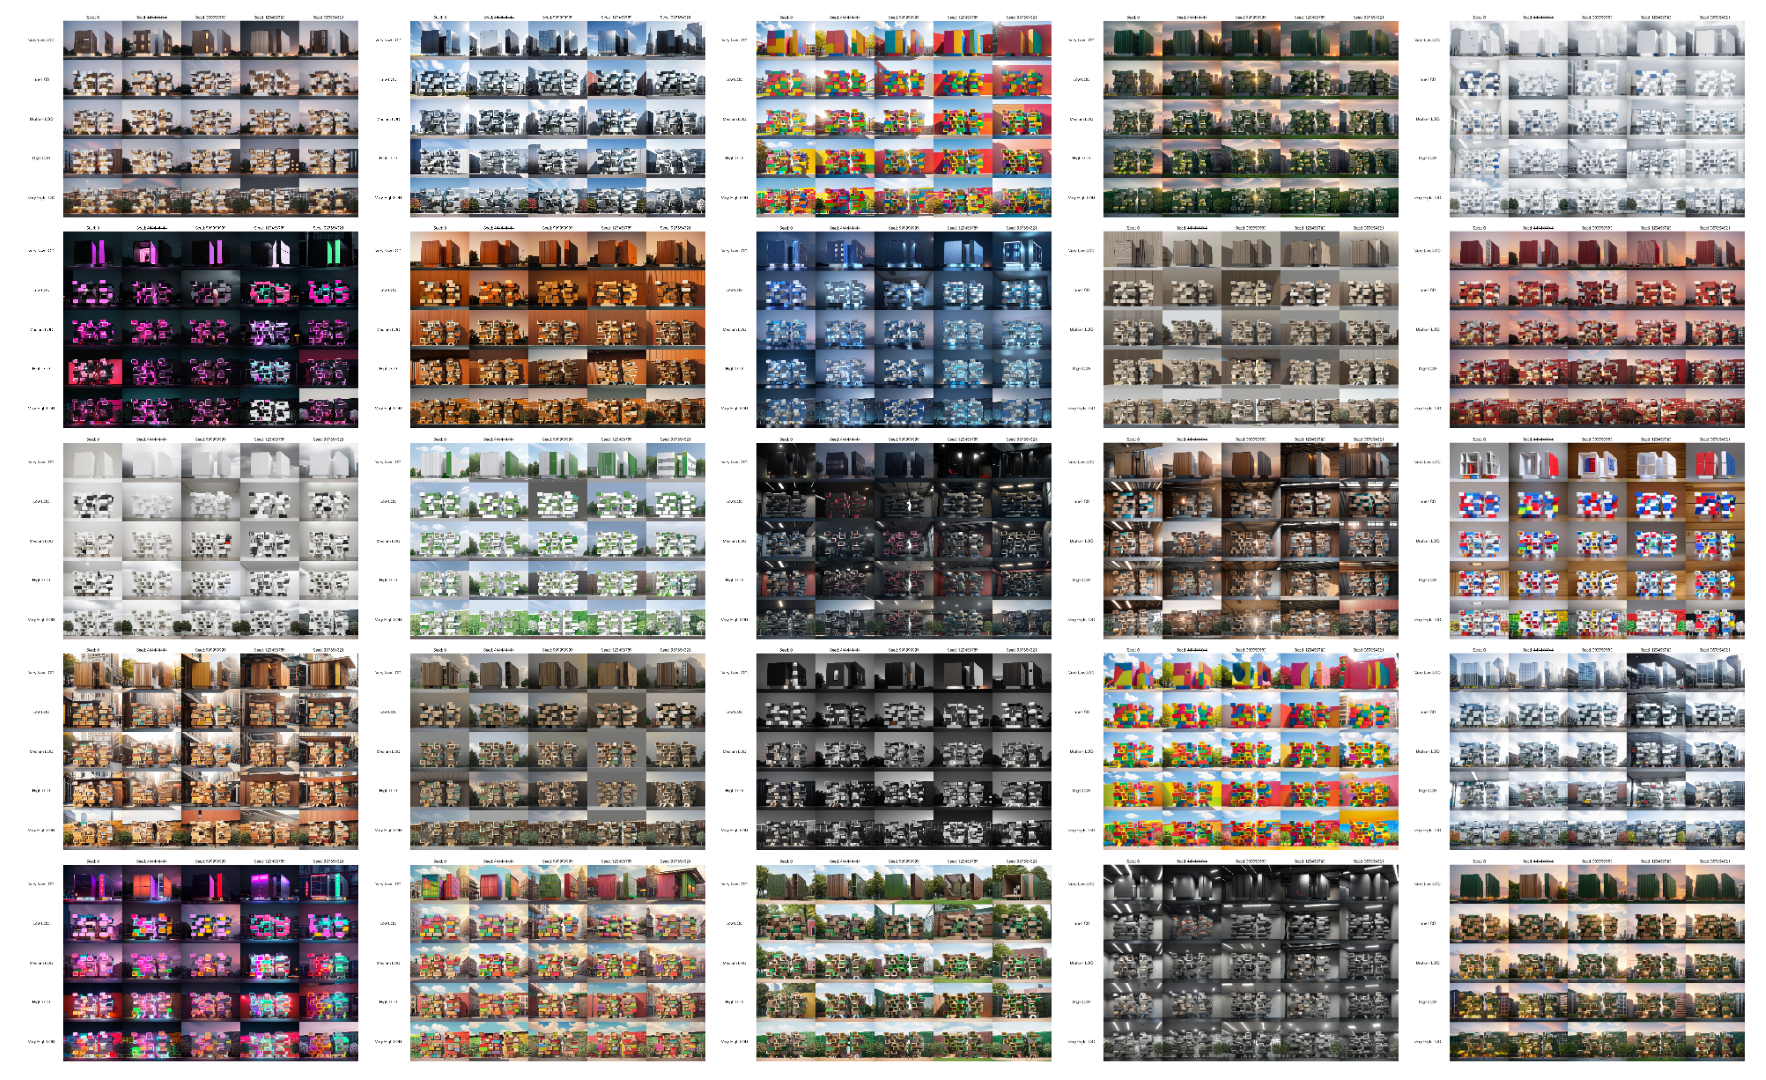
ControlNet offers an ingenious way to achieve specific styles or ‘vibes’ in an image — through reference modes. By providing a reference image, it’s possible to guide the output of four preprocessors: Reference Only, Adain, Adain+Attn, and Shuffle.
The results each preprocessor yields when given the same reference image is quite substantial. While the Reference Only, Adain and Adain+Attn modes tend to replicate the features of the input in terms of structure, patterns and content, the shuffle mode serves more as a LUT and captures colors and feel. The final result, a combination of Adain+Attn and Shuffle, comes closest in mimicking both the color and geometry of the reference image.
In the research, 25 images are used from the finalists of the One Rendering Challenge 2022 on Architizer to showcase the wide array of styles that ControlNet can capture. This not only underscores the tool’s flexibility but also its potential as a resource for architecture firms. The ability to use existing renderings as references eliminates the need for creating a custom model, saving significant time and costs. Moreover, it opens up possibilities for using images from sources like Midjourney.
ControlNet: Playing with Detail and Finding the Balance
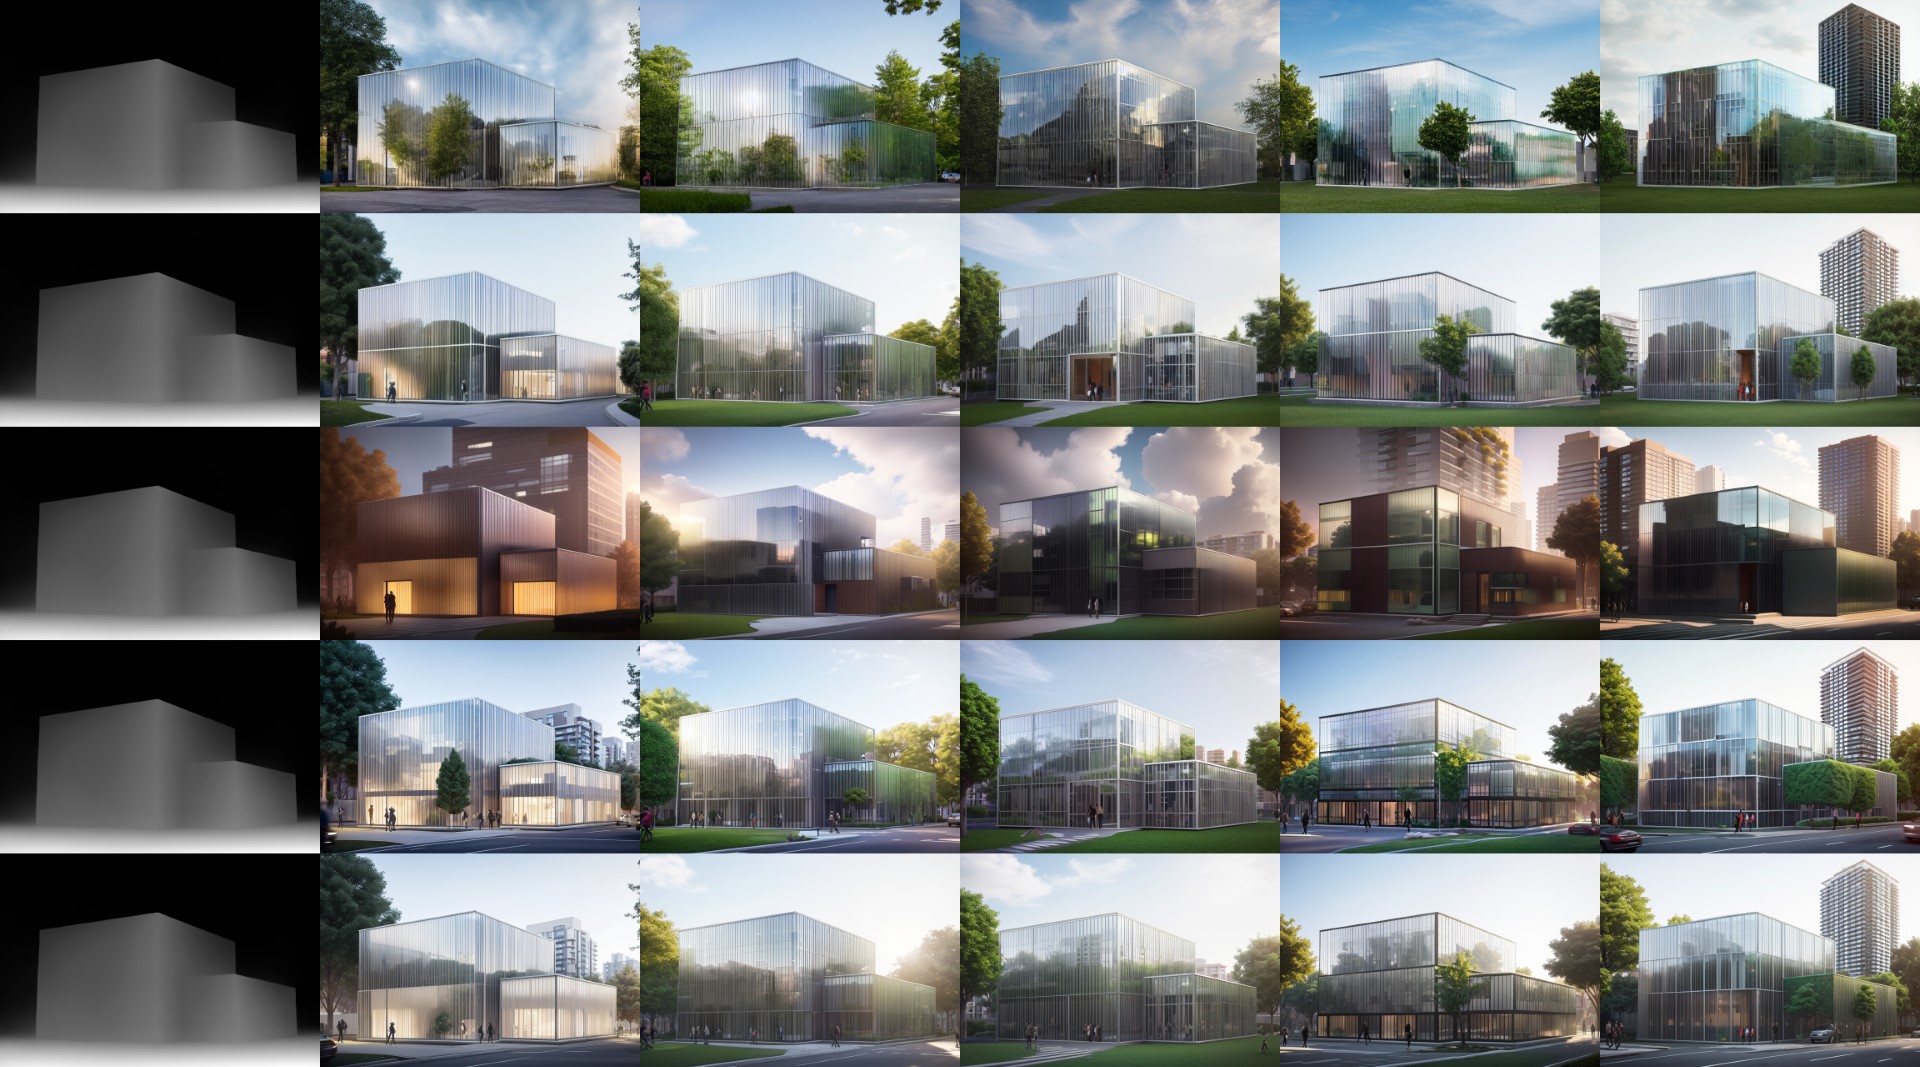
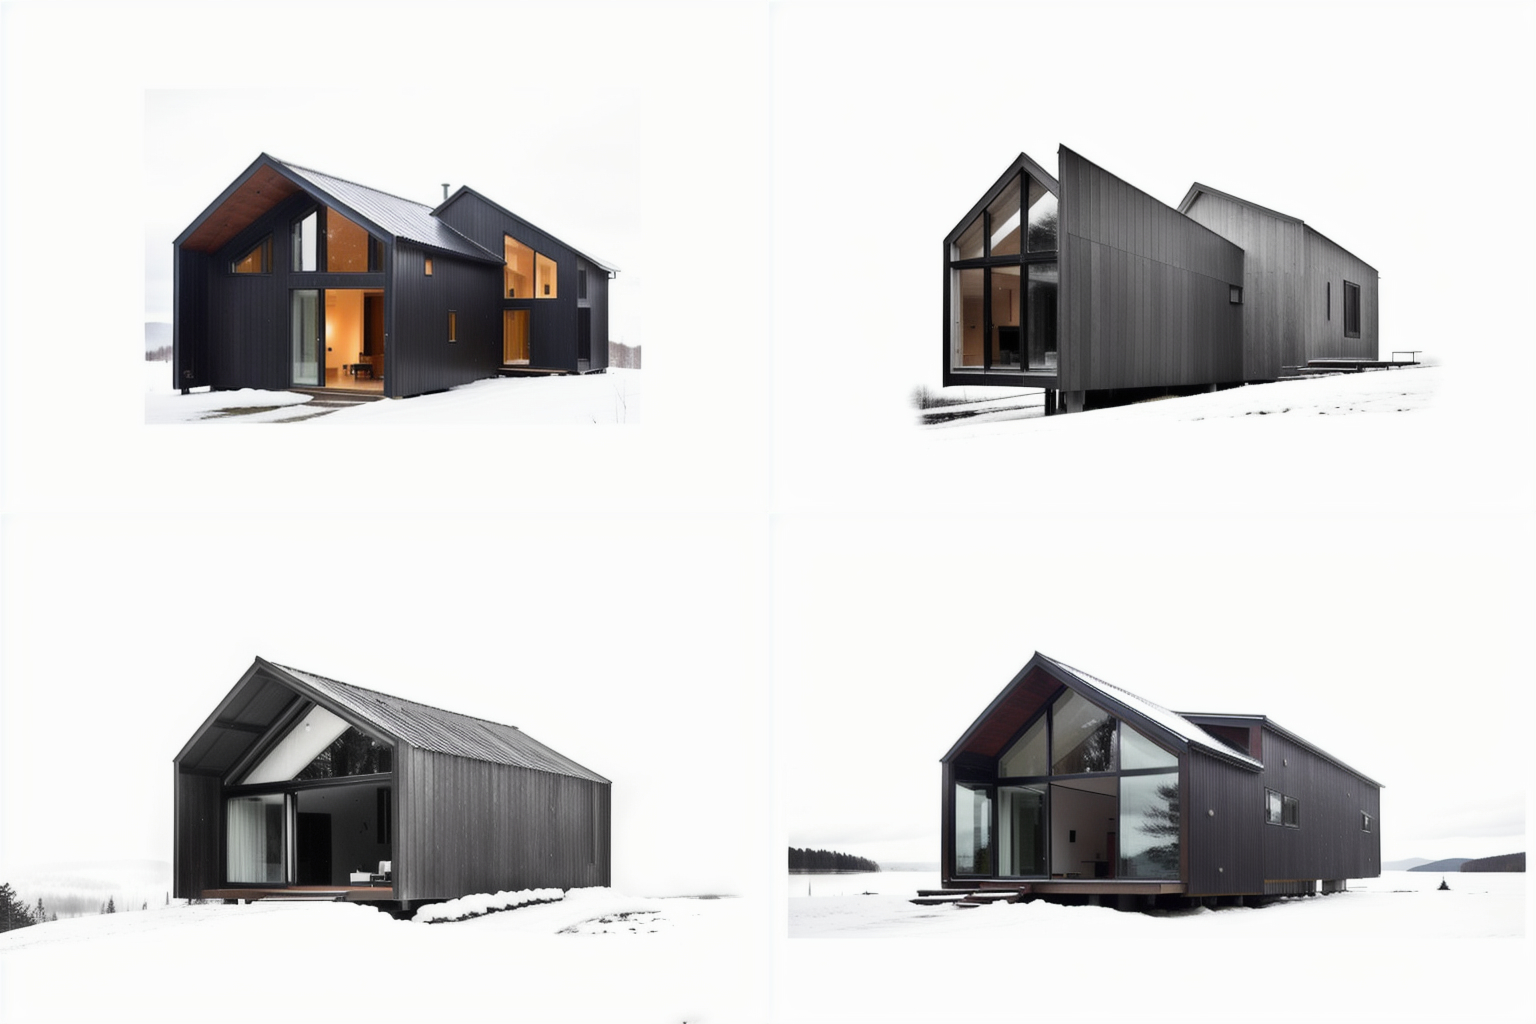
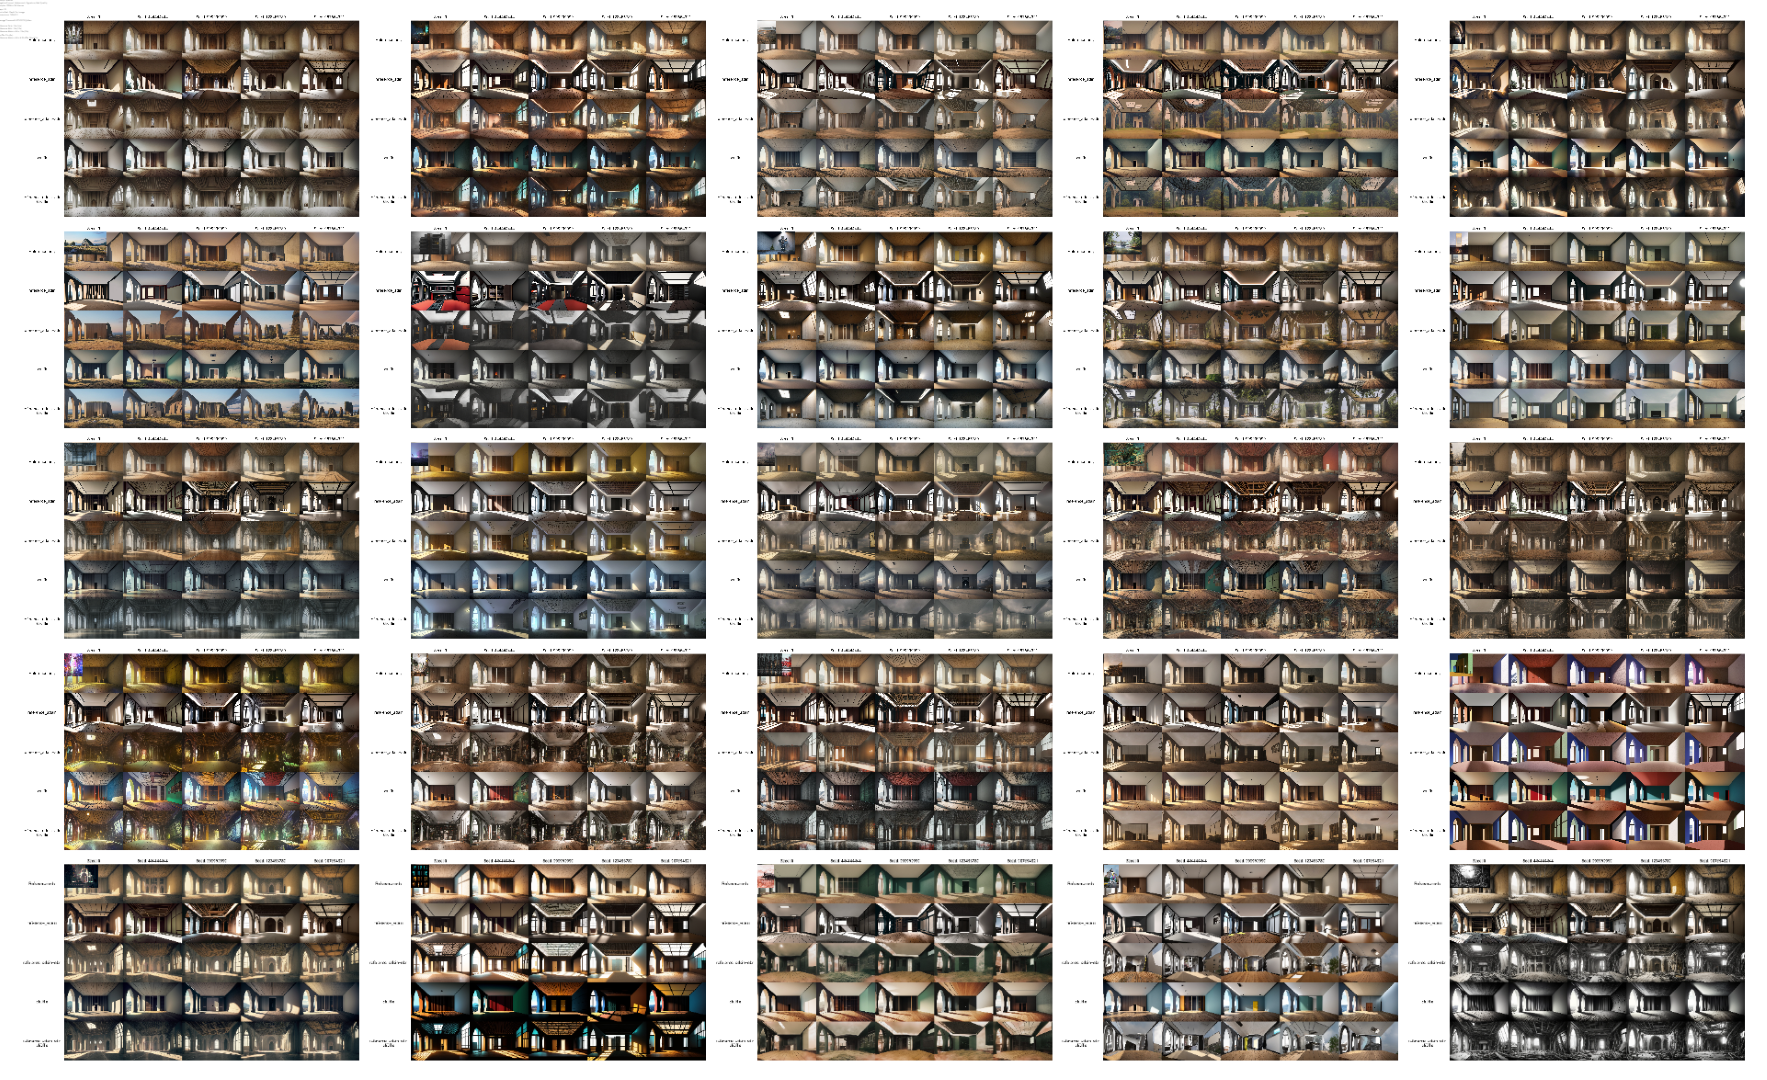
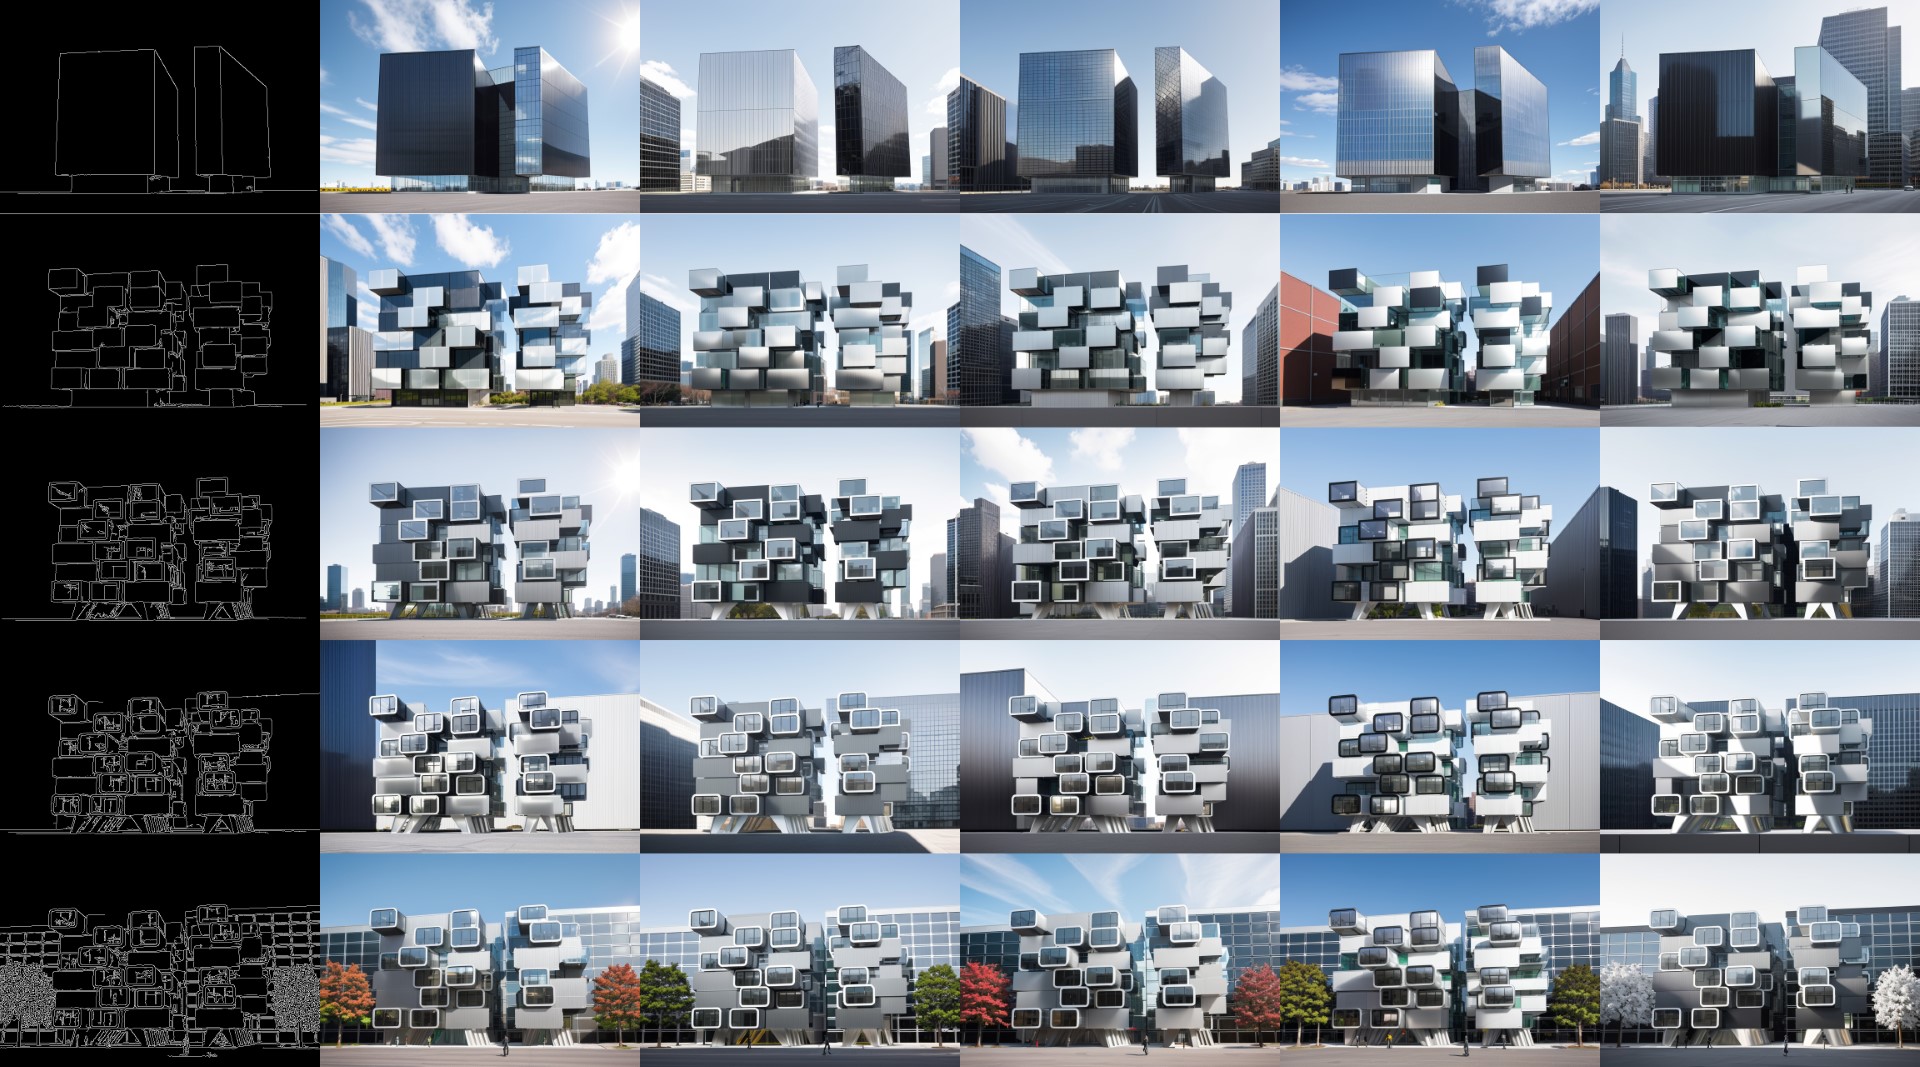
The next focus of exploration is the level of detail required in an input image to produce the desired outcome. The findings suggest a delicate balance: more detail brings the output closer to an actual rendering, while less detail provides more room for exploration and randomness. Essentially, more detail restricts the output but enhances the accuracy of results.
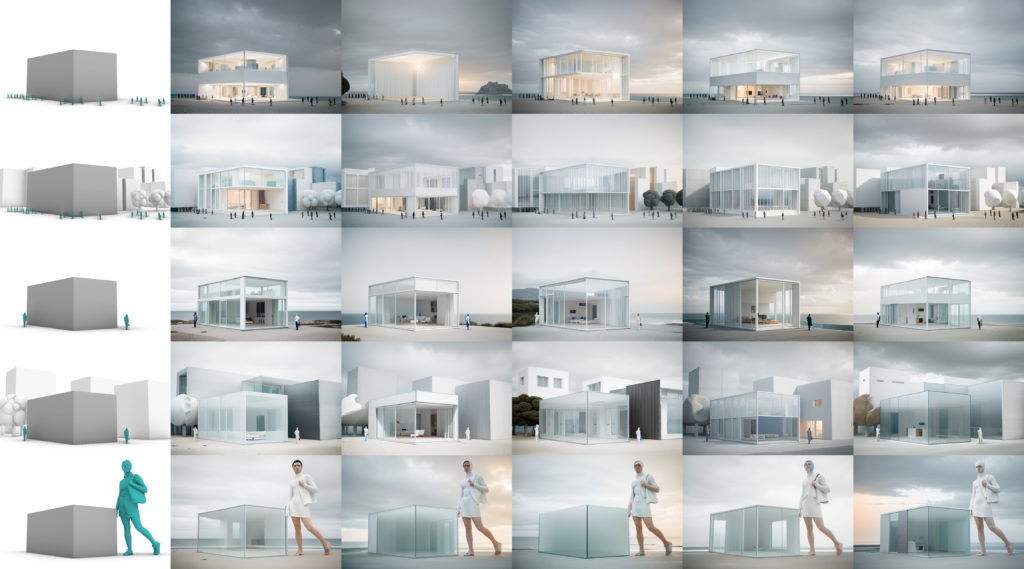
ControlNet: The Impact of Scale and Surrounding Elements
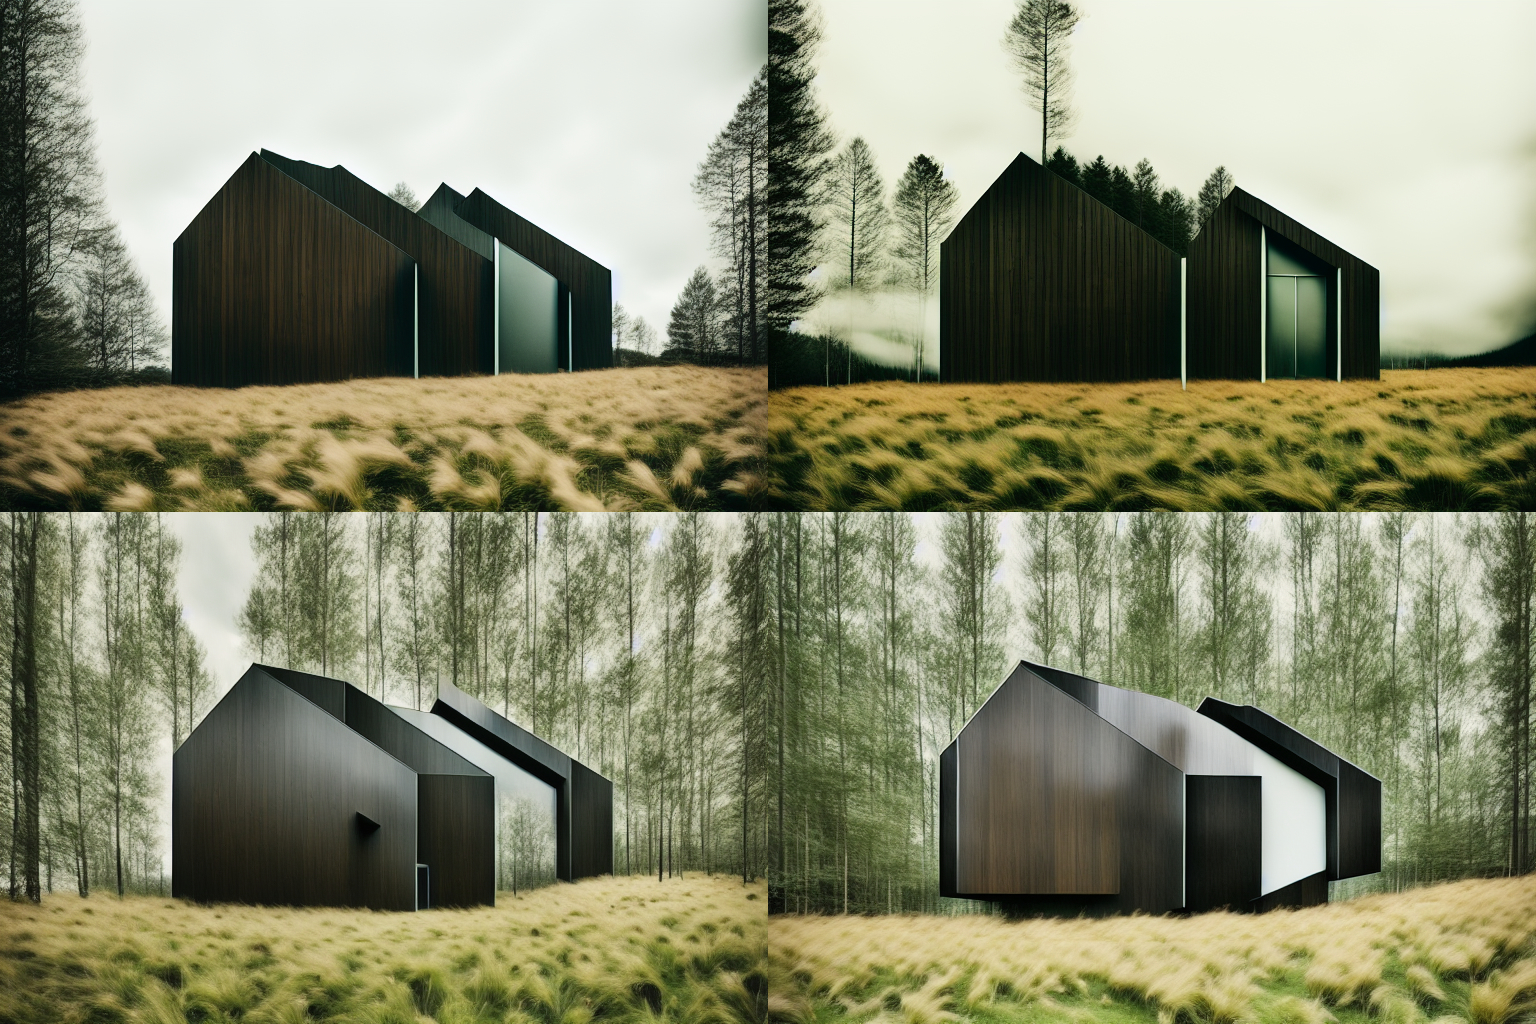
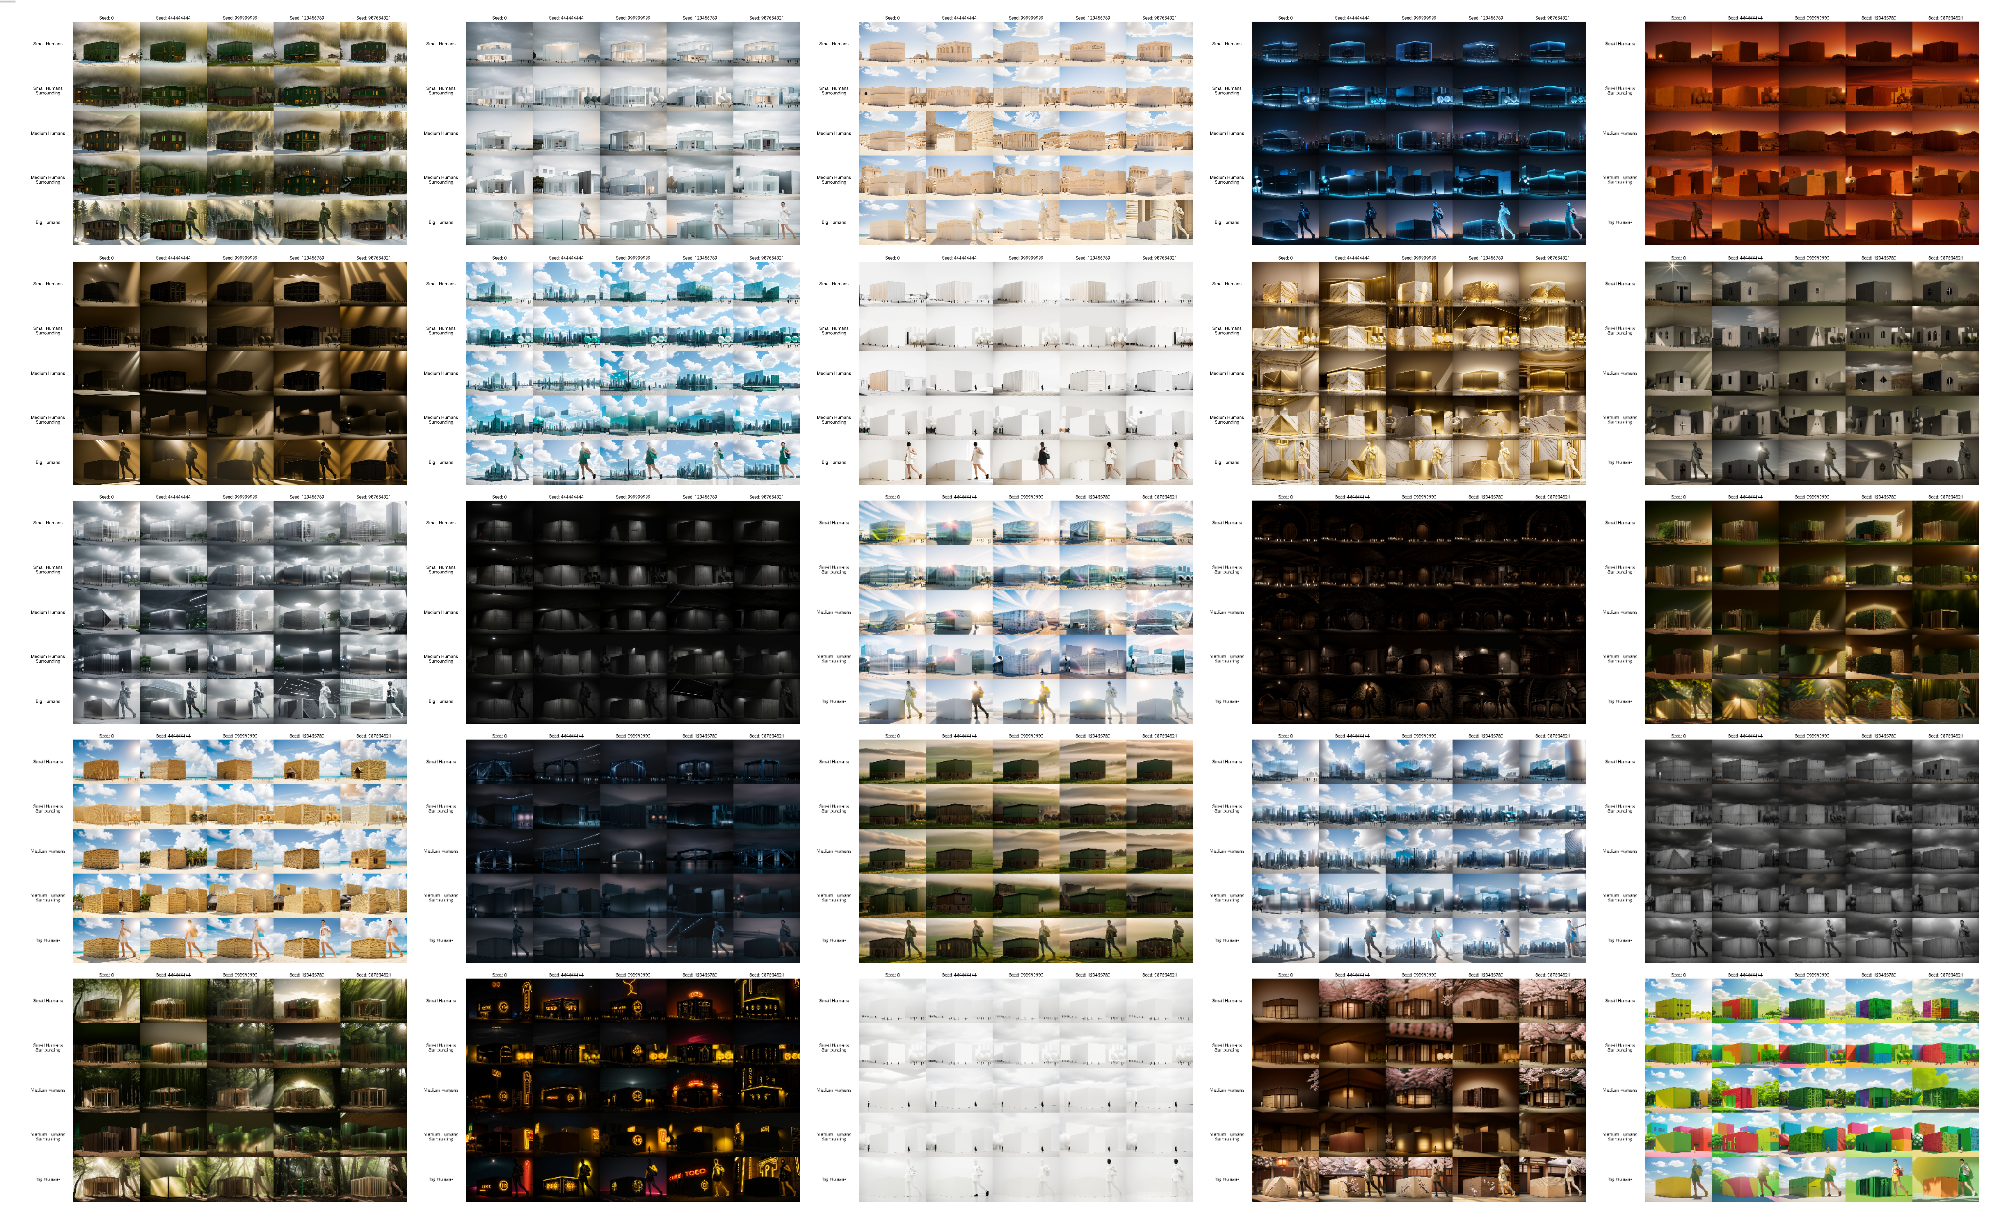
Beyond detail, also another method of guiding ControlNet is explored – by varying the scale of elements in the input image and adjusting the surrounding elements such as trees or buildings. These manipulations significantly impact the output, with the scale of the building in the generated result adapting to it. This is evident in the proportions of architectural details such as floor heights, doors, windows, and interiors.
However, it’s important to note that when the scale of provided objects deviates too far from realism, the system begins to falter.
The Project: Putting the Research into Practice
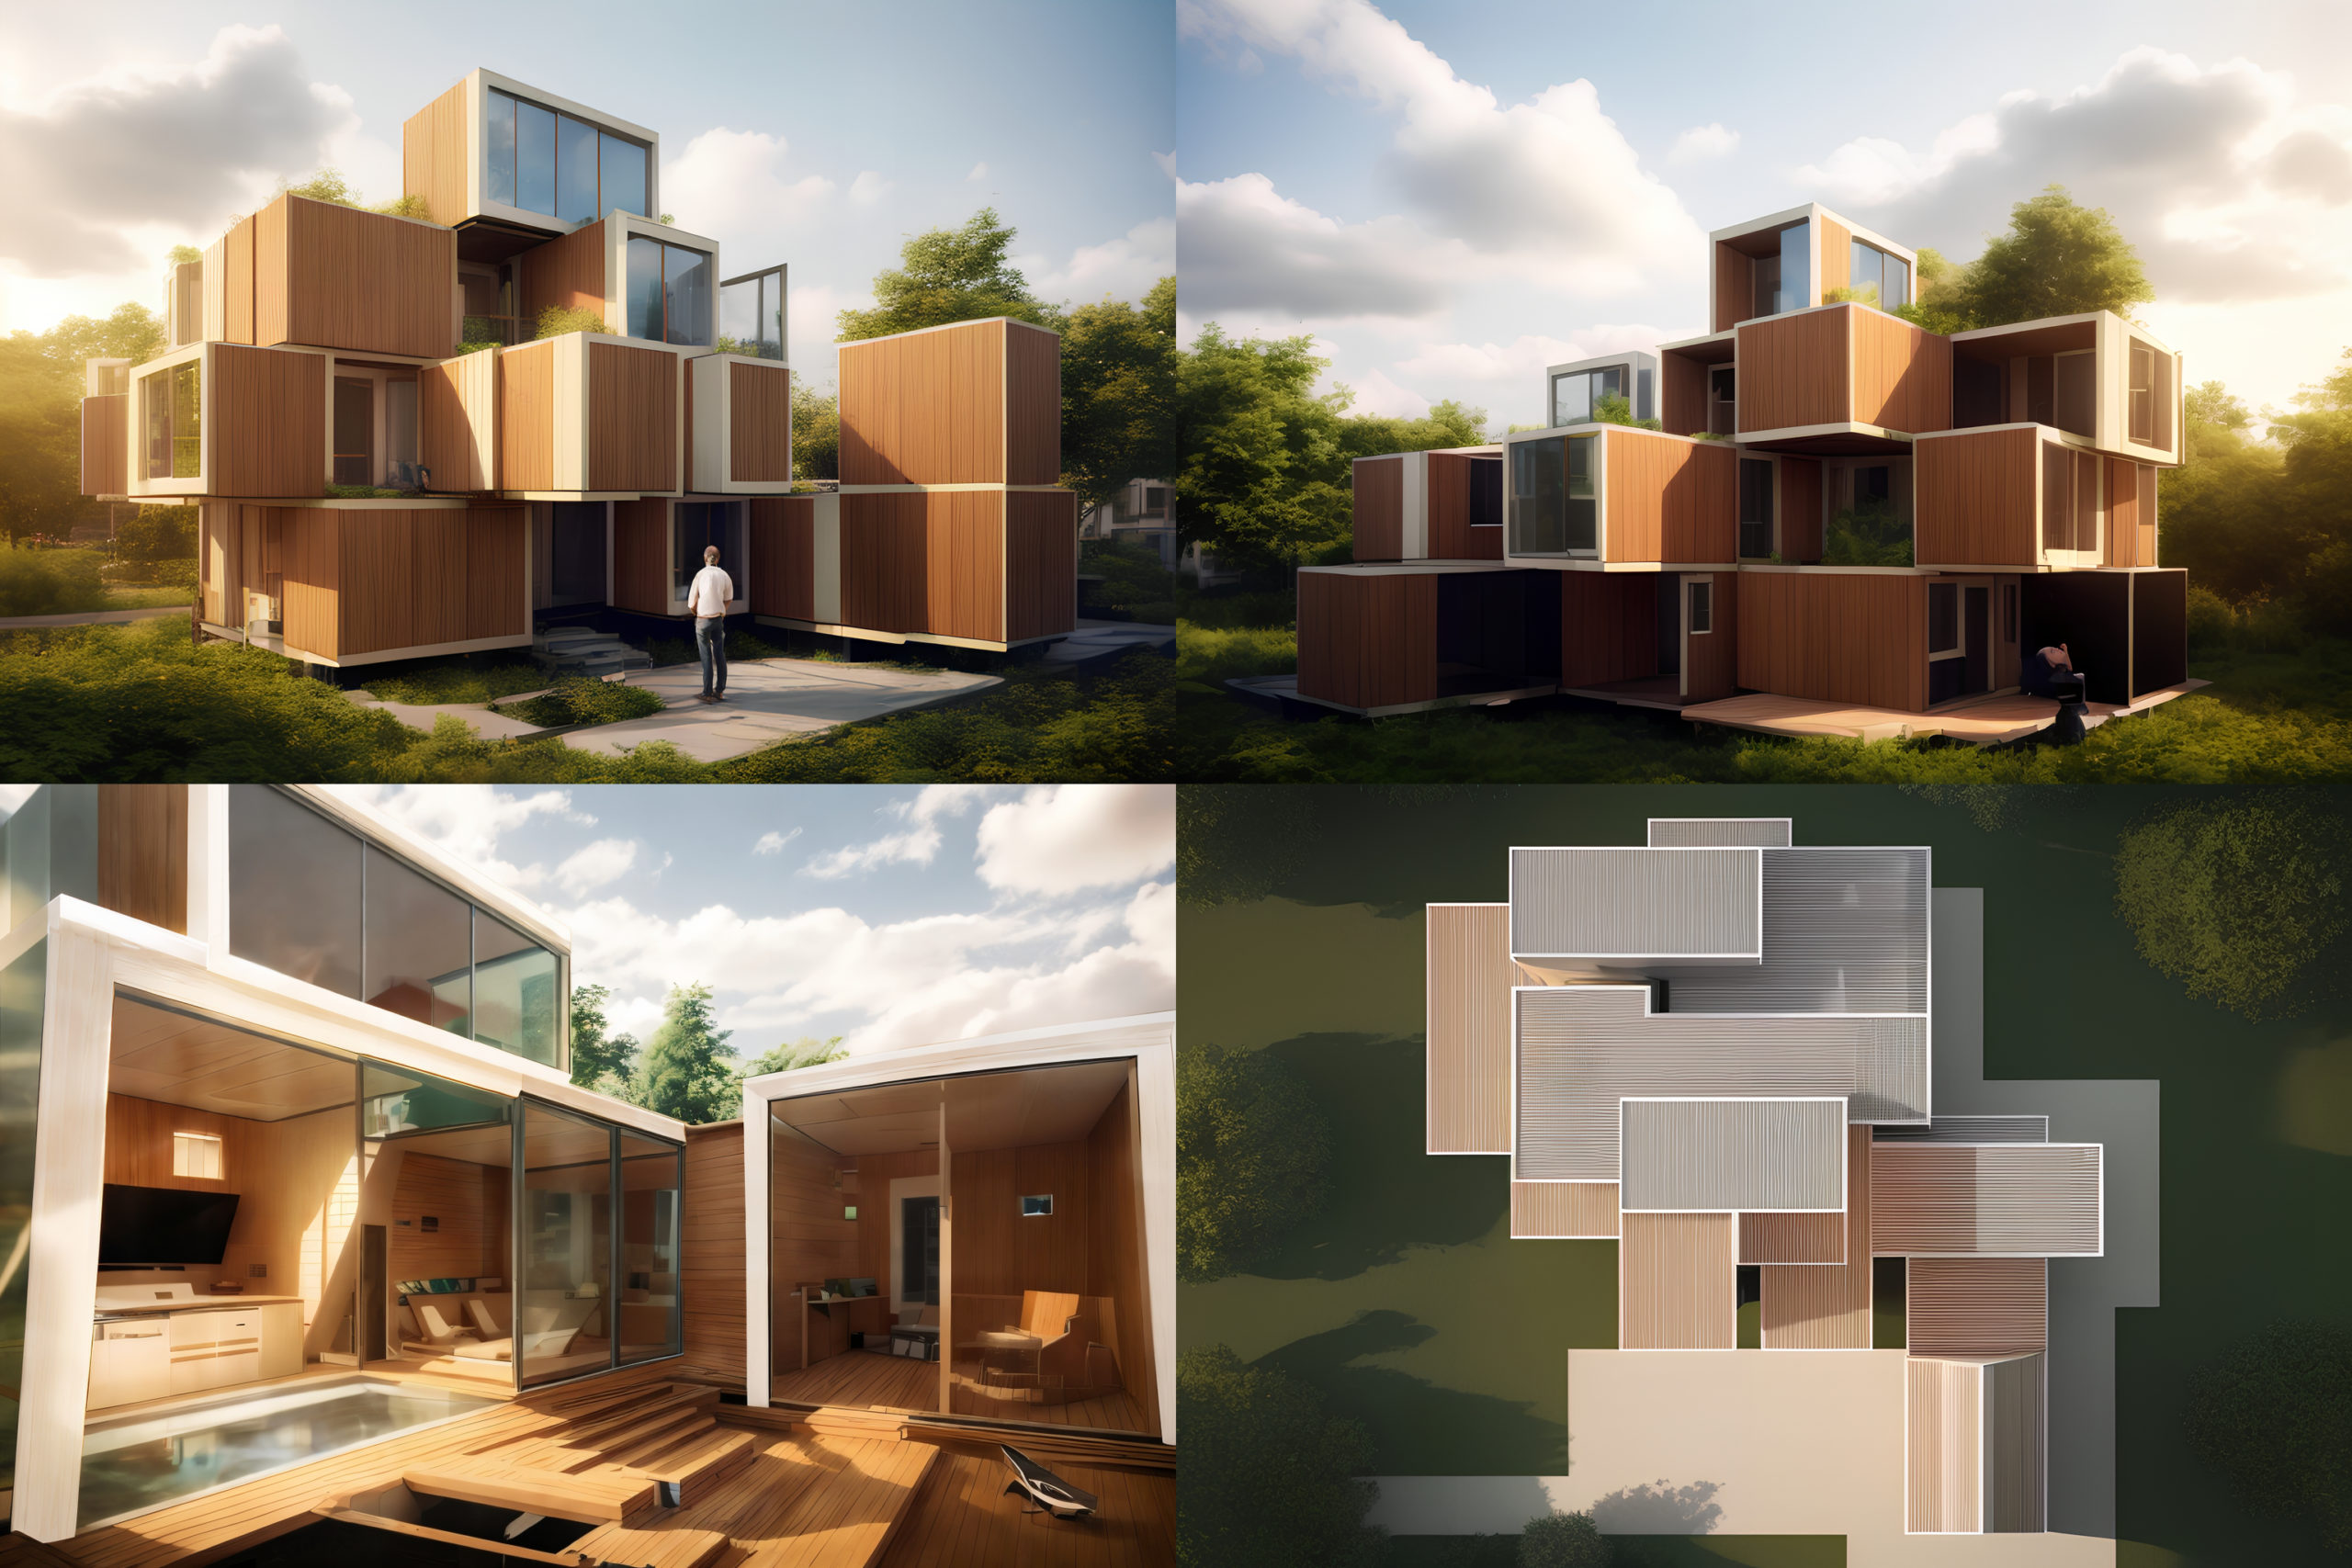
Following the research on ControlNet, a project is undertaken to apply all of the acquired knowledge and insights. The purpose of this project is twofold: to demonstrate the feasibility of generating a comprehensive proposal using artificial intelligence, and to maintain maximum control over the process without sacrificing the speed and flexibility that characterizes generative AI diffusion models. In addition, it is crucial to ensure a consistent aesthetic throughout the generated images.
The project’s fictional objective is to create a proposal for a sustainable modular apartment complex. A front and back view are required as well as one interior rendering and a plan in top view.
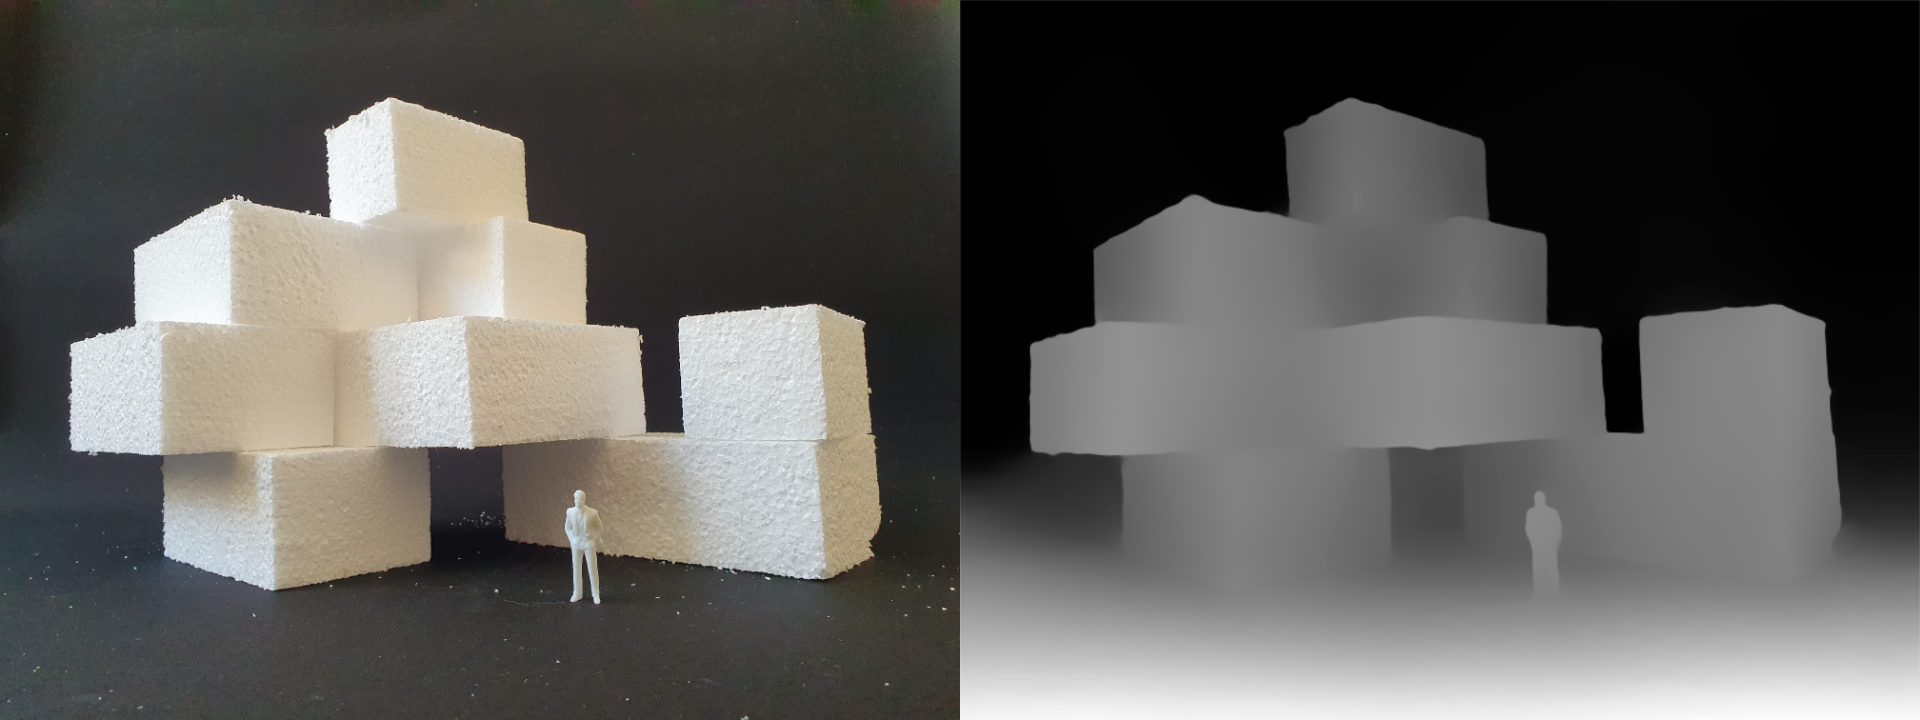
The Front View: Physical to Digital
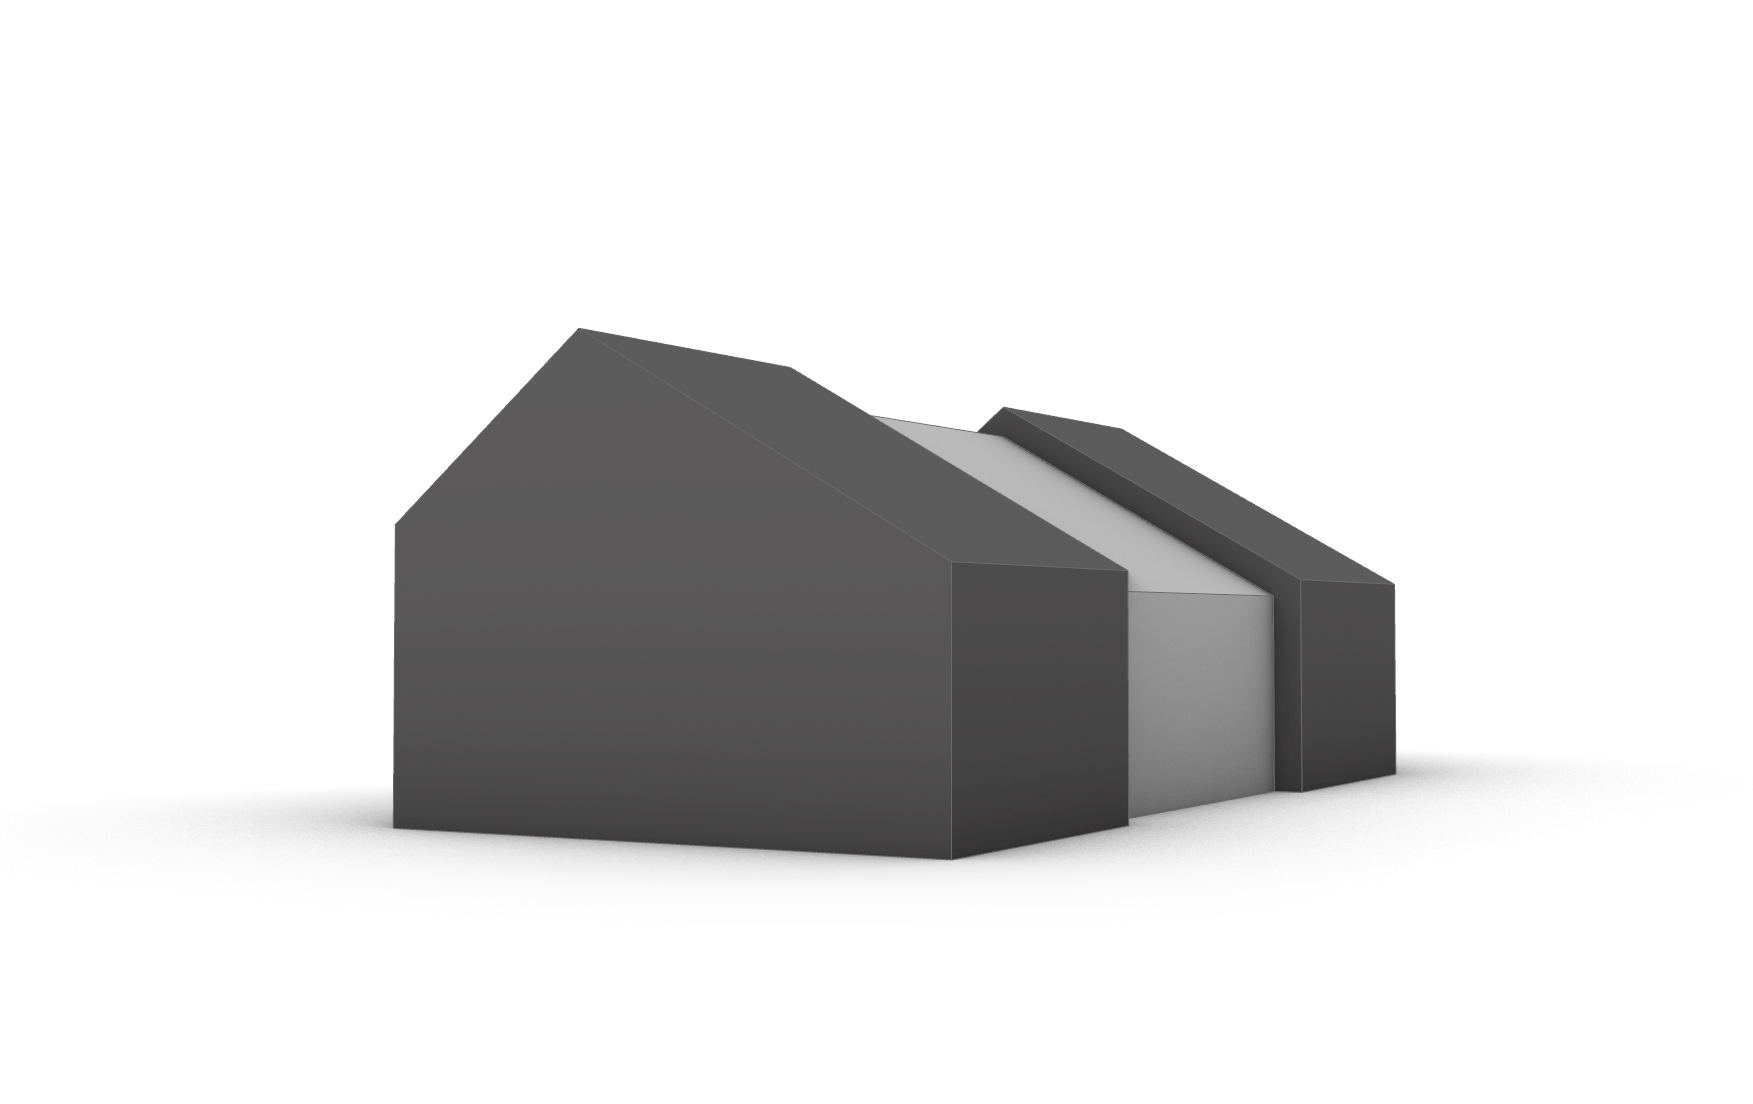
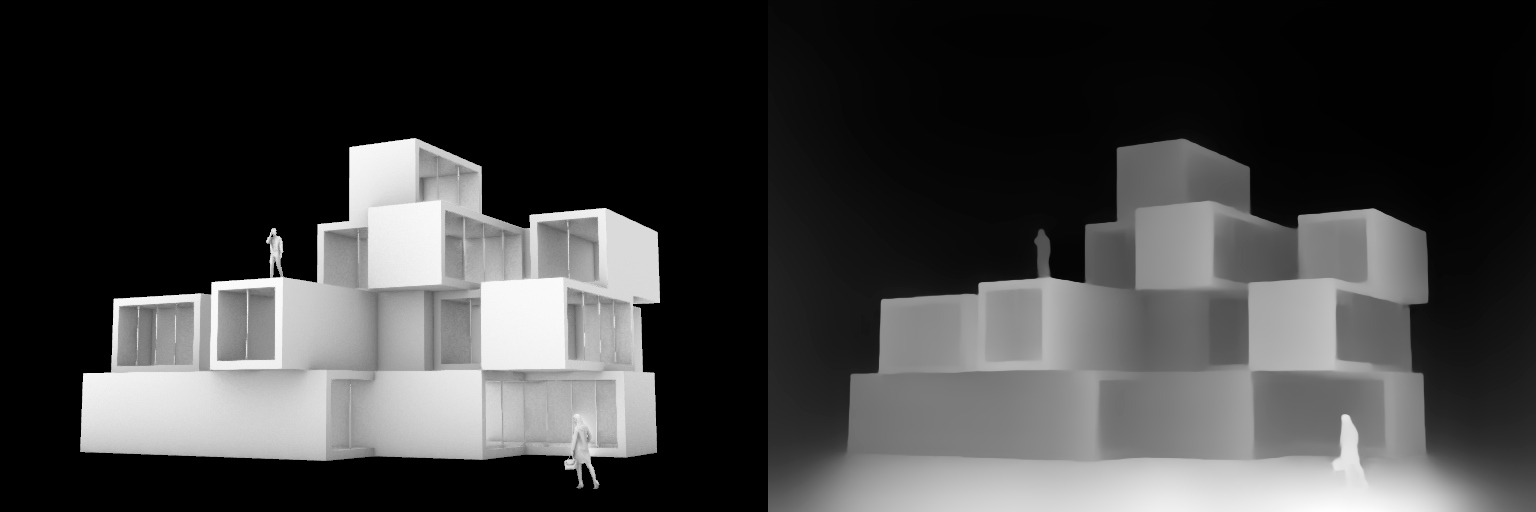
The initial phase in the creation process involves crafting the volumetry using traditional model-building materials, such as Styrofoam. To give Stable Diffusion a reference for the size of the objects in the intended outcome, a human figure is also included in the image. Following this, the ControlNet Depth Midas preprocessor is employed to convert the photograph into a depth map.
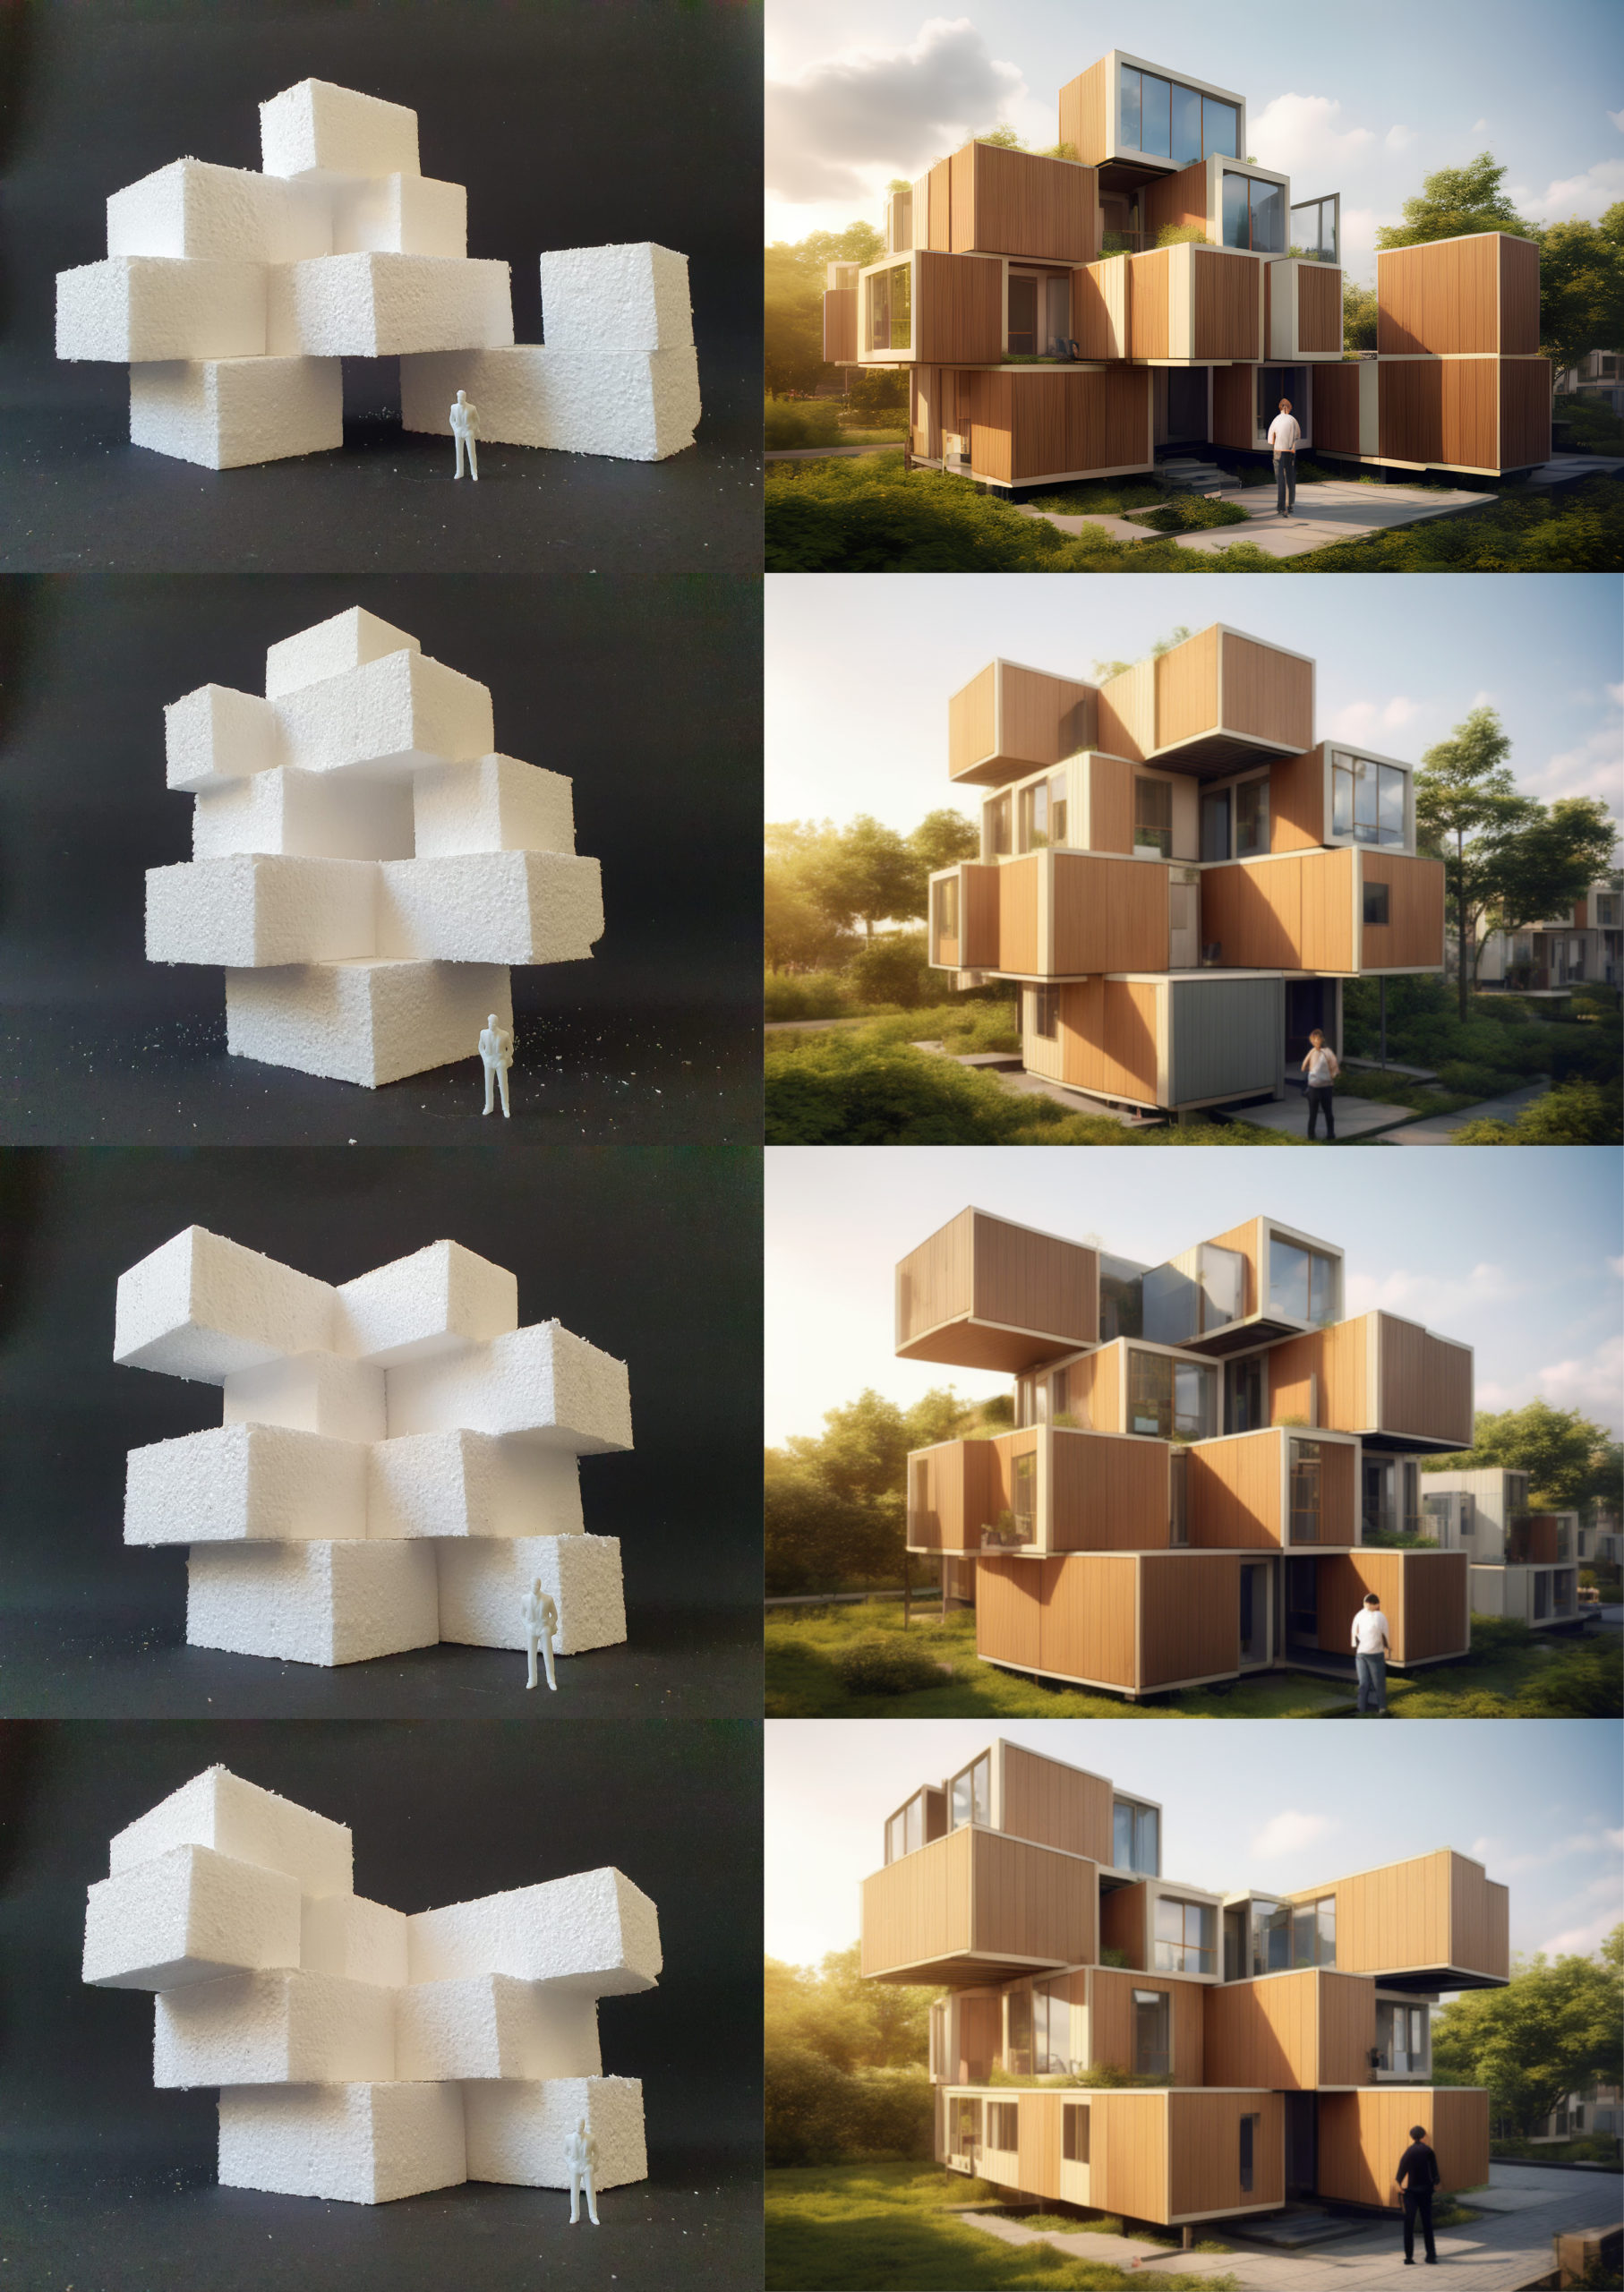
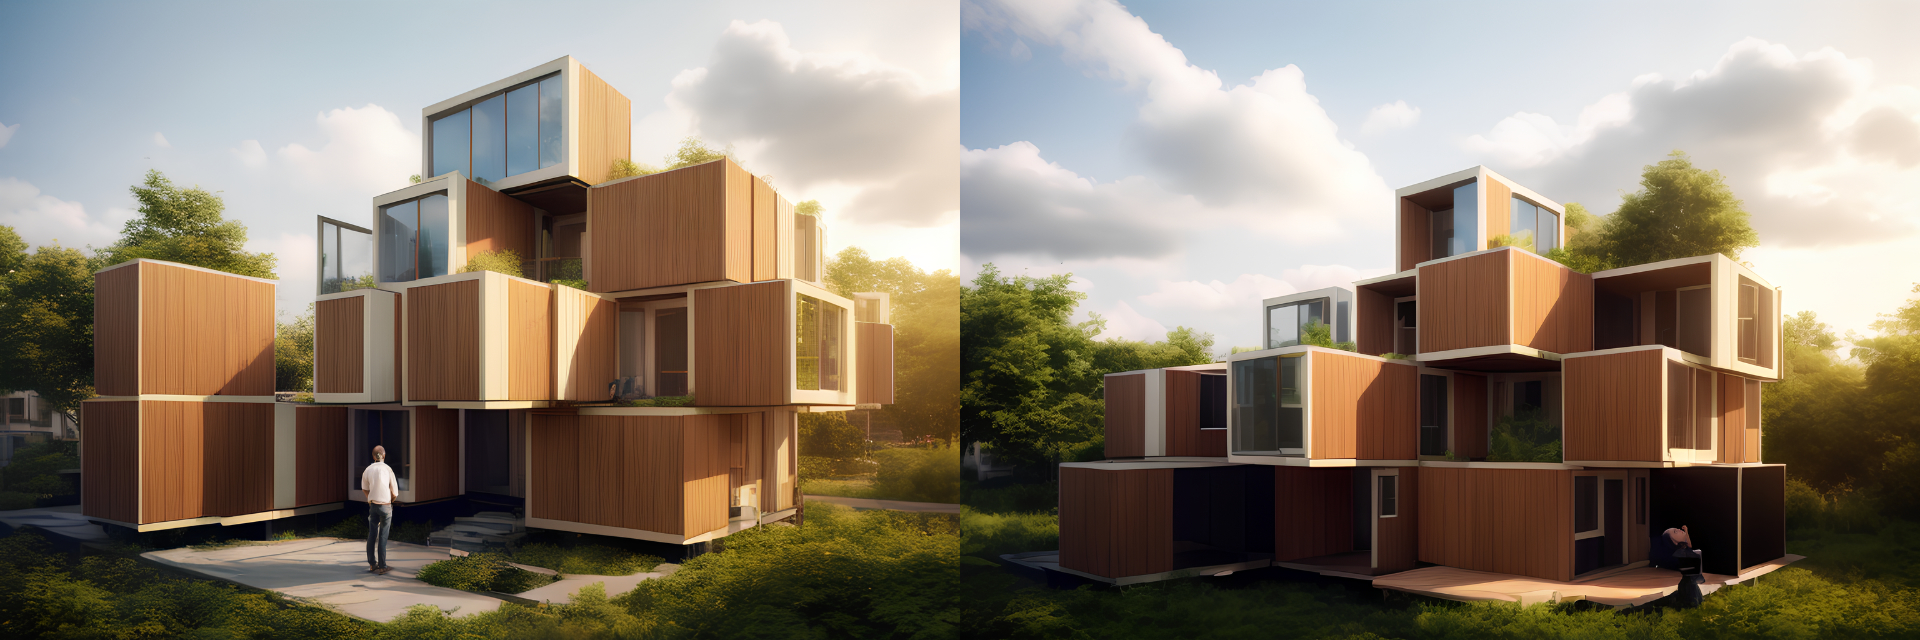
Upon generating the first mask, several concepts are developed using Midjourney. These references could also be previous renderings or other types of images. However, it’s advisable to choose images that bear a geometric resemblance to the physical model. Finally, using the ControlNet Depth Midas model with the physical model image, and the ControlNet Reference Adain+Attn and Shuffle models with the Midjourney image, the first set of results is generated.

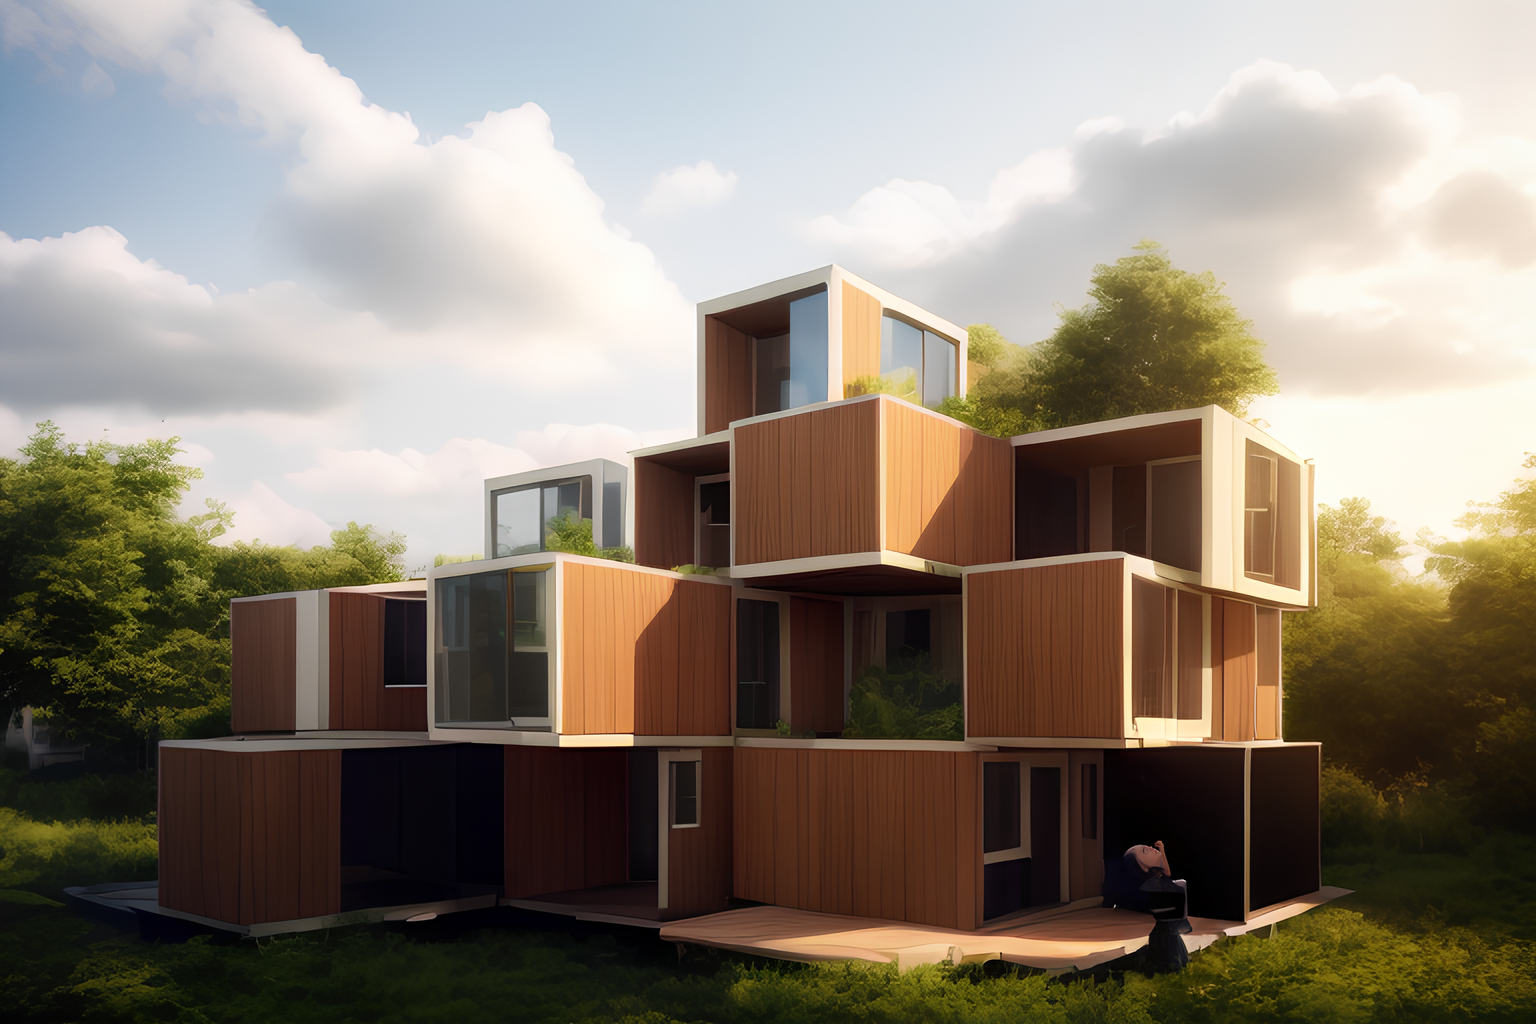
Upon finding an aesthetic that aligns with the design vision, the next stage involves exploring different volumetric configurations. The blocks are reassembled in varied arrangements to explore alternate massing possibilities. The same workflow used earlier – combining the Depth Midas model, the Shuffle model, and the Reference Adain+Attn – is once again employed until the optimal shape materializes.
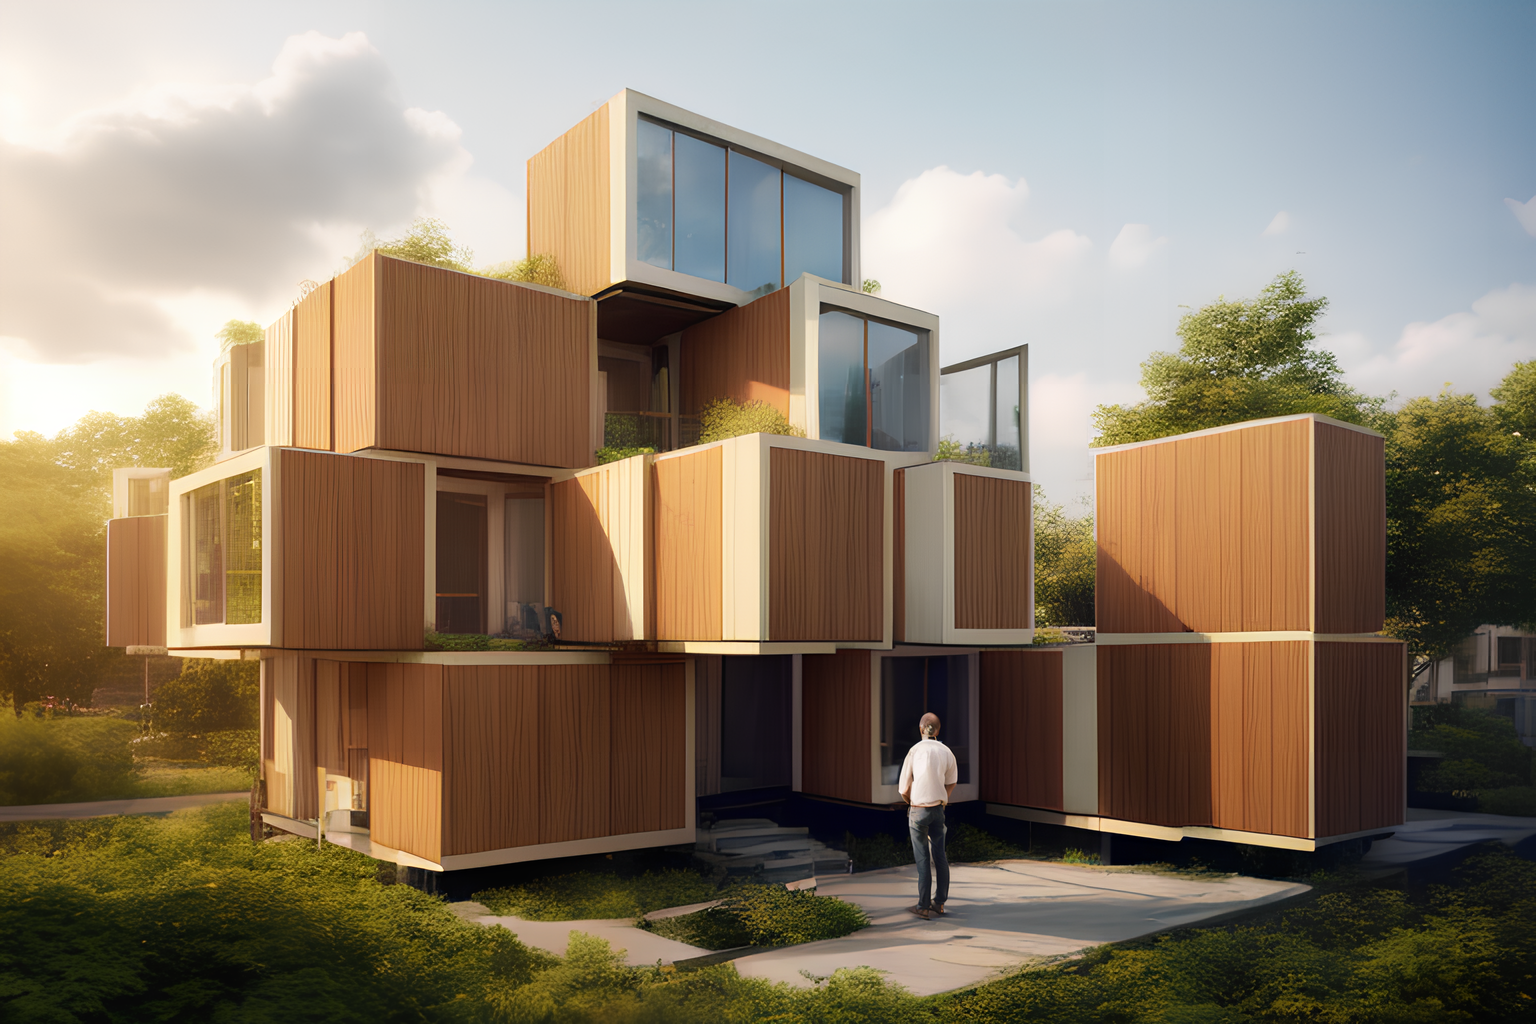
The final step in the process involves enhancing the image resolution. The ControlNet Tiles model, along with the Ultimate SD Upscaler extension, is utilized to upscale the final image. This ensures that the finished design is presented in the highest quality, ready for detailed examination and appreciation.
The Back View: CAD to AI
The next phase in this process involves the creation of the building’s rear view, utilizing CAD for a greater level of precision and control over the outcome. Having used a physical model for the front view in the previous step, the transition to a digital format is seamless.
In order to dictate the placement of windows, openings are integrated into the digital volumes. It’s important to note that the level of detail modeled correlates directly with the accuracy and controllability of the final outcome. For scaling purposes, human figures are once again added to the rendering. The ControlNet Depth Midas preprocessor is then applied to this digital model.
For the second stage, instead of referencing a Midjourney image, the prior rendering of the front view is utilized as the reference image. This ensures a consistent aesthetic across the different views of the building. The diffusion process is then guided by the combined use of the ControlNet Depth model, the Shuffle model, and the Reference Adain+Attn model.
Once again in order to enhance the image resolution, The ControlNet Tiles model, along with the Ultimate SD Upscaler extension, is used. In theory afterwards it is advisable to use the in painting function on humans or other details that did not generate in the desired way to fix them. This step was skipped in this research.
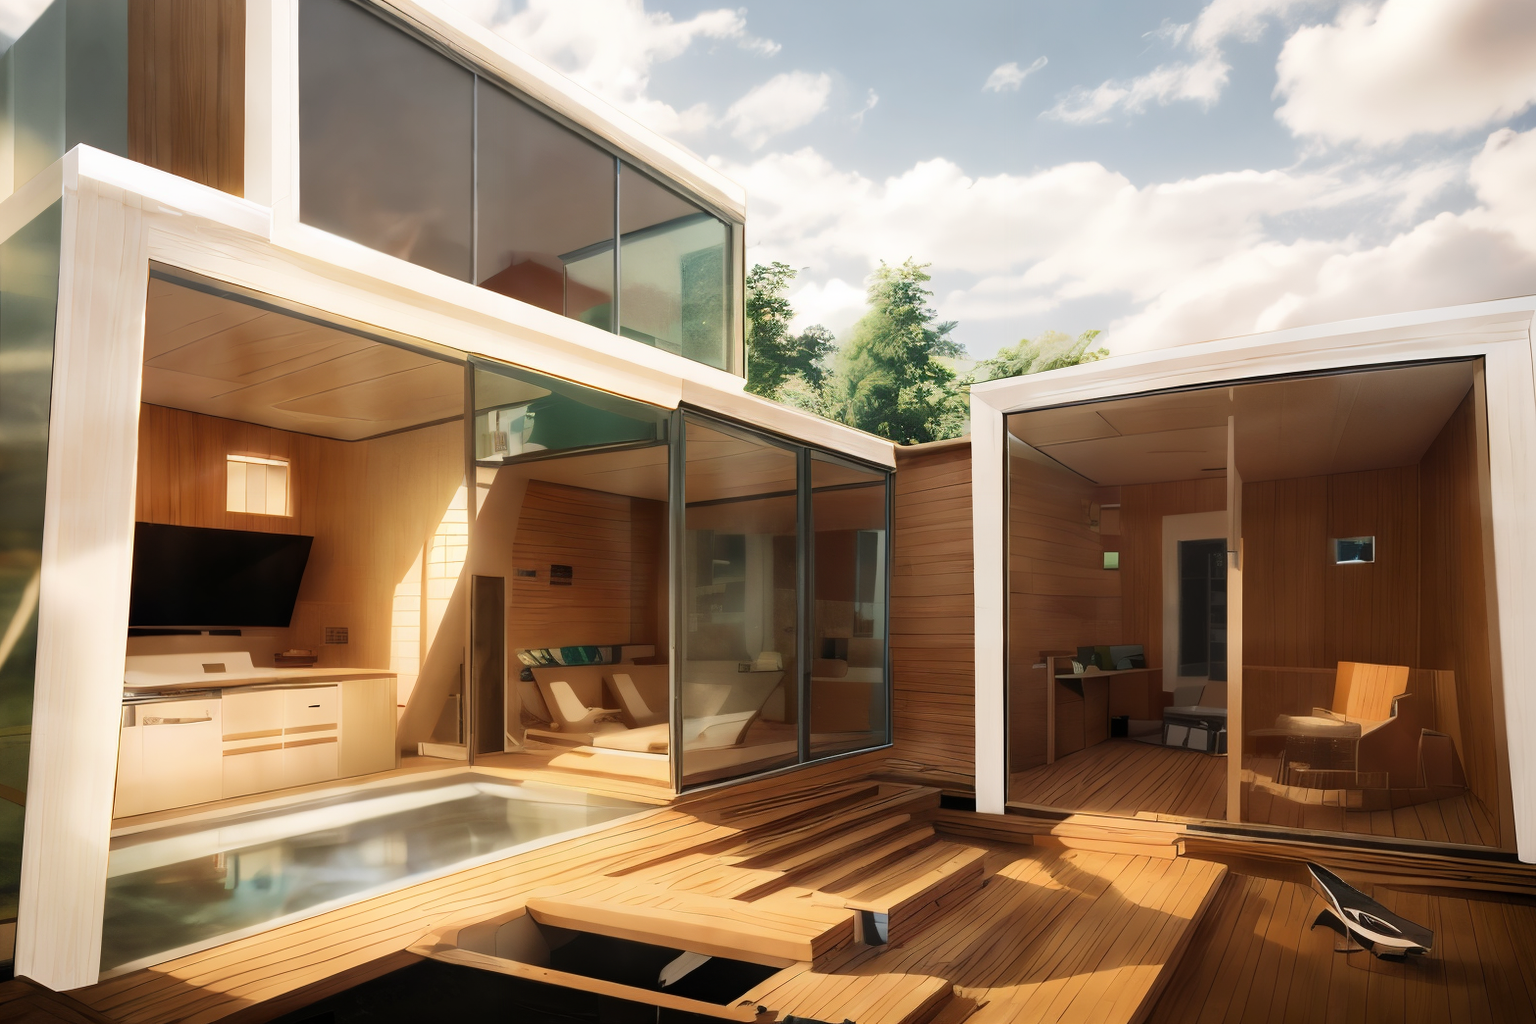
The Interior View: CAD to AI
As the design process evolves to encompass interior views, the workflow remains largely the same, leveraging the techniques and tools that have proven effective in previous stages. The ControlNet Depth Midas preprocessor is once again utilized, this time applied to the CAD viewport to generate the depth mask.
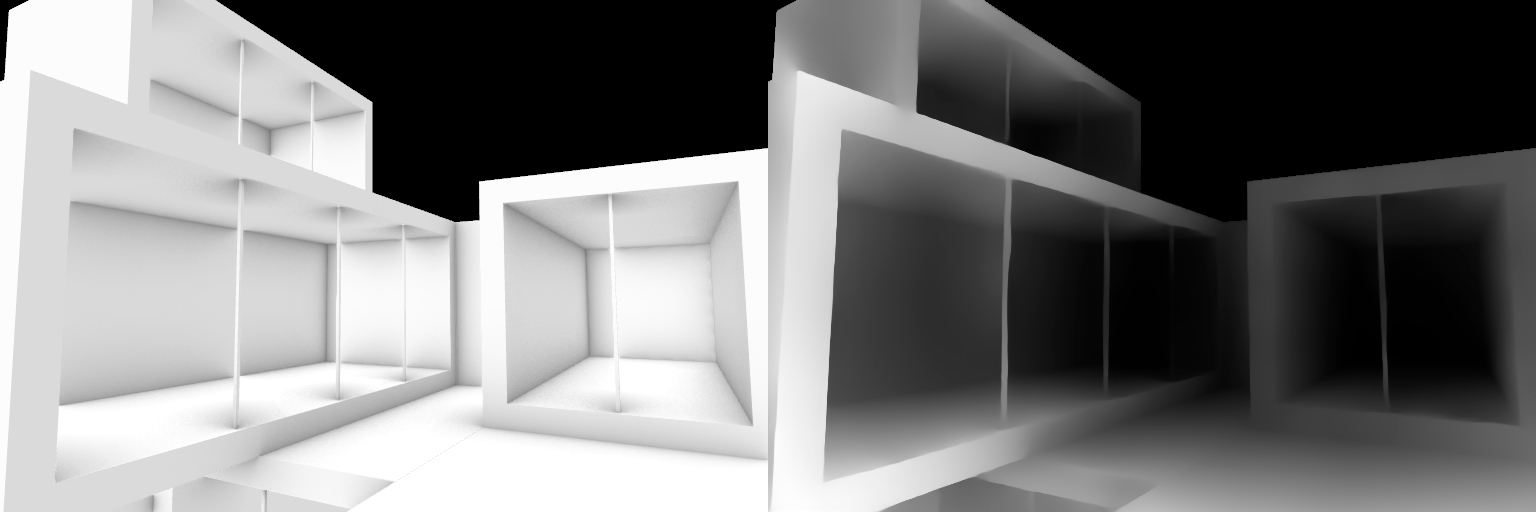
In terms of style transfer, the Reference Adain+Attn mode and Shuffle model draw from the previous image. However, it’s worth noting that the weight of the Reference Adain+Attn mode may need to be reduced as we transition to an interior view. This is because the source image – being an exterior view – is not as closely aligned with the interior scene.
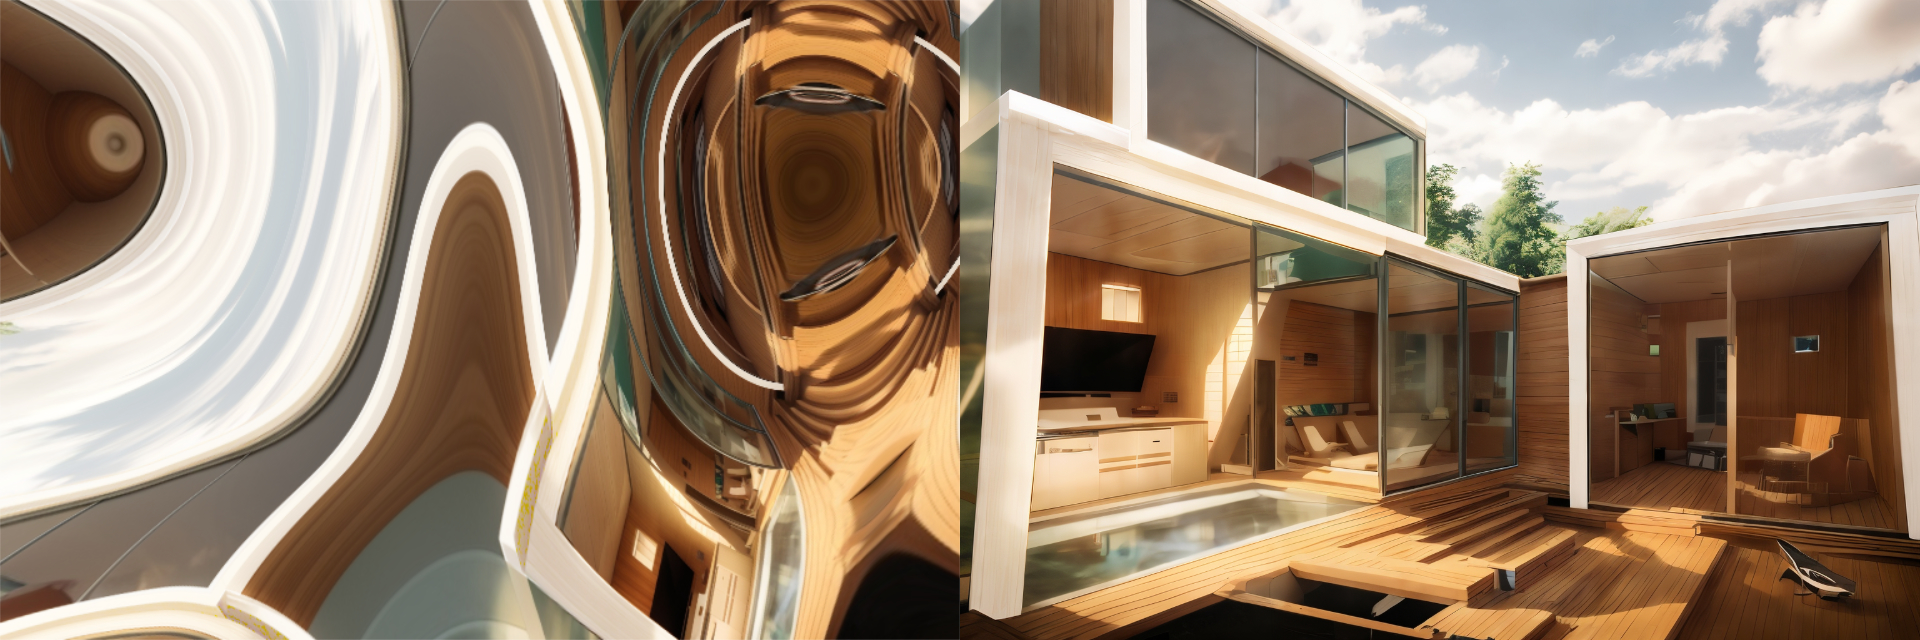
The upscaling process follows the familiar workflow, ensuring consistency across all images in terms of quality and resolution.
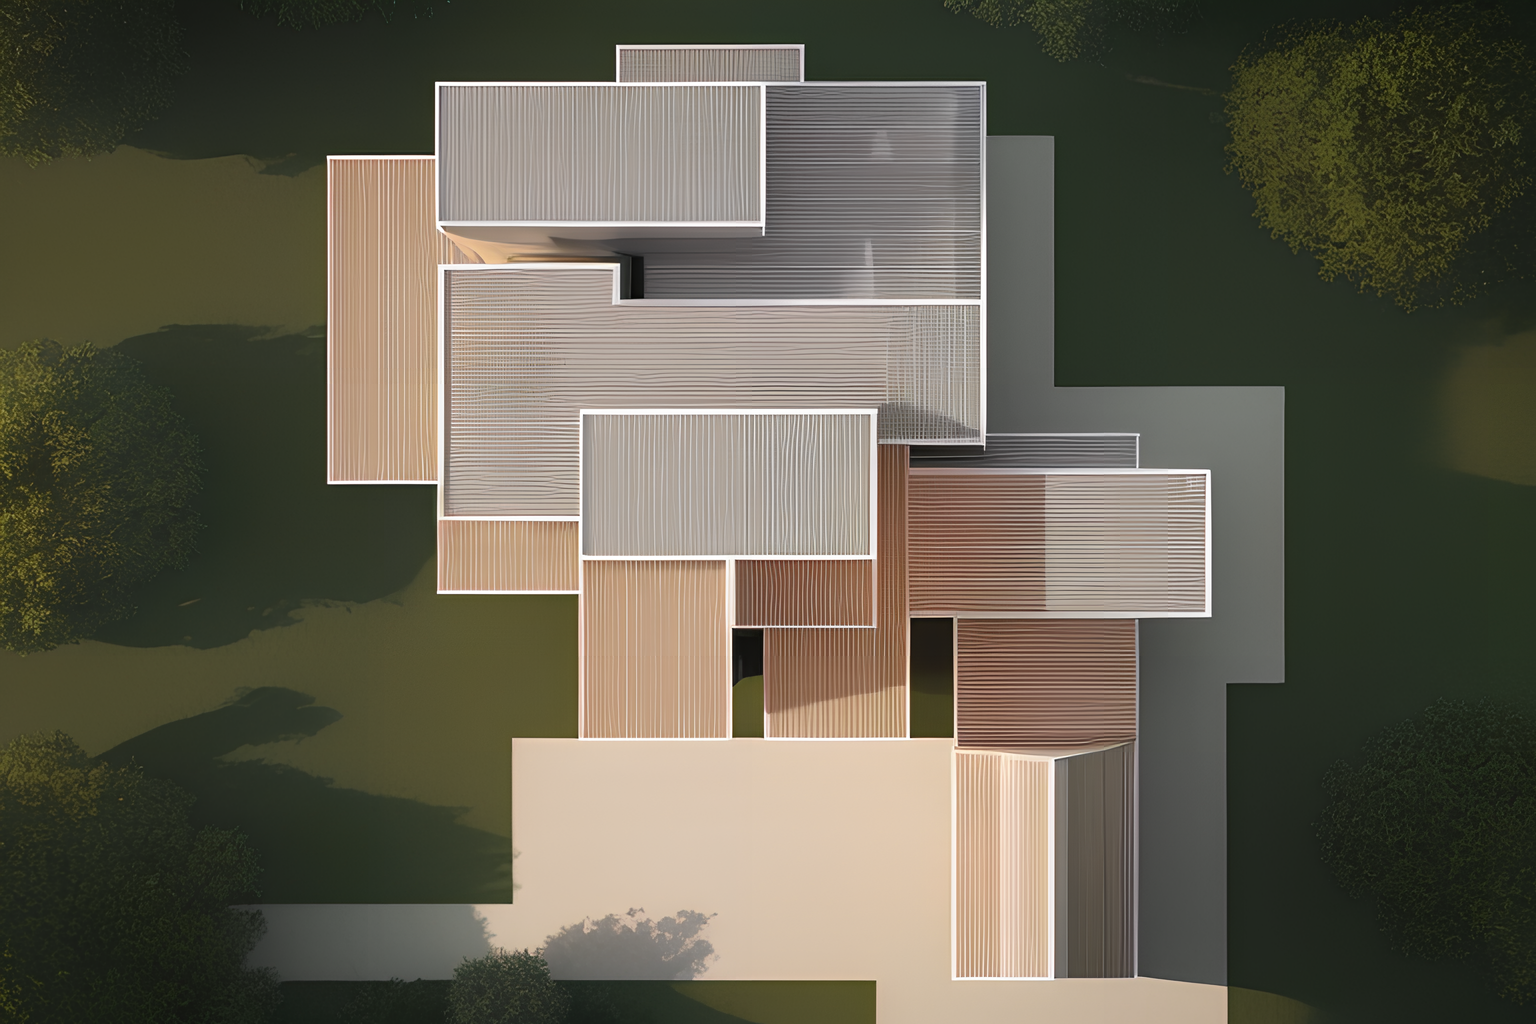
The Plan View: Segmentation to AI
As the project advances to its final stage, the workflow adapts to incorporate new techniques. The process initiates in a familiar manner, with the creation of a depth map from the CAD’s top view using the ControlNet Depth Midas preprocessor.
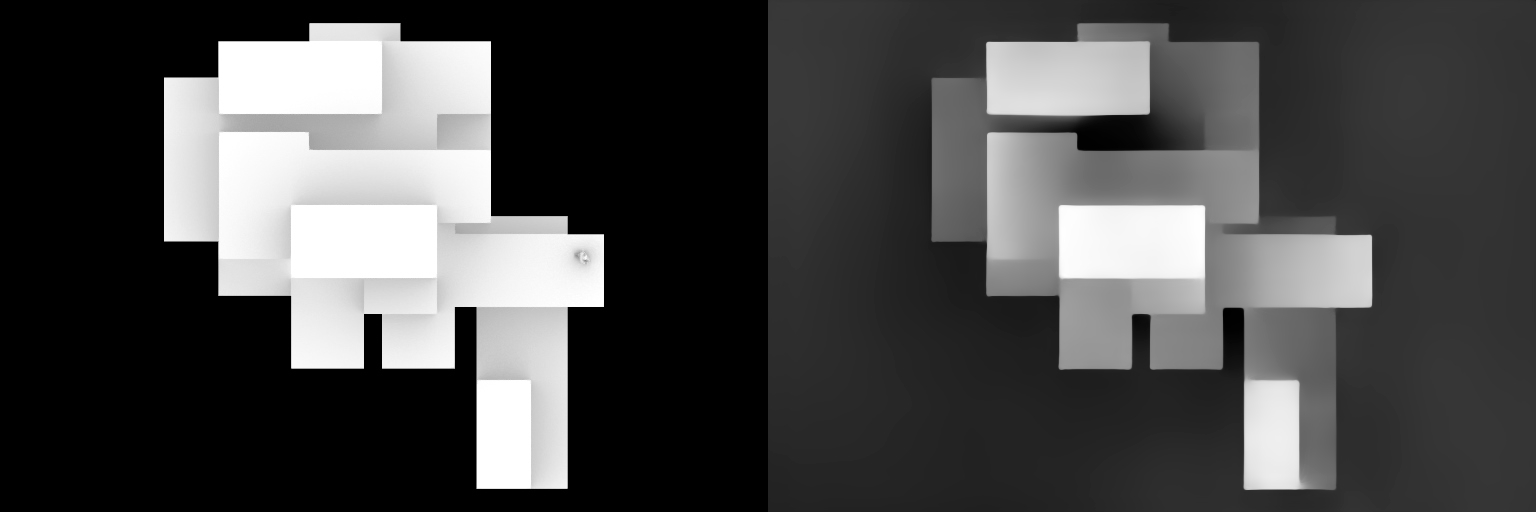
From this point onwards, the approach diverges from previous steps. Instead of employing the Reference modes and Shuffle model, a new strategy involving segmentation masks is introduced. Using specific color codes, different elements of the scene are identified: the building is indicated by #FF09E0, the road is marked with #8C8C8C, grass is denoted by #04FA07, and trees are represented by #04C803.
These color-coded segmentation masks are then used in conjunction with the ControlNet Segmentation model. This model recognizes the color-coded areas and generates corresponding elements in the output image. However, the Segmentation model only sees silhouettes, lacking the ability to understand the three-dimensionality of the input. This is where the depth map comes into play; it’s paired with the segmentation mask to generate the 3D effect and incorporate detail, creating a more visually complex and nuanced image.
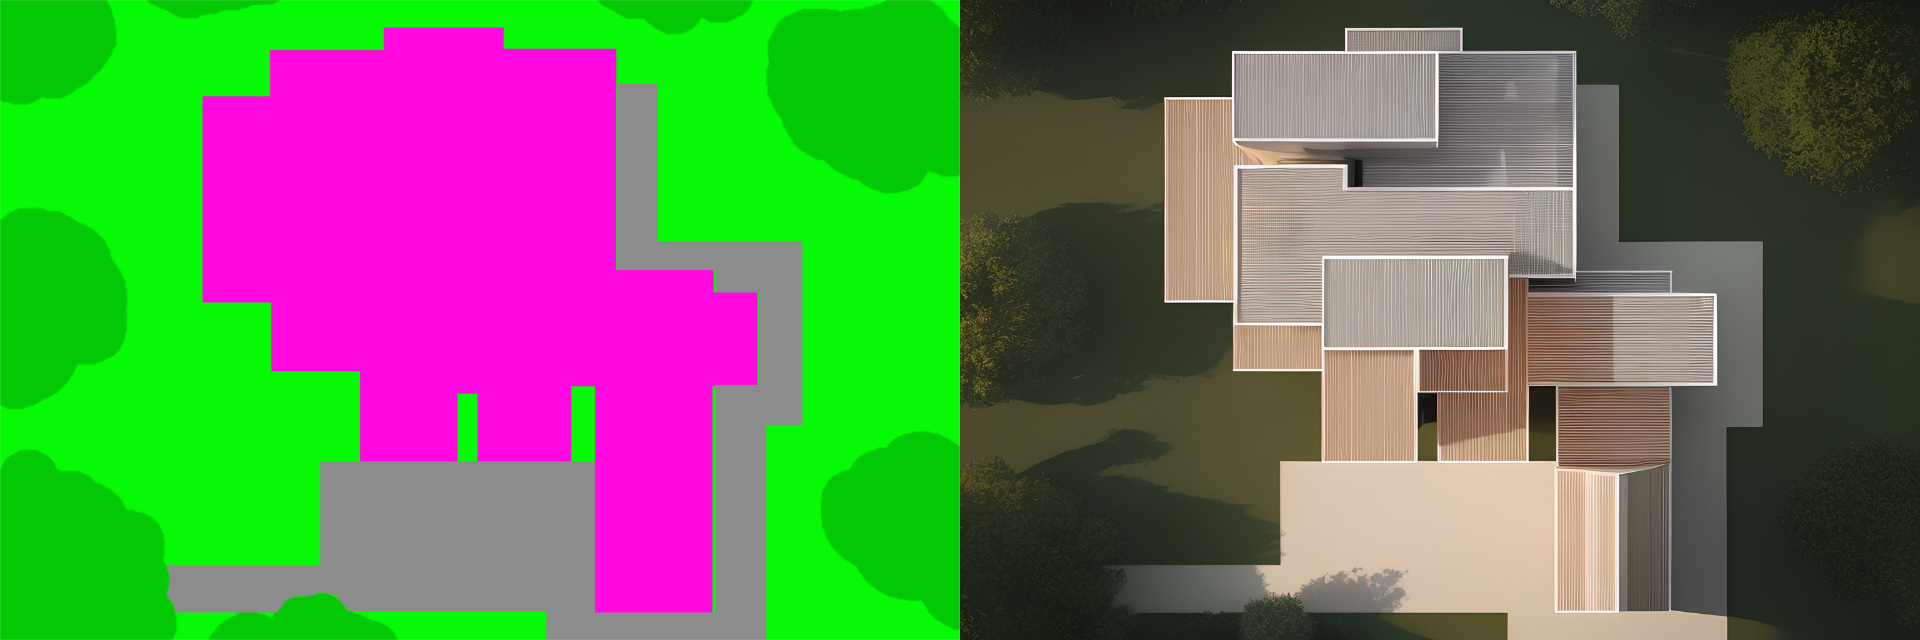
For the last time the upscaling technique is used and the plan is finished.
Sources
Most of the research was done using Automatic11111 https://github.com/AUTOMATIC1111/stable-diffusion-webui
For ControlNet the Automatic11111 extension from Mikubill was used https://github.com/Mikubill/sd-webui-controlnet
The ControlNet models are provided by Illyasviel https://huggingface.co/lllyasviel/ControlNet-v1-1/tree/main
To upscale the images the Ultimate SD Upscaler achived pleasing results combined with ControlNet tiles https://github.com/Coyote-A/ultimate-upscale-for-automatic1111
The Stable Diffusion models used included the following (please be aware that they are uncensored and images on civitai might include nudity) :
1. ReV Animated https://civitai.com/models/7371/rev-animated
2. Realistic Vision https://civitai.com/models/4201/realistic-vision-v30
3. Deliberate https://civitai.com/models/4823/deliberate
4. Absolut Reality https://civitai.com/models/81458/absolutereality
One of the best sources of information on this fast evolving topic has been the subreddit r/StableDiffusion https://www.reddit.com/r/StableDiffusion/
The color code for the ControlNet segmentation model provided by Github user ninjasaid2k https://docs.google.com/spreadsheets/d/1wJr1jh7STJnLi50VsoGQA9coN9z2mySbc-rO4BcHrZQ/edit#gid=0
