Welcome to the world of advanced computational tools, where we delve into the intricacies of Grasshopper, a graphical algorithm editor tightly integrated with Rhino’s 3-D modeling tools. This blog post will guide you through the learning process, focusing on the fundamental aspects of Grasshopper and logical representations.
Grasshopper Fundamentals
Grasshopper is a powerful tool that allows us to explore parametric and algorithmic design. We start with an introduction to Grasshopper, understanding its interface, components, and how they interact. We then move on to functions and parameters, learning how to manipulate and control various elements within the Grasshopper environment.
The heart of Grasshopper lies in its algorithmic logic. Here, we learn how to create and manipulate data, lists, and numbers, and understand the concept of data matching. (Exerc. 01), We also delve into data management (Exerc. 03), exploring how to organize, filter, and search data effectively.
We then explore conditional statements, learning how to create rules and conditions within our designs. The concept of attractor points (Exerc. 04) is introduced, allowing us to influence and control our designs in a more nuanced way. We also delve into data trees management, learning how to work with complex data structures.
Throughout the course, we will be conducting various exercises to apply what we’ve learned.
The Running Men
Urban Furniture – Exerc.01 (algorithmic logic – data matching)
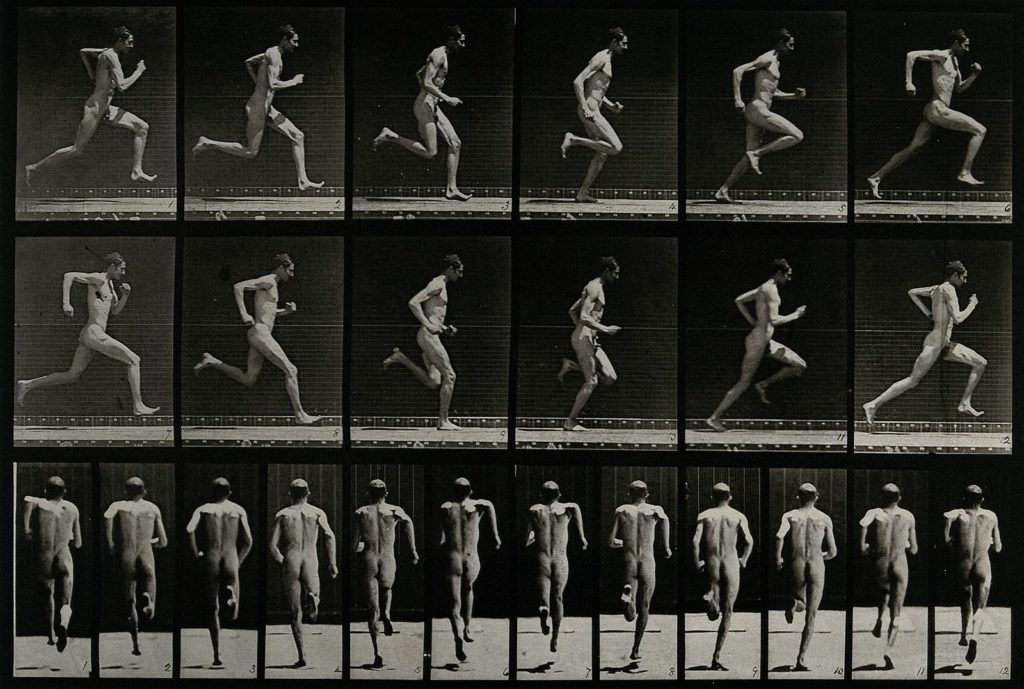
This urban furniture collection is based on the photographs of Eadweard Muybridge, the famous photographer who studied the movement of humans and animals through the camera. Muybridge managed to capture the different phases of an action, such as that of a man running, in a series of images that follow each other in time.
These images fascinate me for their beauty and their historical value, but also for their creative potential. I have decided to use them as a starting point to design pieces of furniture that have a dynamic and original shape.
The process consists of abstracting the photographs of Muybridge, taking the profiles of each one of the images in the series. Then, I use 3D modeling techniques, such as revolve and loft, to join these profiles in a three-dimensional shape. The result is a furniture that has a fluid and curved appearance, that evokes movement and speed.

line subtraction script

The collection includes different types of urban furniture, such as benches, tables, shelter. My intention is to create a public space that invites interaction and surprise, that reflects the energy and diversity of urban life. Is a tribute to Muybridge and his legacy in art and science.
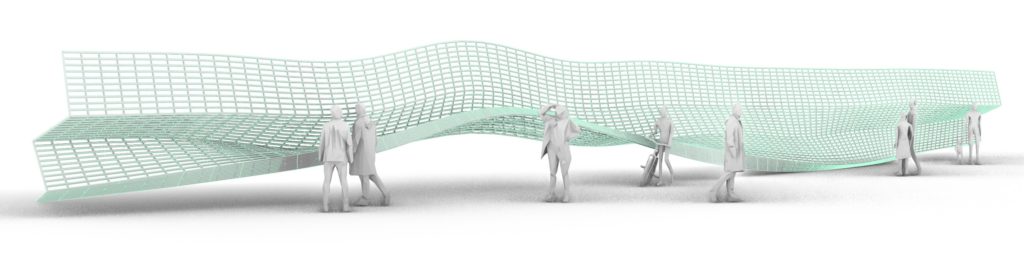
Pipe Script Furniture

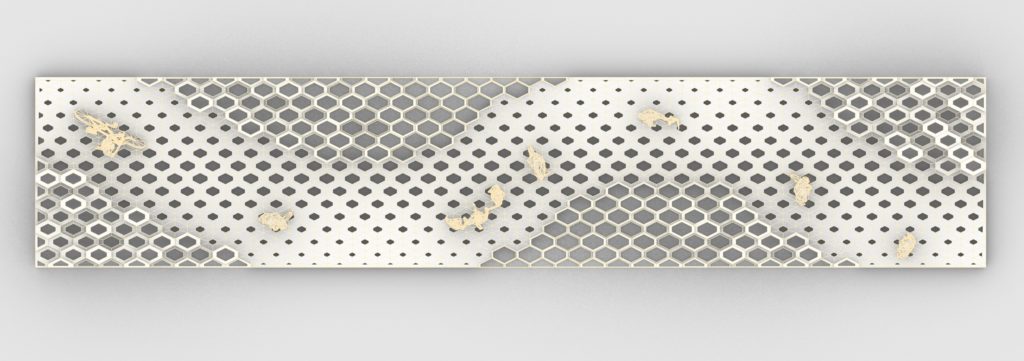
Organic Paneling Wall
Parametric Wall – Exerc.03 (data management)
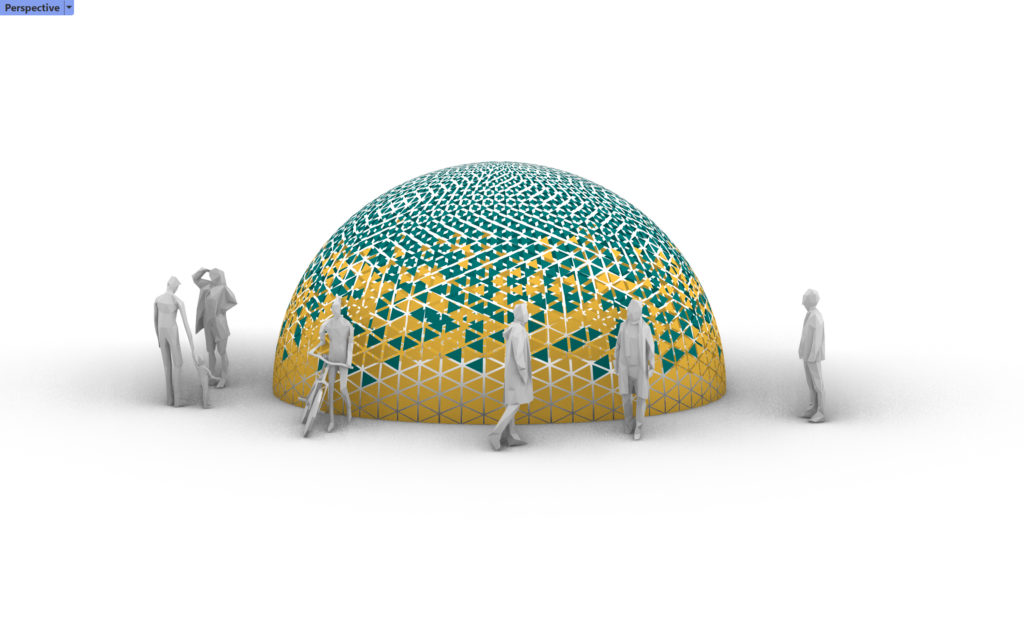
In this exercise we learned about Lunchbox, that is a plugin for Grasshopper that provides a set of tools for creating complex geometries. One of these tools is the Paneling tool, which allows you to create parametric panels.
To create a parametric panel with Lunchbox, you first need to define a surface in Grasshopper. You can then use the Paneling tool to divide this surface into a grid of panels. The size and shape of these panels can be controlled using domains.
Data management in involves organizing and manipulating the data that drives your design. This can involve anything from sorting lists of numbers to creating complex data trees. Good data management is crucial for creating complex parametric designs, in these case we are using data management to insert colors into the panels.
Curve Wall Script

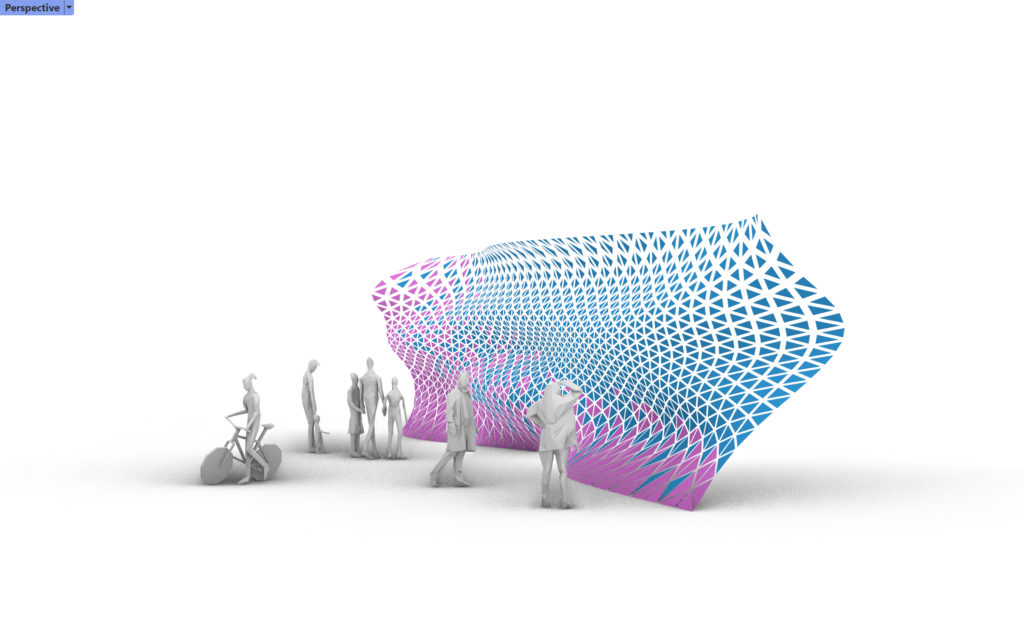
Urban Path
Path – Exerc.04 (attractor points)
One of the fascinating features of Grasshopper is the use of attractor points. In this blog post, we will delve into how attractor points can be used for creating extruded panels and how these panels can be manipulated based on an attractor point.
Attractor points are a key concept in parametric design. They are points in space that influence the geometry around them. The closer the geometry is to the attractor point, the greater the influence. This can be used to create complex, organic forms that respond to their environment, in these exercises we are going to use attractor points from an interpolated curve.
So we create panels using lunchbox plugin, taking a flat panel and extending it in the third dimension. In Grasshopper, you can create an extruded panel by using the ‘Extrude’ component and connecting it to a surface or curve. Once you have your extruded panels, you can start to manipulate them with attractor points. By measuring the distance from each panel to the attractor point, you can change the properties of the panel based on its proximity to the attractor.

Logical Representations
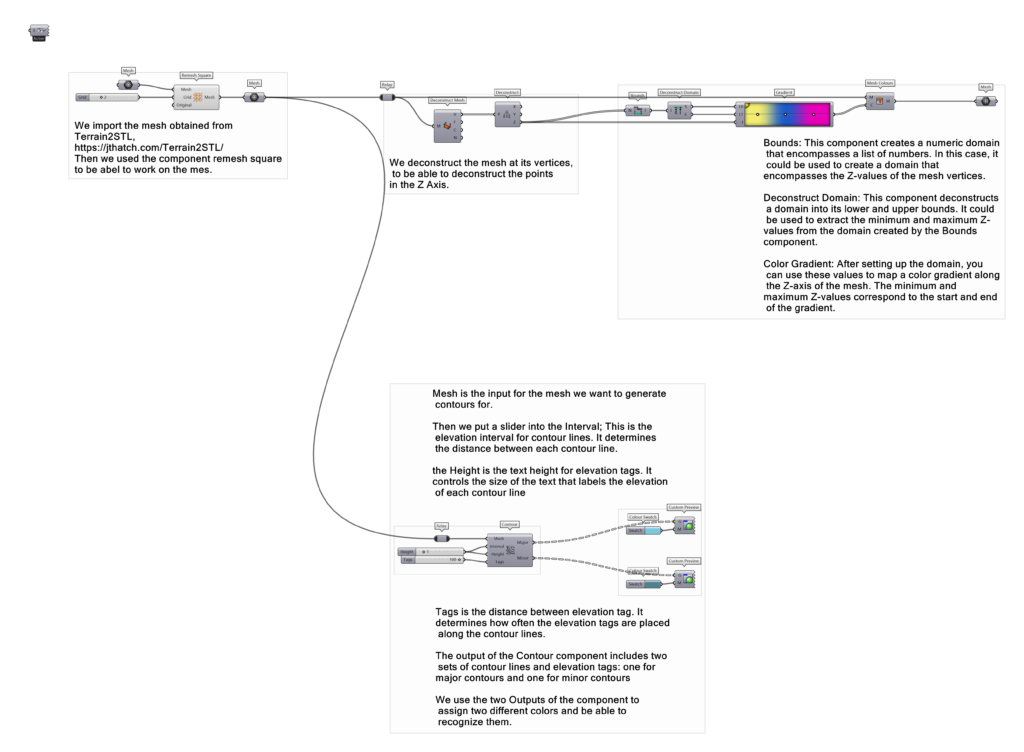
We explore mesh topologies, understanding their structure and how they can be manipulated within Grasshopper. We also delve into data visualization (Exerc. 06), learning how to represent our data in a visual and understandable format.
We then move on to animations (Exerc. 07), understanding how to create dynamic and moving designs within Grasshopper. We learn how to create scenes and control the camera, allowing us to view our designs from various perspectives.
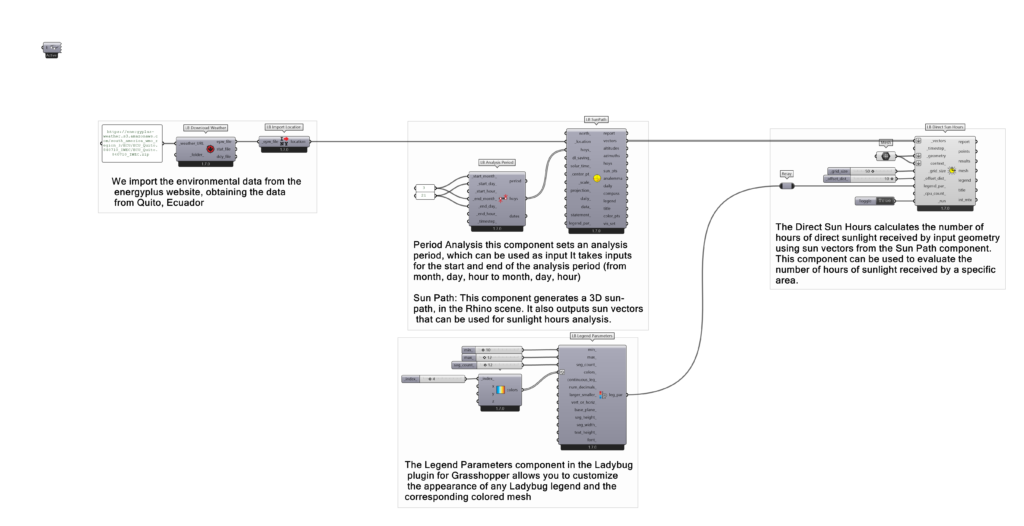
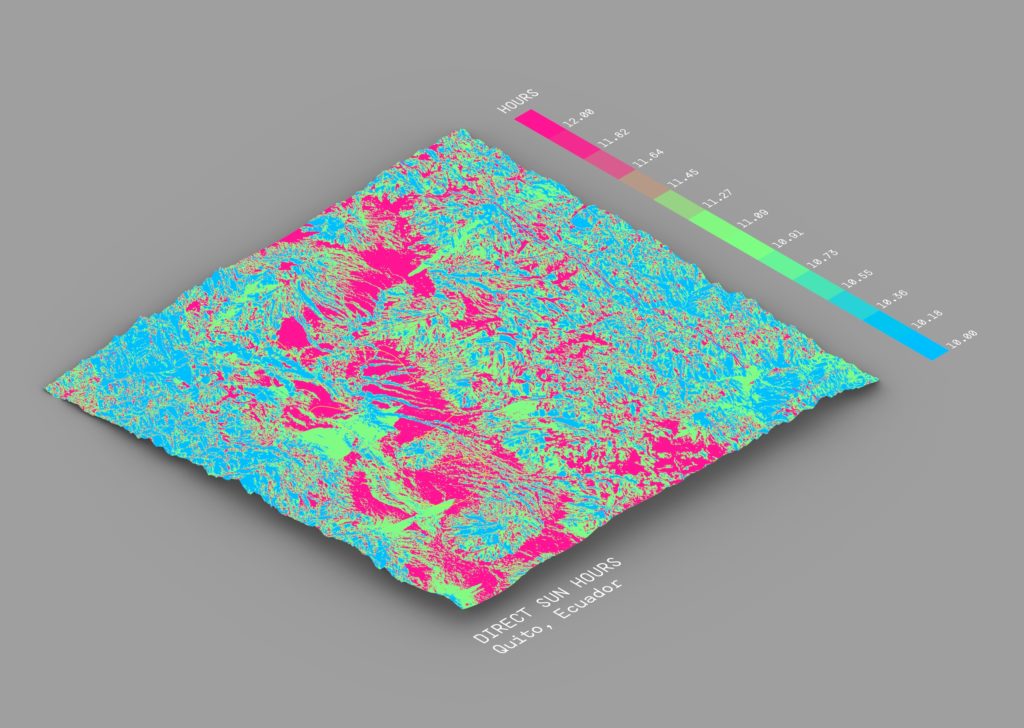
Terrain Analysis Ecuador Mountains
Mesh Topography – Exerc.06 (mesh topologies -data visualization)
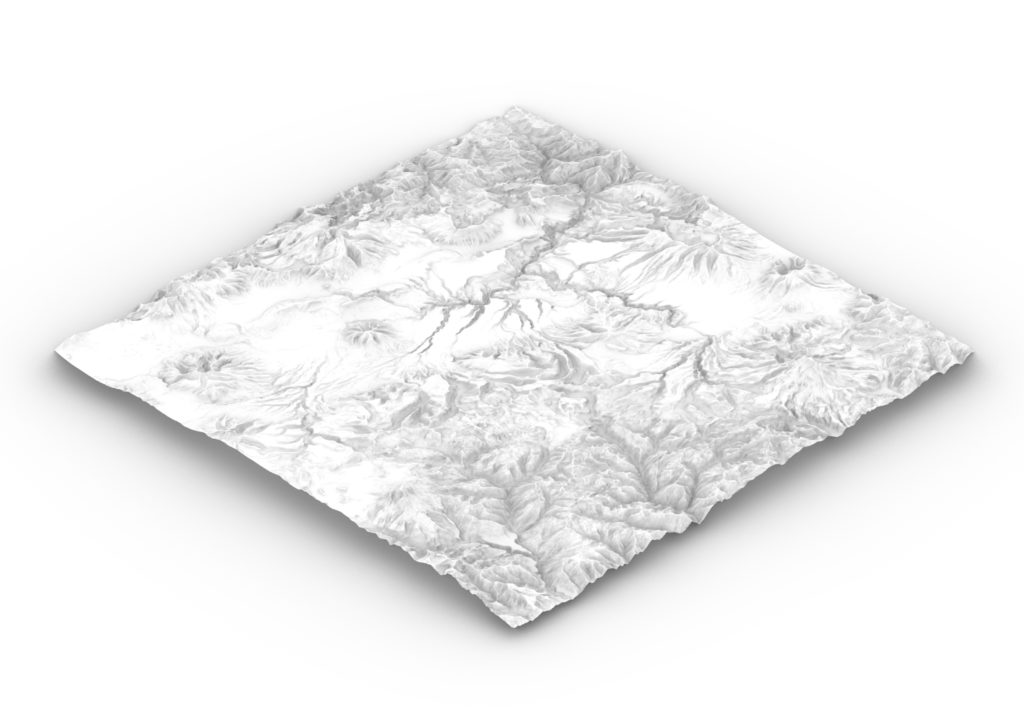
we will explore how to use meshes and data visualization in Grasshopper to create a topographic analysis of the mountains in Ecuador, including color-coding for height and sun hours.
A mesh is a collection of vertices, edges, and faces that define the shape of a 3D object. In Grasshopper, you can create a mesh from a set of points, curves, or surfaces. For a topographic analysis, you would typically start with a set of points that represent the height of the terrain at different locations.
To create a topographic analysis of the mountains in Ecuador, you would start by creating a mesh that represents the terrain. You can do this by importing a set of points that represent the height of the terrain at different locations, and then using the ‘Mesh’ component to create a mesh from these points.
Once you have your terrain mesh, you can use data visualization to analyze the terrain. For example, you could use the ‘Gradient’ component to color the mesh based on height, with lower areas in blue and higher areas in red. This would give you a clear visual representation of the height of the terrain.
To analyze sun hours, you could use the ‘Sun’ component to calculate the amount of sunlight each point on the mesh receives throughout the day. You could then use the ‘Gradient’ component to color the mesh based on sun hours, with areas that receive more sunlight in yellow and areas that receive less sunlight in blue.
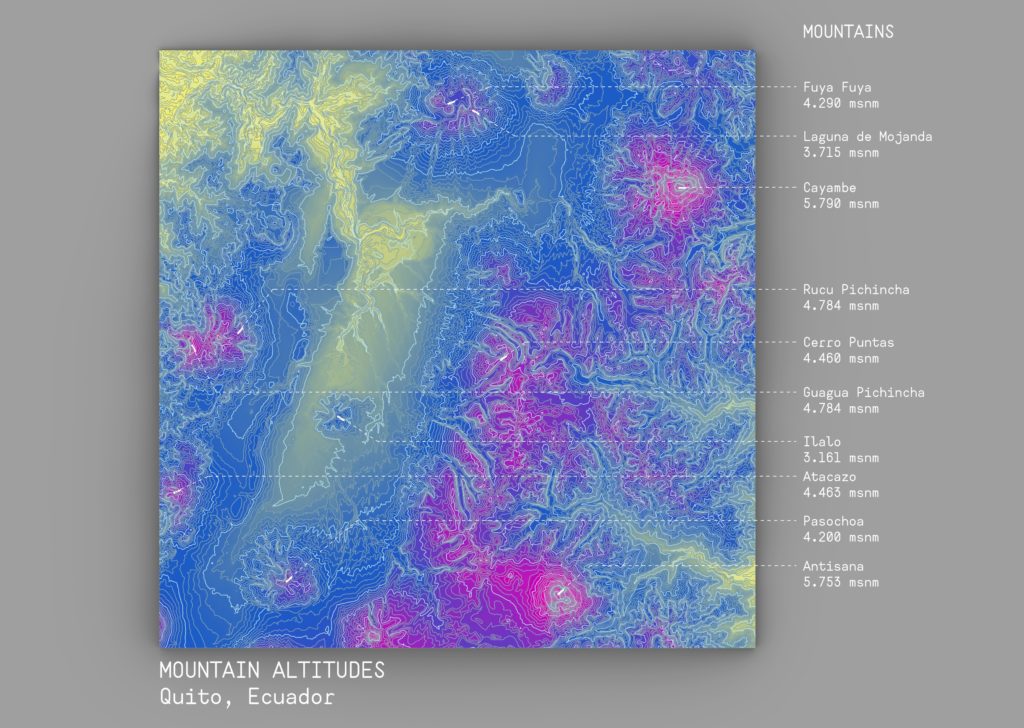
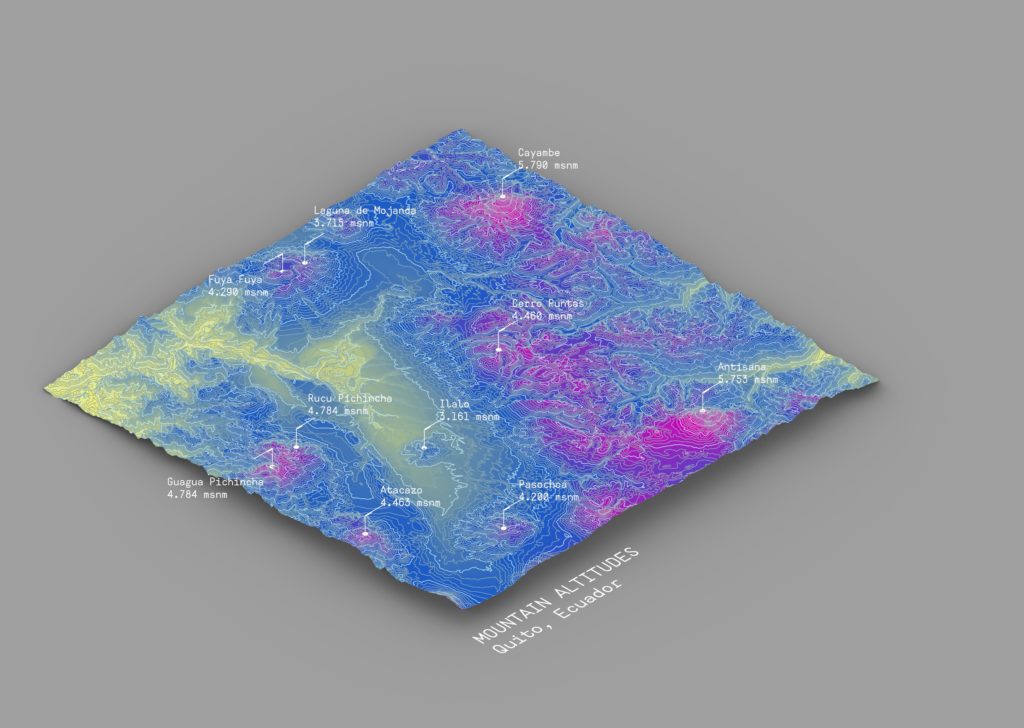
Altitudes Script
Sun Hours Script