
How might we improve clay 3D printing by integrating automated post-processing techniques and hybrid workflows?
Our goal is to implement craftsmanship techniques to robotic processes to elevate surface finishes & improve dimensional accuracy to create new opportunities for the mass customization of clay.
Introducing our project Clay Virtuoso. Our project focuses on how might we enhance clay 3d printing through post production and automate hybrid workflows? Our goal was to look at how can we improve fitment of multi piece 3d prints in an assemblage and how could we automize glazing of components. To achieve this we focused on used this semester to focus on gaining a deeper understanding of clay carving and glazing.
Context
For context we want to highlight three projects by studio Rap, where they have 3D printed clay for architectural installations and facade projects that show our main topics of exploration; being – digital craftsmanship, fitment and glazing.
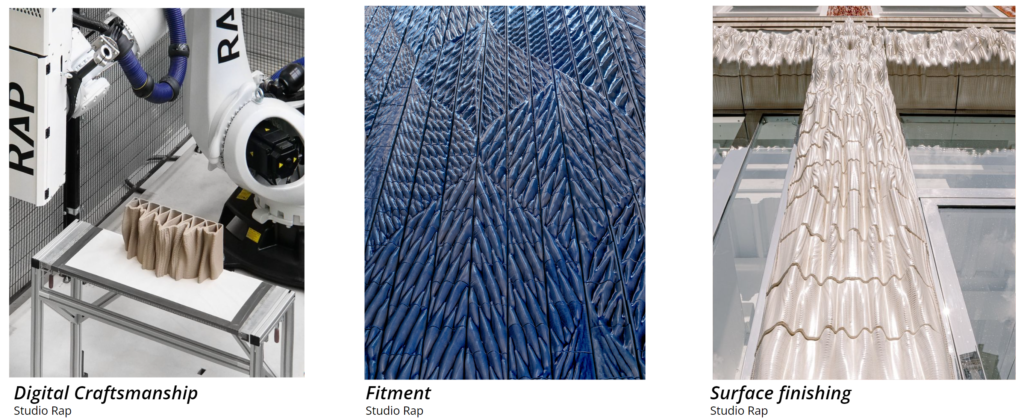
Each project exhibits distinctive texture and design continuity, resulting in a unique brick for every location within the larger assembly. We would like to look at how we can add more possibilities where clay 3D printing has reached its limitations, for instance, removing layer lines or adding additional texture through carving.
For fitment, these projects are also an interesting reference, since each piece is not one continuous print but rather made up of multiple components that are assembled together; consideration to how shrinkage may affect the dimensional accuracy of each part. This makes well-fitting assemblies challenging and is, we can assume, a reason why the bricks are all similarly shaped. What if you could shape them in more complex shapes, without losing dimensional accuracy by post-processing the joining surfaces?
For glazing, each of these pieces is glazed by hand by a craftsman or by a machine on a production line. What if a 3D printed clay part could be scanned, and painted digitally. This process would allow for the colors chosen to be glazed automatically? This production workflow would allow a high degree of precision, as well as the ability to selectively create color contrast among multiple panels by utilizing data. These questions and ideas led us into the project.
State of the Art
For the state of the art, we want to reference three different projects and production methods.
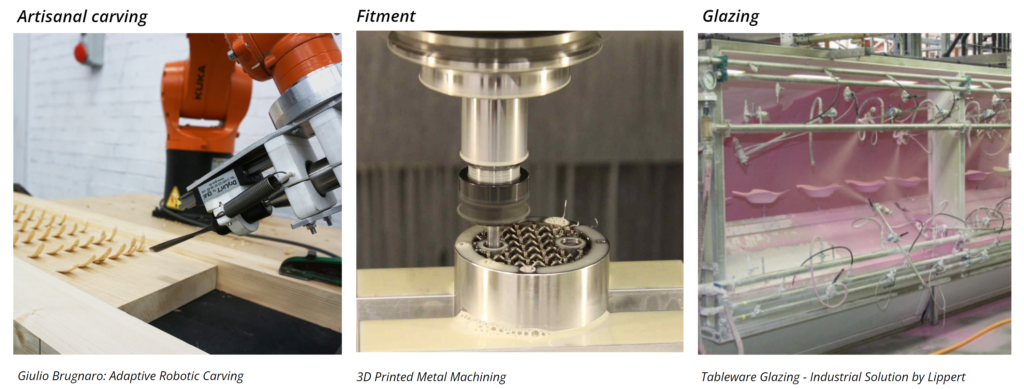
On the left is Giulio Brugnaro’s Adaptive Robotic Carving from UCL Bartlett. This project explores wood carving by gathering data from manual tests, incorporating positional and pressure information. The scanned final outcomes are then utilized to develop a digital tool capable of predicting the visual outcome of the carving.
The second project is an example of post-processing for fitment. In 3D printing metal components, it is common practice to machine the face of parts that have exposed infill, serving both as a way to deburr and ensure a smooth, planar face for bolting or welding. This same approach can be applied to 3D printed clay geometries, but more as a means to overcome how a piece may shrink during the drying phase of the production process, ensuring that the printed piece dimensionally matches the design in CAD.
On the right, there’s a reference to an industrial glazing production line, exemplified by Lippert’s industrial solutions. Glazing automation is already established in the tableware and sanitary ware industry, typically involving dipping and airbrushing for mass production purposes. However, within the realm of architectural applications, there is a noticeable absence or scarcity of robotic glazing processes capable of providing mass-customizable colors across various components. Recognizing this gap, we perceive an opportunity to incorporate such capabilities into our workflow.
Workflow
Our proposed workflow begins by 3D printing the desired component or geometry, with the necessary tolerances for fitment carving. Once the part has dried sufficiently, it is then 3D scanned. This data is used to compare how the printed geometry has deviated from the digital model, which will inform the carving and glazing processes. After the piece is carved and the post-carving scanned data aligns with the parameters of the digital model, we proceed to the glazing part. During the glazing process, real-time color scanning could be integrated to establish a feedback loop, automatically adjusting color brightness, coverage and other issues that might arise.
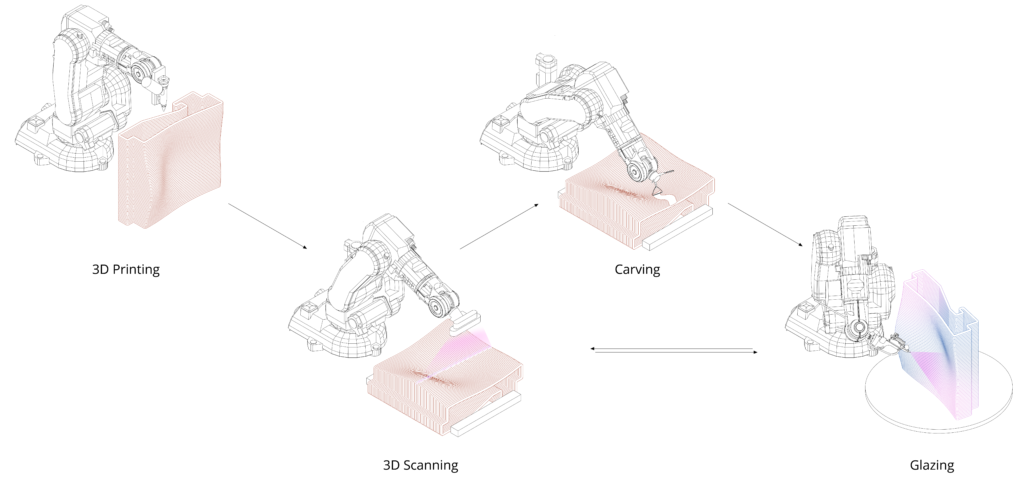
Due to the large scope of our project, and the fact that we have not worked with scanning technologies before, this semester, we decided to reduce complexity and focused on first principles – understanding clay carving and glazing.
Carving
For carving, we focused on two areas: carving for fitment and 2D carving for surface finish. We explored both because they are similar, and mastering 2D carving will aid in fitment carving and vice versa. We started by taking a clay modeling and glazing workshop with local artisans from Kema Ceramics. They provided us with valuable information and tips regarding clay density, drying techniques, and various carving and glazing processes.

Carving Tool
We began this process of exploration by hand-testing clay carving tools on a sheet of clay to understand each tool’s purpose and function. Learning from this would inform the robotic toolpath and cutting axis positions for each movement.
From these learnings, we then applied that logic to a robotic function. We built an end effector for an ABB robotic arm, which allowed us to test a variety of different tools. Toolpaths were developed that varied in angles of carving, shapes, and depths. This provided us with insights into how the tools function. Our key learning was that they function quite predictably, but it was challenging to remove the carved clay. When we angled the tool about 15 degrees towards the path it should follow, it alleviated many of these problems and nearly removed the clay when it finished the pass.
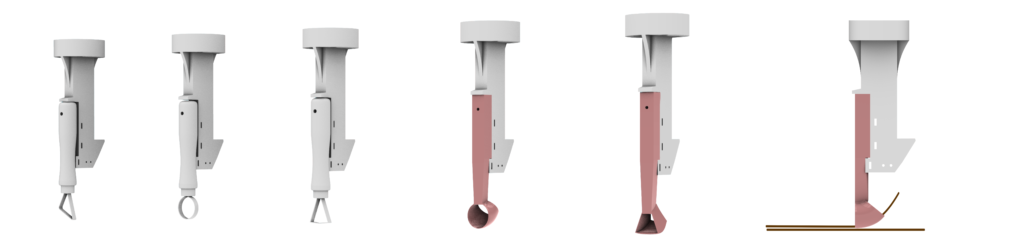
We utilized these learnings to design two new end effectors, which were 3D printed for the speed of development. These end effectors, which have geometrical similarities to an ice cream scoop, were able to remove material with each pass with limited human intervention. For future iterations, we have designed a set of carving tools for the robot that can be interchanged based on the rotation of the end effector. This is something we aim to test in the next semester. Additionally, we plan to develop a station outside of the carving area where the removed material is deposited, and the tool is cleaned between passes.
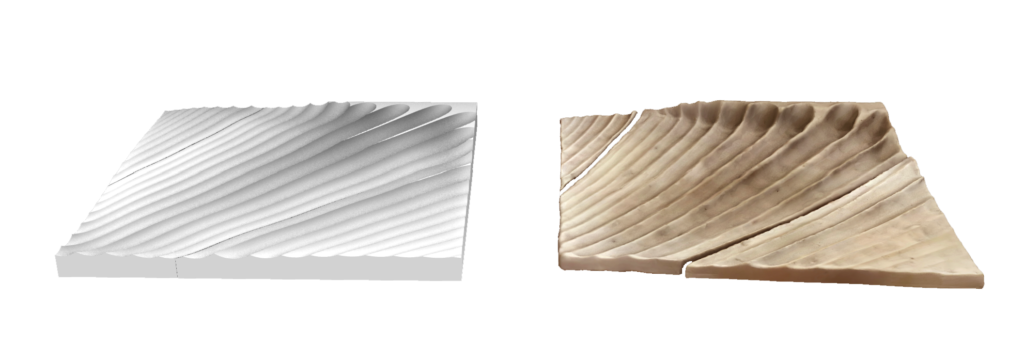
Carving Testing
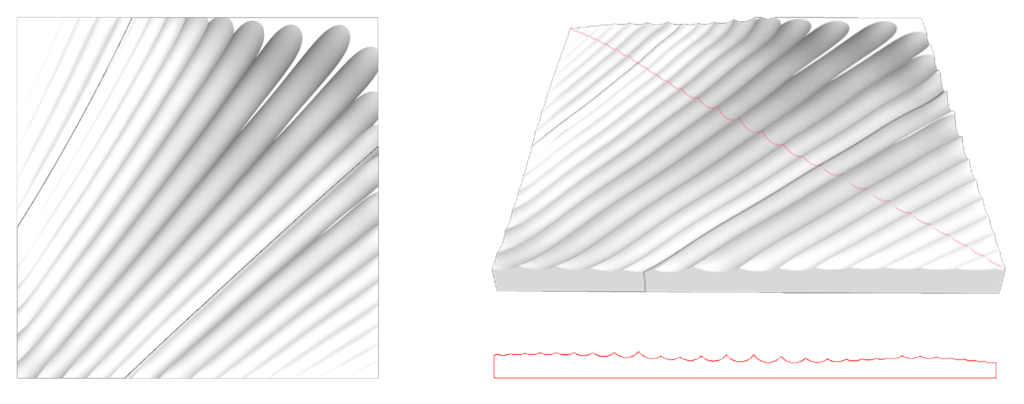
To evaluate carving, we adopted a data-driven approach, comparing the physical piece with the digital model. We explored numerous digital iterations to identify a design that featured overlapping toolpaths, varying heights, and distinct entry and exit points on the piece. The selected design below met most of our criteria and was used for testing. This piece is composed of three parts, proposed to be cut using a knife end-effector, complemented by the sweeping carving cuts of the “ice cream scoop” end-effector.
During the carving process, we gained significant insights, chiefly that multiple depth passes are essential. We observed that the tool struggles with deep cuts in a single pass, leading to a broken tool. Additionally, we initially carved in quite wet clay, a condition we plan to alter when transitioning to 3D printed clay. Future tests will involve a metal end-effector, and we aim to record various metrics on clay dryness based on weight.
Despite these challenges, we successfully completed the tool paths, and the results were quite accurate upon visual analysis. We utilized Polycam to scan the piece and compare the digital version with the physical one. We recognize the tool’s limited precision, but it’s noteworthy that the final result closely matched our digital model, marking a promising initial step.
Carving for Fitment
Carving for fitment tests involved 3D printing the same shapes as the three tiles used in the 2D carving tests. This process required different considerations, such as wall thickness and support infills. These were crucial to ensure that when the surface was carved, there was sufficient material and structure to withstand the forces exerted during carving.
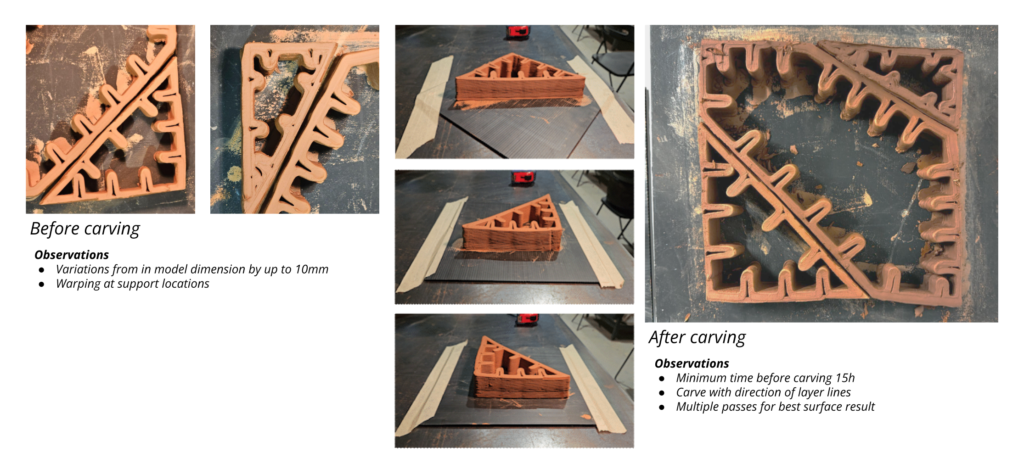
However, the raw 3D printed parts did not align with our initial fitment expectations. We observed dimensional variations of up to 10mm on some mating surfaces. Lacking access to scanning data, we attempted manual carving to reduce this variance. Through this process, we learned that carving along the layer lines yielded much better results compared to carving from top to bottom. Although this was just a manual test, we plan to use these insights to guide our approach in the upcoming semester.
Glazing
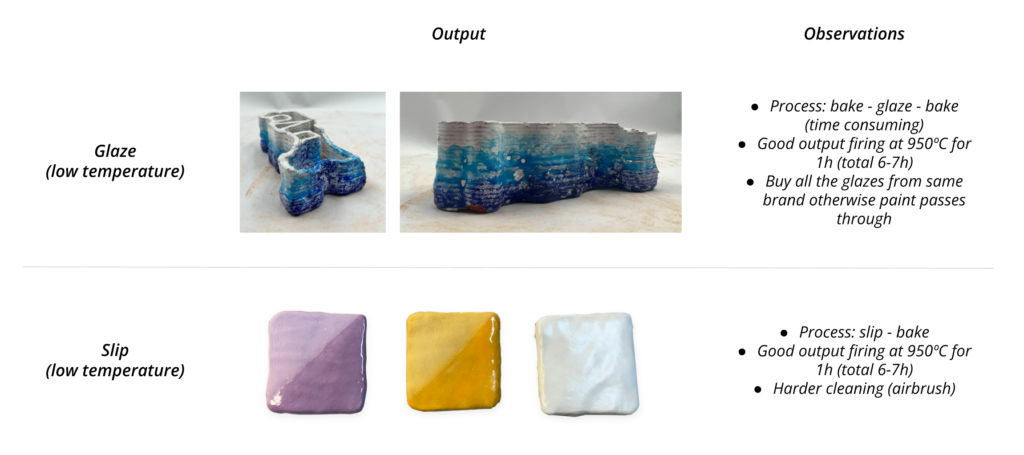
Our exploration began with tests on various glazing techniques, employing both conventional glaze and slip – a mixture of water, clay, and pigment. Executed at a low temperature (around 900ºC), both methods performed as expected. Time constraints led us to choose slip over glaze since it can be applied immediately after carving/smoothing and requires only one firing, unlike glaze, which necessitates firing before glazing.
Glazing Tool
In the pursuit of automating the glazing process, we deliberated between a brush and an airbrush. Opting for the latter due to its potential for precise control, we designed an airbrush end-effector with two servos regulating air and paint flow. Detailed information on the creation of this end-effector is available here.
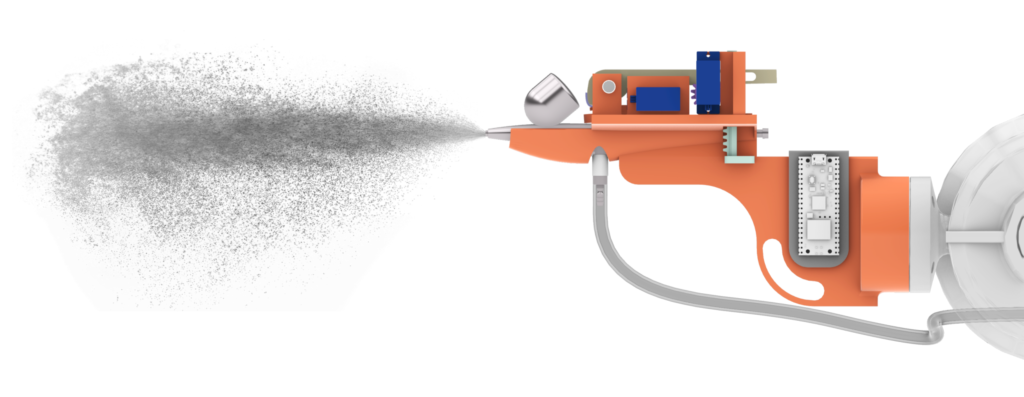
Moving forward, we will be integrating an industrial grade airbrush into the glazing process with a consistent air and ink supply. This shift will address reliability issues and, ideally, streamline the process of cleaning and making paint changes (a frequent necessity when using slip). While our current focus is on fine details, we recognize that a small airbrush may not be suitable for larger pieces. Consequently, we are eager to explore alternatives in designing an end effector that aligns better with our application. In the coming semester, we plan to either borrow or seek means to acquire this equipment as part of our ongoing efforts to improve and refine our process.
Glazing Testing
Before painting the final tile, multiple tests were conducted to ensure the accuracy of height, angle, motor setup, speed, and offsets. In the case of clay, a consensus was reached that the robot needed at least four iterations for the paint to be noticeable.
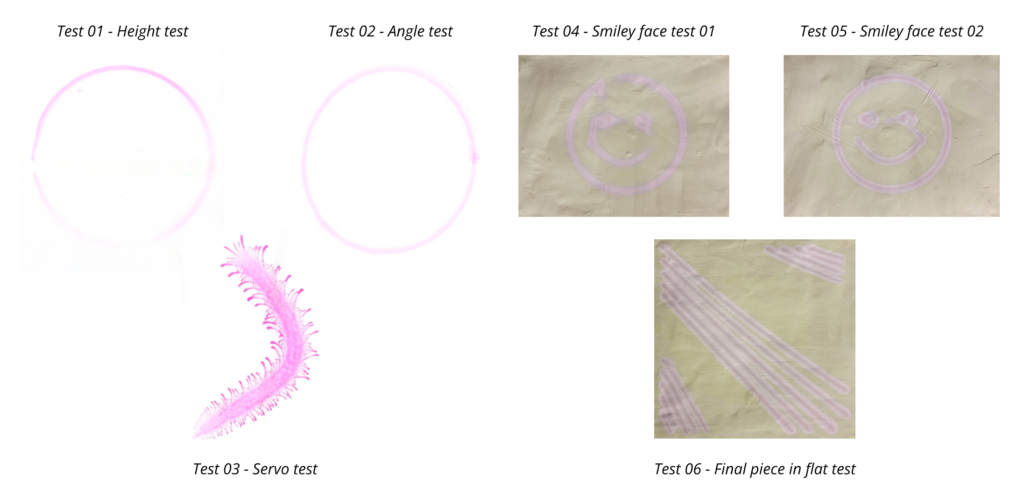
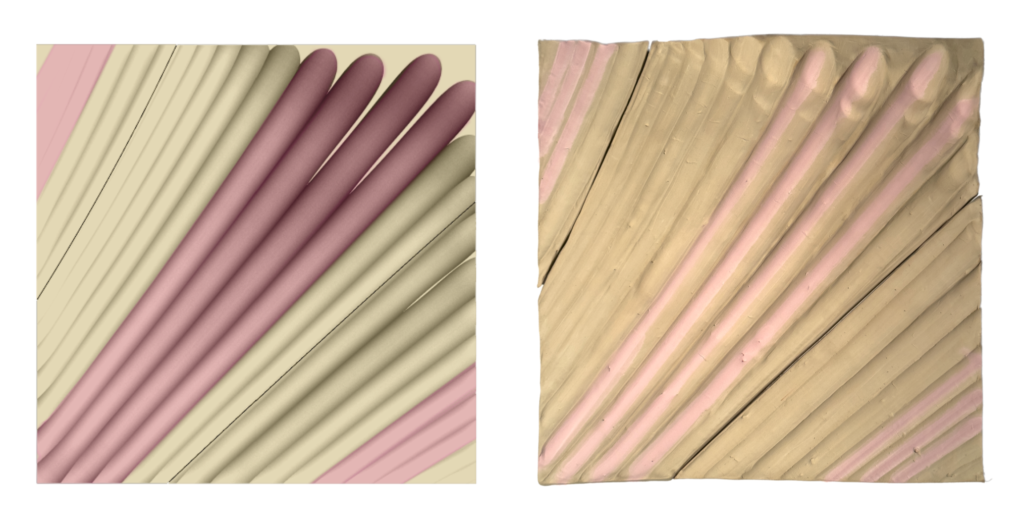
Once we had everything figured out we created a suitable pattern that highlighted the carving and created a toolpath for it.
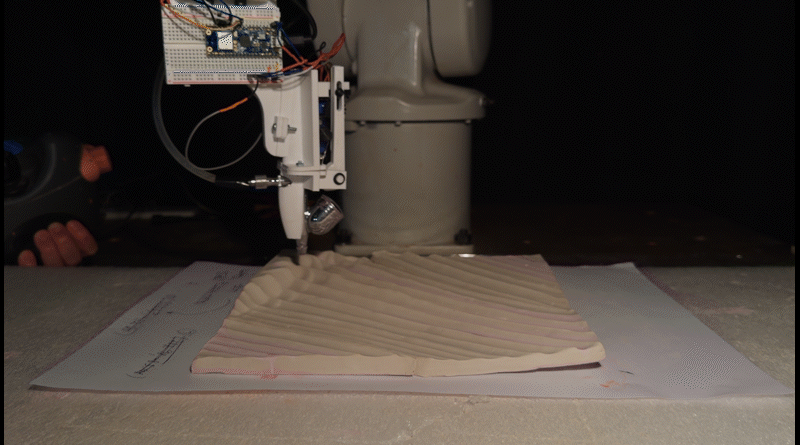
While acknowledging room for enhancement, given that the design and output are not exact (potentially improved by incorporating more curves on the toolpath or elevating the end-effector), we are content with the current progress.
Outlook
For the next two terms we will be experimenting utilizing sensors, data, in order to achieve a sense of mastery over the material. Furthermore, we aim to utilize meticulously polished and refined end-effectors to optimize overall performance.
Carving Process:
- Tool Changer: Create an end-effector made from materials other than plastic that can easily switch between different tools.
- Timing: Use a scale (or thermal cameras) to assess the optimal stage in the clay drying process for effective carving.
Glazing Process:
- Direct Ink and Air Flow Supply: Explore the development of an alternative design that directly supplies ink and air flow, similar to the SAMES KREMLIN A28.
- Enhance toolpath intricacy: By increasing the complexity of the toolpath, we can create more intricate and captivating patterns.
