Introduction
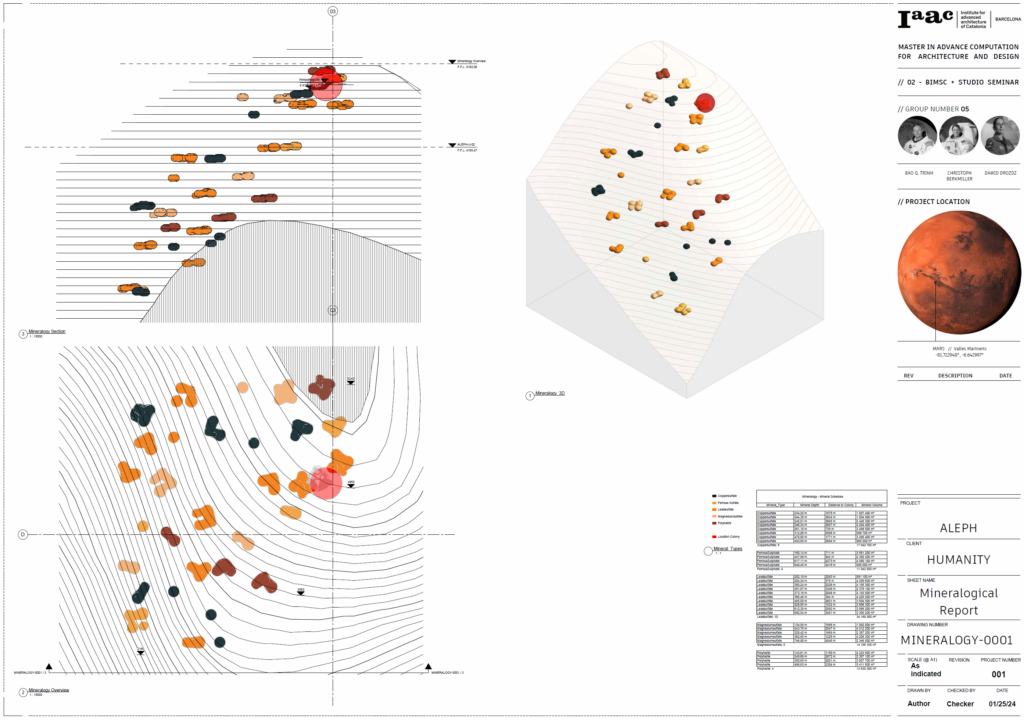
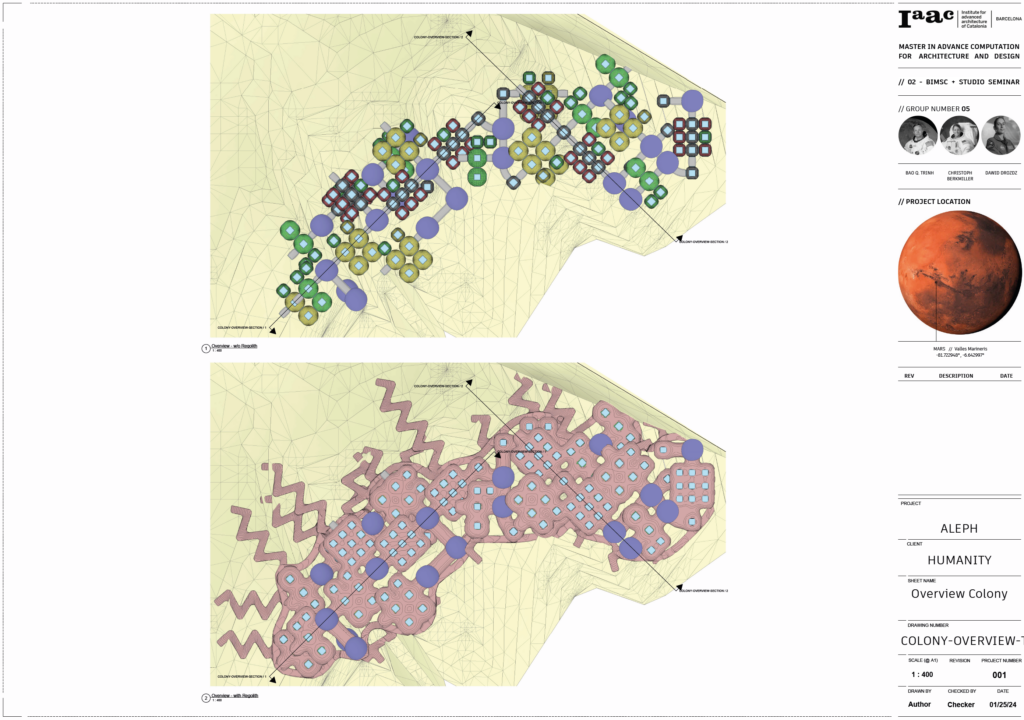
As part of our studio project, we have designed a Mars colony. The main purpose of this colony is the extraction of urgently needed raw materials in a kind of open pit mine. Taking into account the special conditions and protection needs on Mars (mini-metroites, radiation, sandstorms, atmosphere…) we decided to combine our base with the open pit mine and to orientate the shape of the open pit mine not only towards the extraction of minerals but also to create a protected location for living, leisure and working areas.
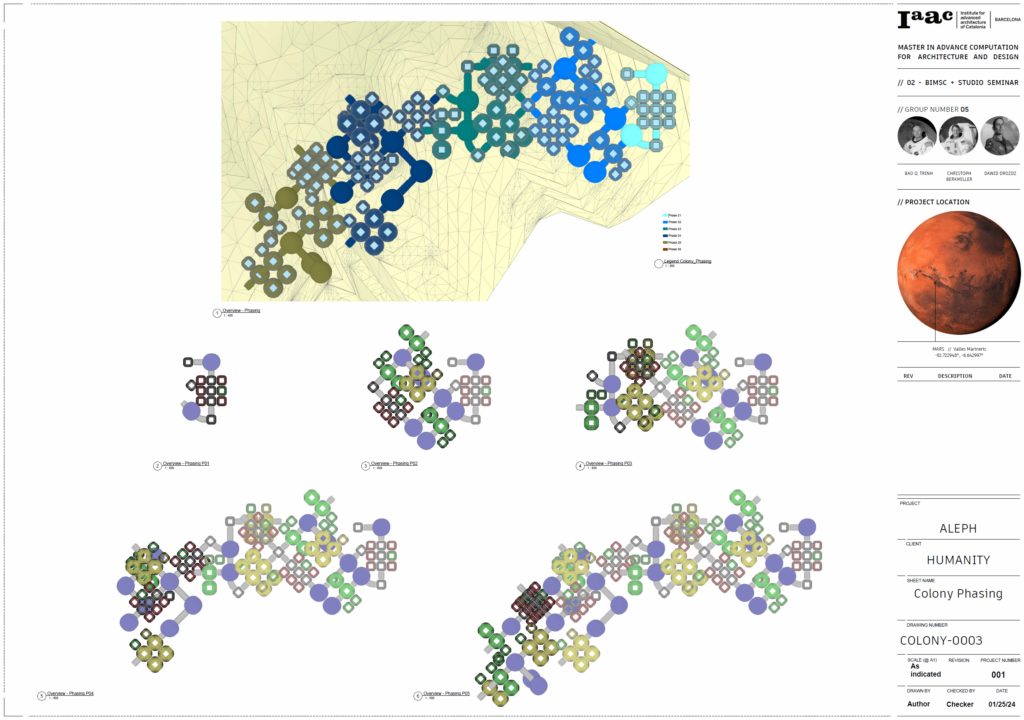
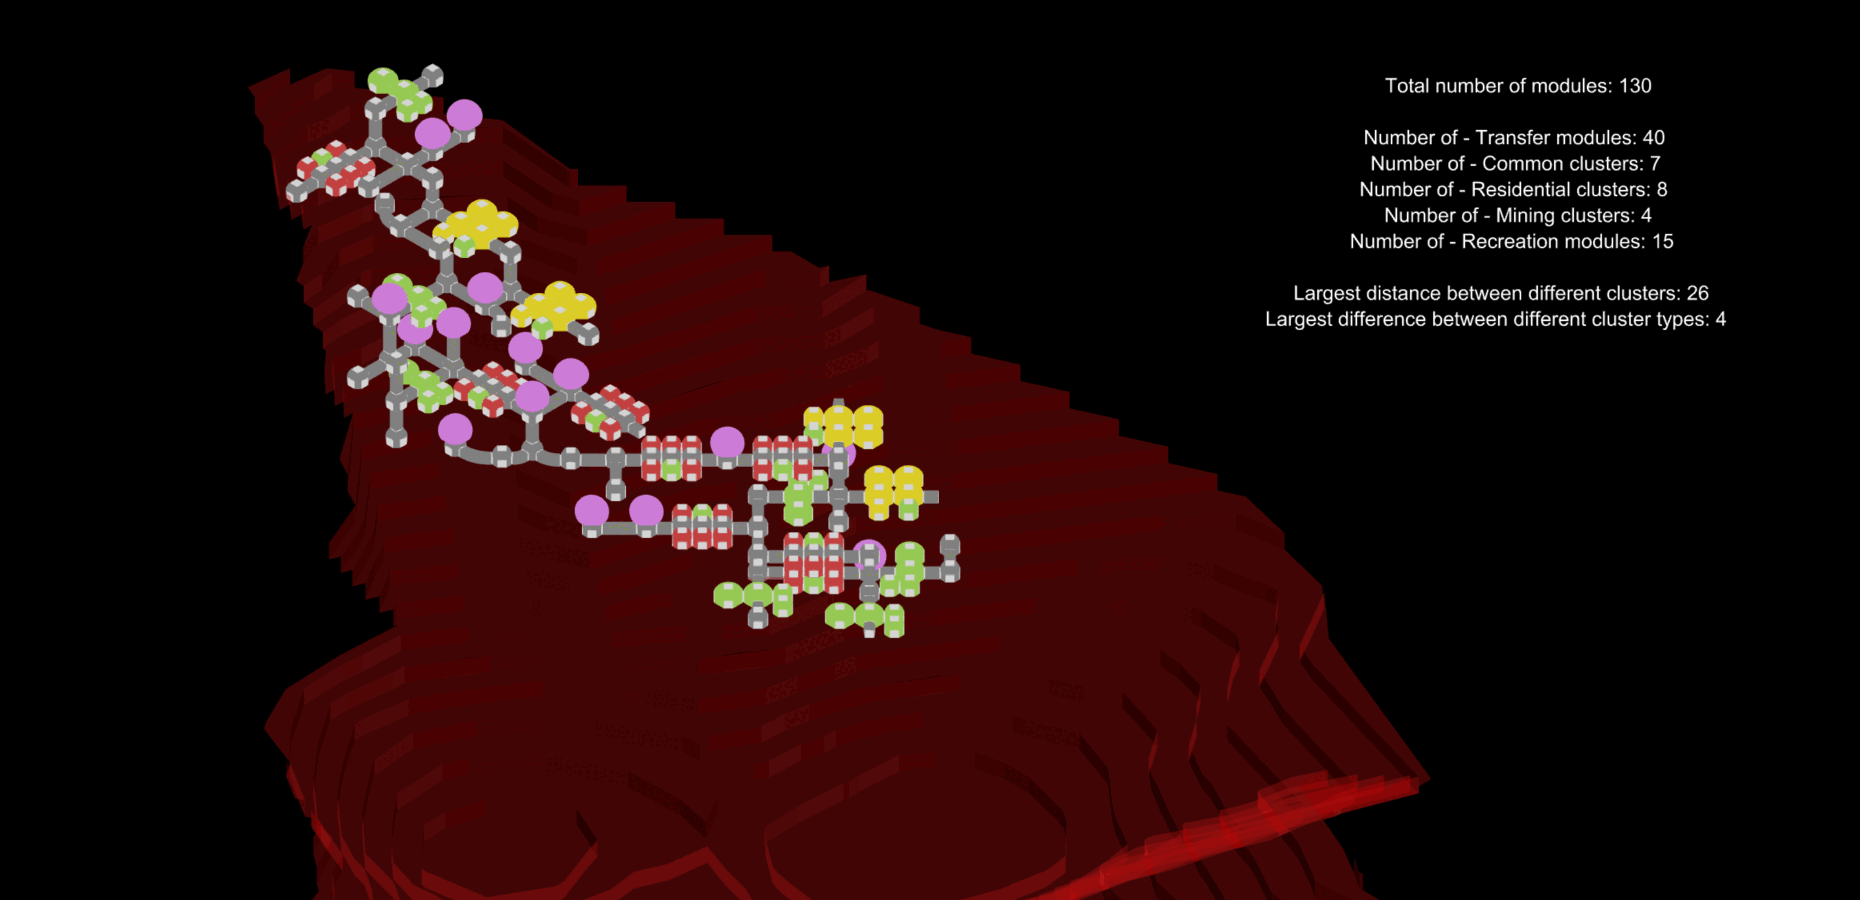
As a construction technique, we opted for inflatable structures that are subsequently protected with a 3D-printed regolith layer. Overall, we pursued a modular approach. To do this, we first designed our inflatable modules and corridors in Rhino and Grasshopper and then grouped them into clusters. We designed our script so that we could create a wide variety of aggregations and evaluate their performance. In the following we would like to describe specifically how the tools and information from the Integrative Modelling course have supported us with the documentation in Revit.
Transfer to Revit
We used Speckle to transfer our geometries from Rhino and Grasshopper. All our geometries were divided into specific subbranches. This made it easy to work only on the specific geometry.
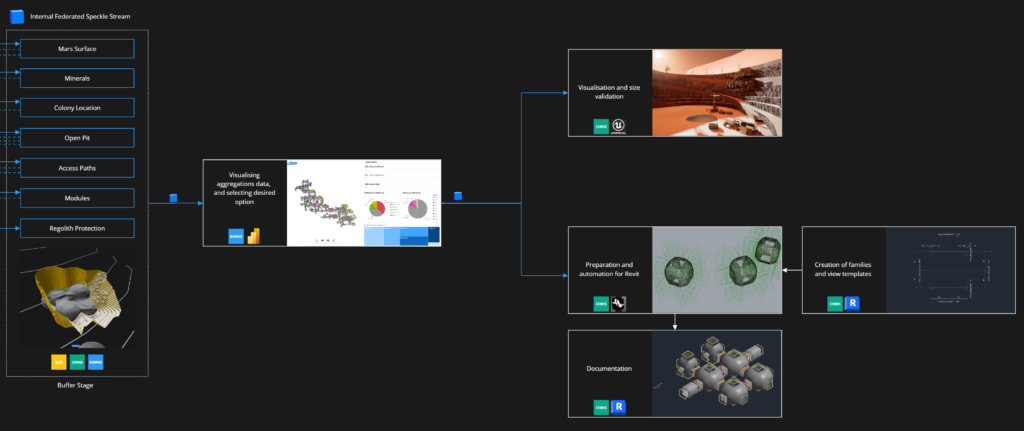
Since we intended to further enrich the geometries in Revit with data and possibly also manipulate them, we replaced as many of the geometries as possible with native Revit families using Rhino.inside.Revit during import.
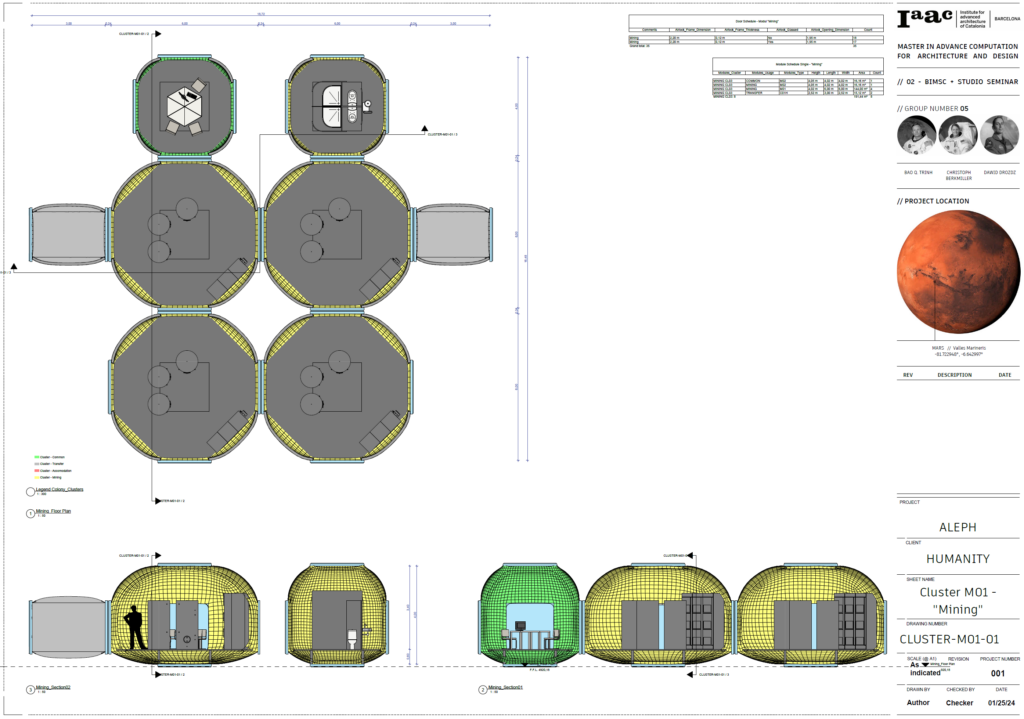
- Inflatable modules: These were imported as DirectShapes for the sake of simplicity. It would have been very difficult to create a Revit family for this.
- Airlocks: These were converted to Revit doors
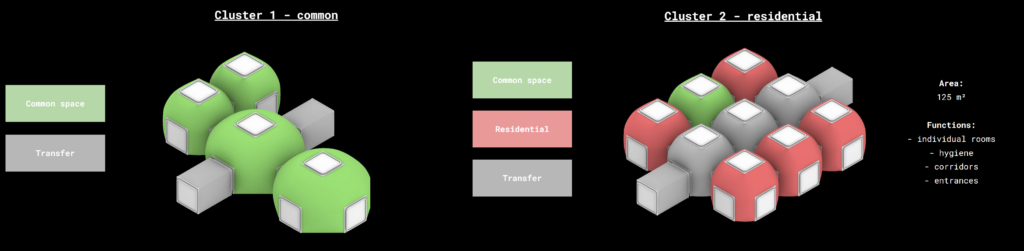
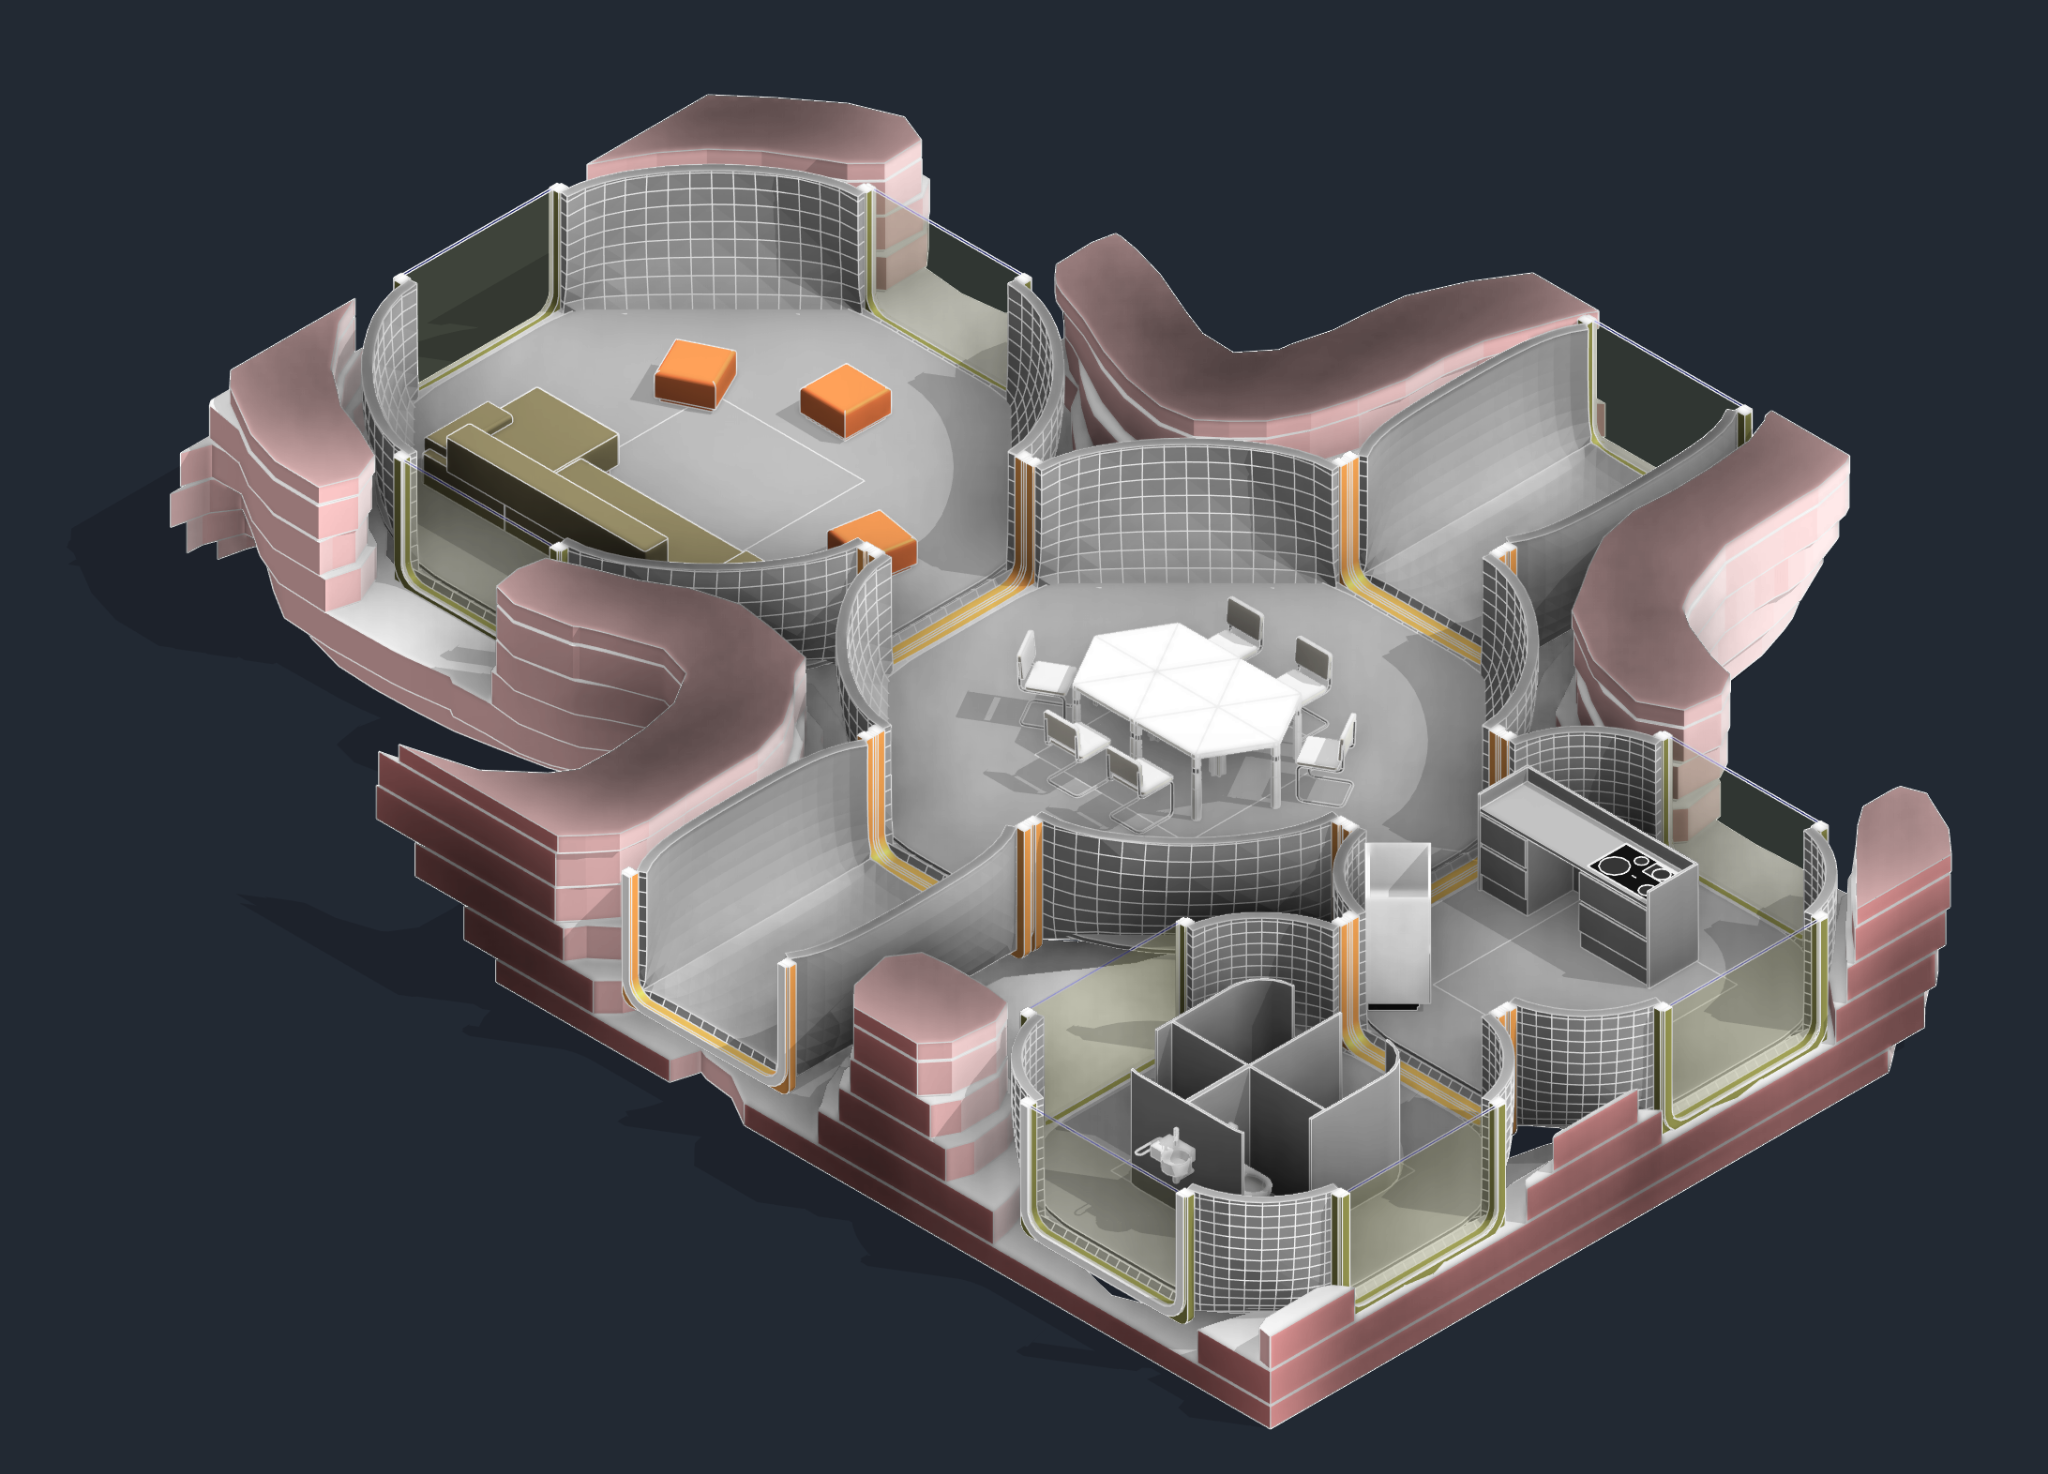
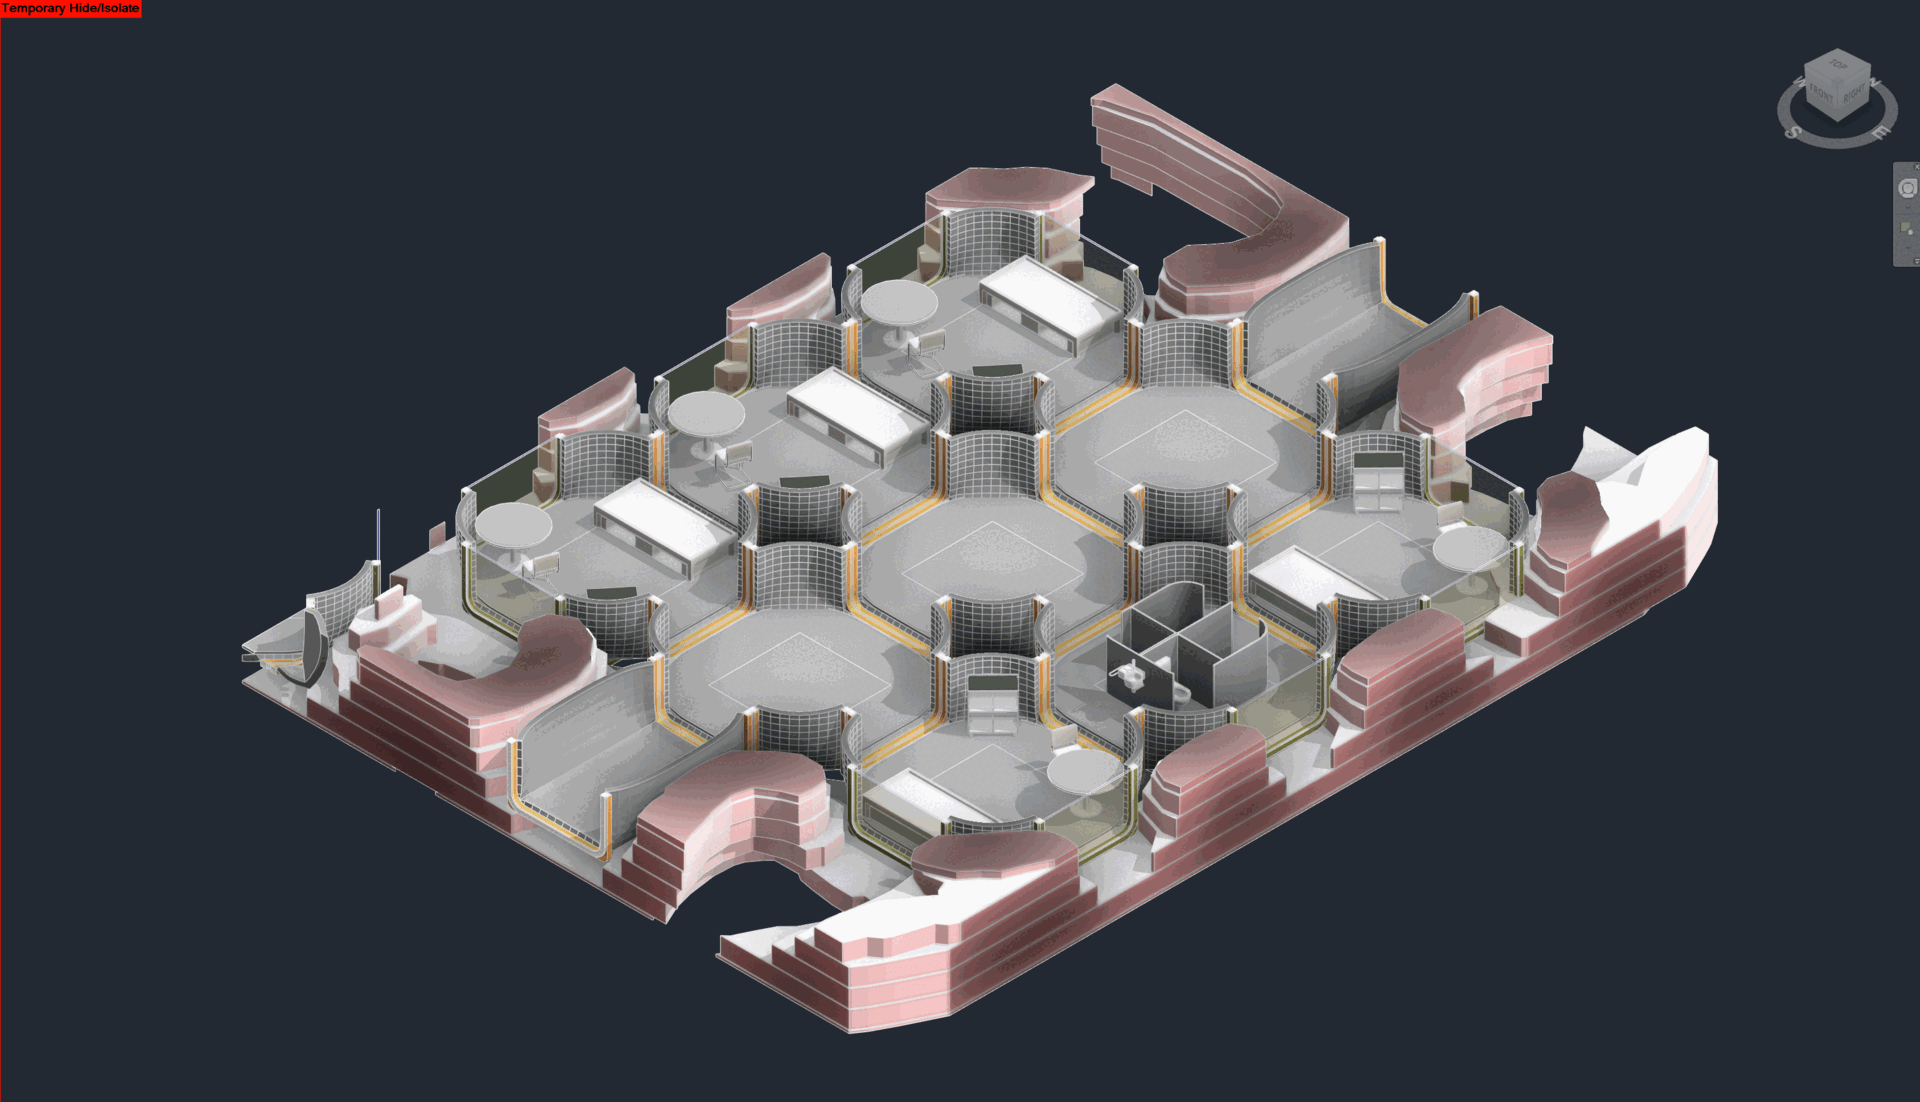
- Interior: Since it was already clear at the aggregation stage how each cluster of modules would be used later, it was very easy to create suitable interiors within the modules.
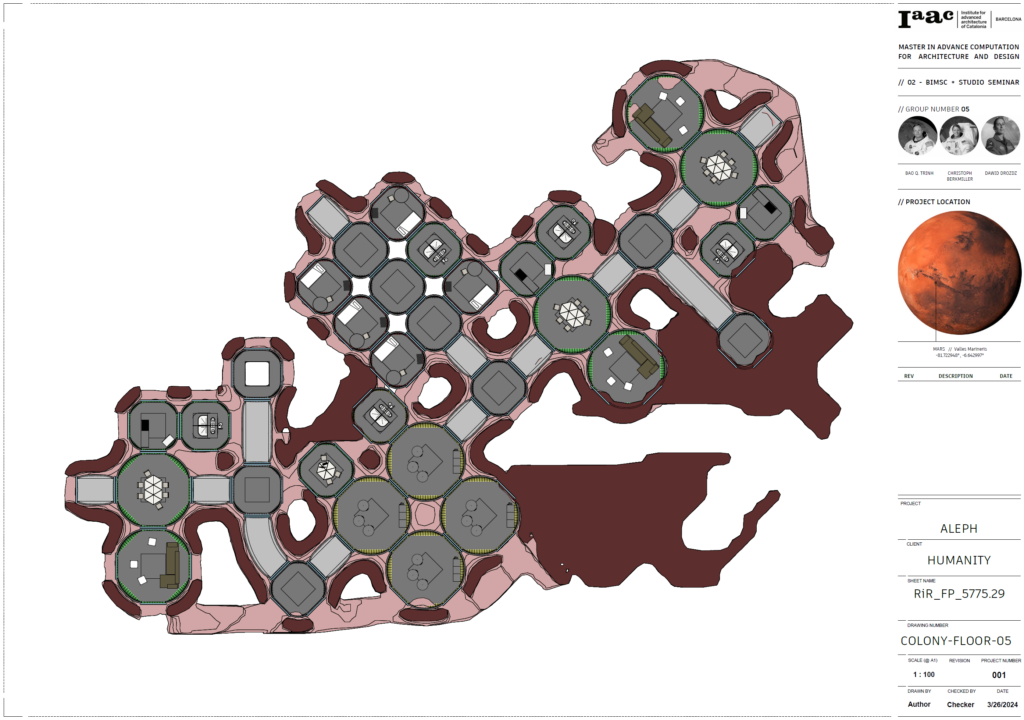
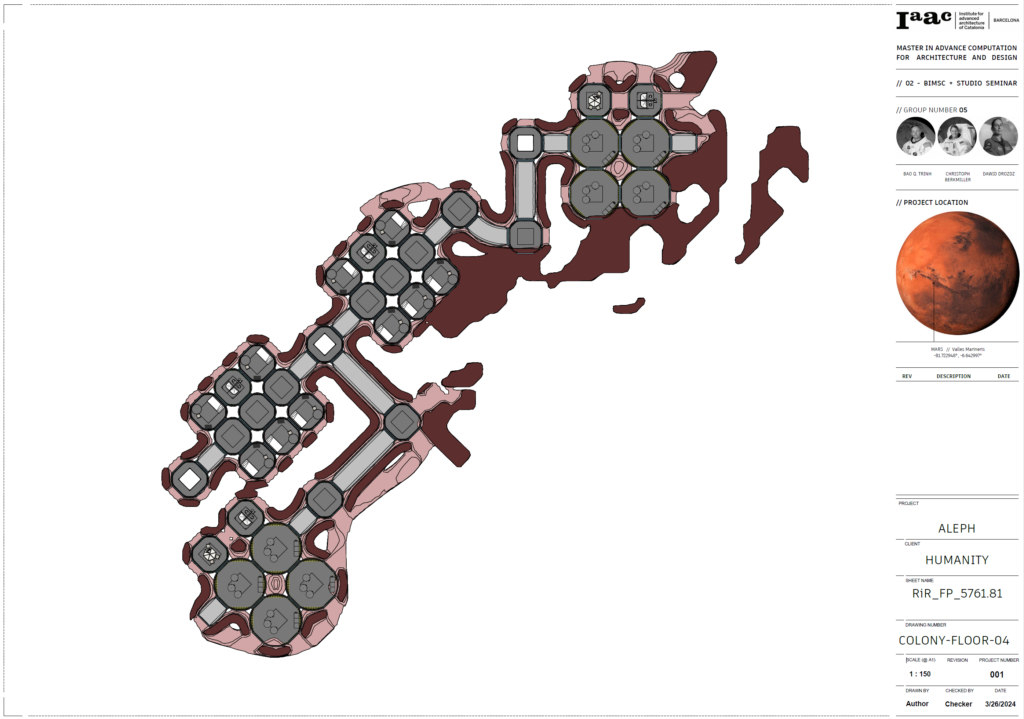
- Terrain: The surrounding terrain of the open-cast mine was converted into Revit topology
- Printed protective cover: We initially wanted to import this as a slab or roof. However, we encountered problems with this and ultimately had to import it as a DirectShape.
Automation using Rhino.inside
In the following, we would like to discuss some of the automations that we were able to successfully implement with the help of Rhino.Inside and the knowledge gained in the course:
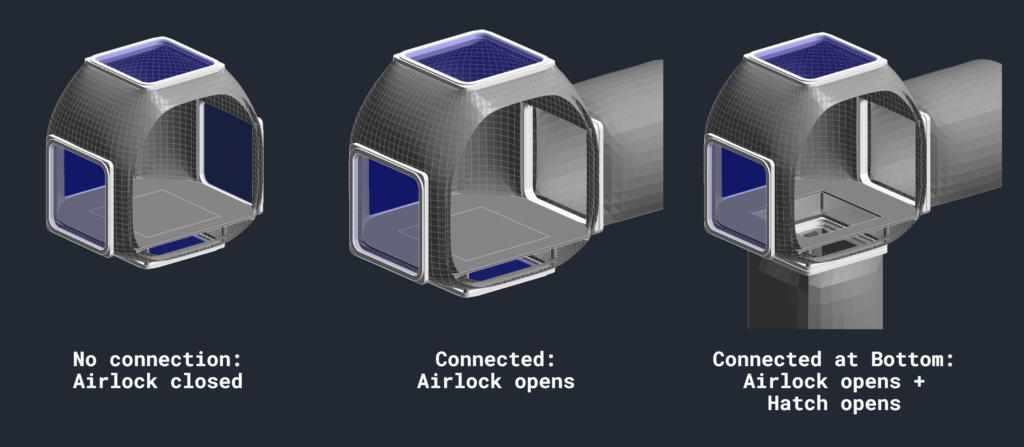
Airlocks and Hatches
As mentioned, the airlocks were replaced by a door family in Revit. In the family, we added a instance parameter that controls whether the airlock is open or closed. In Rhino.Inside, we were then able to open the airlocks when another airlock was connected or close them when the airlock faces the empty space.
In addition, we had a family automatically placed in the modules to create a raised floor and ensure a level surface within the colony. This is fitted with a hatch door, the opening of which is controlled by an instance parameter in a similar way to the airlocks. Our script only opens this hatch when a corridor is connected to the floor airlock of our module. This also ensures a vertical transfer.
Automatically placed furniture
Another automation was the placement of the furnishings. To do this, we set up our own Revit families for the various module uses. These then contained furniture as nested and shared families. Depending on the value of the usage parameter of the module, the corresponding furniture is placed when the script is executed. In addition, the option to change the orientation of the furniture has been added to some of the corresponding families. Depending on how the corresponding module is placed, it can thus be ensured that the furniture does not block any important paths. Another useful aspect: By using the nested and shared families, we were able to directly read the complete requirements of the entire colony for each piece of furniture in component lists.
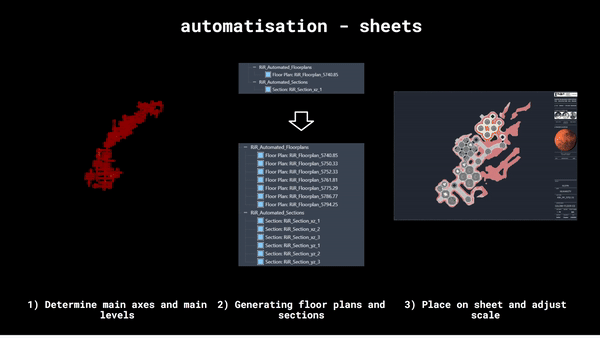
Automatic generation of plans and sections
As the aggregations of our colony always looked different, the floor plans and sections had to be adapted to the latest aggregation each time. We therefore also automated this process. The most difficult part was to automatically determine the main levels and main axes. While it was still relatively easy with levels for floor plans, as these could be determined quite reliably via the position of the main modules, it was much more difficult to find main axes for sections. As corridors with 45° angles are also used in the colony, the alignment of the colony changes in different areas.
However, once both main levels and main axes had been determined, sections and floor plans were automatically generated, placed on the corresponding sheets and the scale automatically adjusted so that there was no overhang.
Unsuccessful: Importing roofs with internal openings
One issue that we did not succeed in implementing was importing the 3D-printed protective layer from Regolith as a floor slab or roof. In our specklestream, these were stored as an outline with one or more internal boundary lines for openings. Unfortunately, these could not be converted to the said categories. According to internet research, it seems that this is generally not possible at the moment.
We then helped ourselves by importing the protective layer as a DirectShape, which worked without any problems.
Documentation